- Joined
- Oct 18, 2001
- Messages
- 20,978
I finished this one for DrDan a couple days ago and thought I should share how it went. Seems useful to the forum as a whole.
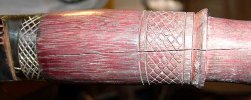
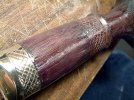
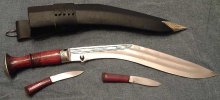
DrDan ordered a special Chitlangi with engravings on the bolster and handle(purpleheart). Unfortunately, when it arrived, it had a massive crack running 3/4's the length of the handle. happens....and when it does, we make lemonade.
There's information in the archives on how to do this fix and it's been discussed here many times - this is in no way "new information". However, probably for the first time, it's going to get spelled out one part at a time - always makes more sense that way.
Ok. Here we go!
First thing I do is get everything set up, ready to go.
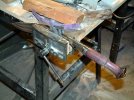
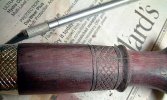
Here you can see the khukuri in a vice, ready to be sanded. The sanding strips I use can be bought on a roll, 1 inch wide from Harbor Freight for just a few dollars and last a long time. The piece of leather is to protect the blade from the vice jaws. Fortunately, mine are wood, but I take extra precautions anyway.
You can also see the crack from this far away....yikes!

Here you can see where I've just finished gluing up (I know...kinda out of sequence here...but play along...).
1 - styrofoam bowl & popsicle stick for mixing up epoxy
2 - High output lamp about 2-3 feet away from what I'm working on. No matter how bright you think it is in your kitchen/garage/whatever, you still need this in order to do detail work. Makes a huge difference in the end result.
3 - Acetone - for cleaning epoxy off the blade and bolster after glue up. What you can't see is the jar of Mineral Spirits I keep around for taking off the red rouge and finish that the kamis put on the khukuri.
4 - Exacto blade - for fine detail work.
5 - Acraglas - can also use epoxy.

Now it's time to get going. I begin by sanding the handle shoe-shine style with the long strip of sandpaper. I do that only to remove the finish. Once it's removed, I sand "with" the grain the rest of the time.
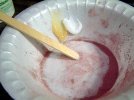
In this pic, you can see what I'm putting together to begin glue up. If I just mix up some epoxy, I'll end up with a big yellow streak down the handle.....:barf:
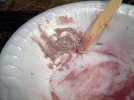
So, what I need is purple dust. Rather than try to collect the dust falling as I sand (anybody got an extra hand lying around?) I take a piece of scrap purpleheart and sand on it for a while to make some dust. Then I put it in the mixing bowl.
1 - purpleheart + 60 grit sandpaper
2 - Acraglas - 2 part epoxy gel
3 - "Craft" sticks.....cheap at craft store, comes in a bucket.
4 - Collected purple dust

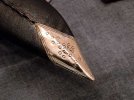
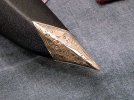
In order to make a clean glue-up, I need to take the exacto knife and clean the "wound" of any gunk, splinters, etc. so that the glue will have a smooth surface to cling to. I use the back of the blade mostly to clean it out, and switch to the front of the tip where the crack is thin.
DrDan ordered a special Chitlangi with engravings on the bolster and handle(purpleheart). Unfortunately, when it arrived, it had a massive crack running 3/4's the length of the handle. happens....and when it does, we make lemonade.
There's information in the archives on how to do this fix and it's been discussed here many times - this is in no way "new information". However, probably for the first time, it's going to get spelled out one part at a time - always makes more sense that way.
Ok. Here we go!
First thing I do is get everything set up, ready to go.
Here you can see the khukuri in a vice, ready to be sanded. The sanding strips I use can be bought on a roll, 1 inch wide from Harbor Freight for just a few dollars and last a long time. The piece of leather is to protect the blade from the vice jaws. Fortunately, mine are wood, but I take extra precautions anyway.
You can also see the crack from this far away....yikes!
Here you can see where I've just finished gluing up (I know...kinda out of sequence here...but play along...
). 1 - styrofoam bowl & popsicle stick for mixing up epoxy
2 - High output lamp about 2-3 feet away from what I'm working on. No matter how bright you think it is in your kitchen/garage/whatever, you still need this in order to do detail work. Makes a huge difference in the end result.
3 - Acetone - for cleaning epoxy off the blade and bolster after glue up. What you can't see is the jar of Mineral Spirits I keep around for taking off the red rouge and finish that the kamis put on the khukuri.
4 - Exacto blade - for fine detail work.
5 - Acraglas - can also use epoxy.
Now it's time to get going. I begin by sanding the handle shoe-shine style with the long strip of sandpaper. I do that only to remove the finish. Once it's removed, I sand "with" the grain the rest of the time.
In this pic, you can see what I'm putting together to begin glue up. If I just mix up some epoxy, I'll end up with a big yellow streak down the handle.....:barf:
So, what I need is purple dust. Rather than try to collect the dust falling as I sand (anybody got an extra hand lying around?) I take a piece of scrap purpleheart and sand on it for a while to make some dust. Then I put it in the mixing bowl.
1 - purpleheart + 60 grit sandpaper
2 - Acraglas - 2 part epoxy gel
3 - "Craft" sticks.....cheap at craft store, comes in a bucket.
4 - Collected purple dust
In order to make a clean glue-up, I need to take the exacto knife and clean the "wound" of any gunk, splinters, etc. so that the glue will have a smooth surface to cling to. I use the back of the blade mostly to clean it out, and switch to the front of the tip where the crack is thin.


")


")
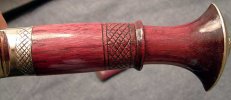
 But not anymore.
 Me Likey!