Curly maple & wire inlay RE-DONE

Joined
Nov 23, 2008
Messages
437
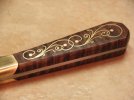
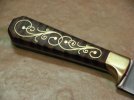
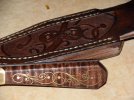
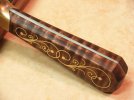
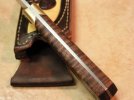
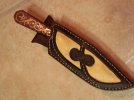
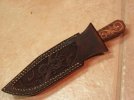
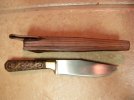
I knew I should've stained this handle the first time around but hey, if your gonna be stupid ya gotta be tough so with the encouragement from all who posted in my last thread I took the sandpaper to her once again. Dark brown stain this morning, Formby's about noon and a light coat of bees wax an hour ago and this is what I came up with.

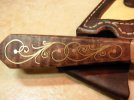
What do you think now ? I'm still open to suggestions for improvement.

Sorry about the pic quality, I guess I better get a light box built sooner rather than later.

-Josh :D
 

Attachments

  • AA001 001.jpg
    AA001 001.jpg
    48.3 KB · Views: 195
  • AA001 002.jpg
    AA001 002.jpg
    57.4 KB · Views: 221
  • AA001 007.jpg
    AA001 007.jpg
    56 KB · Views: 154
  • AA001 008.jpg
    AA001 008.jpg
    86.3 KB · Views: 142
  • AA001 010.jpg
    AA001 010.jpg
    53.7 KB · Views: 144
Wow! what a differance, I realy like the way you finished it, and the sheath matches too.:thumbup:
 
Stained pics
 

Attachments

  • AA001 011.jpg
    AA001 011.jpg
    53.7 KB · Views: 94
  • AA001 012.jpg
    AA001 012.jpg
    46.3 KB · Views: 70
  • AA001 013.jpg
    AA001 013.jpg
    51.5 KB · Views: 83
  • AA001 014.jpg
    AA001 014.jpg
    52.2 KB · Views: 59
  • AA001 017.jpg
    AA001 017.jpg
    51.8 KB · Views: 86
That looks mighty nice. I'm impressed with the way you matched the wire inlay to the pins, that helps it look smooth and nice. I also like the way you beveled the scales/bolsters where they meet; it looks great, shows craftsmanship and is probably stronger that way. Very cool! :thumbup:
 
Mike,
Thanks for posting. I saw your tutorial before and may very well go this route at least temporarily. I had a stand up lamp with 3 movable bulbs set aside for building a light box but now it has become the light I use for the grinder bandsaw and drill press. There is a communtiy garage sale this weekend so I'll be scoping for some lights or going shopping soon.
 
Thanks guys, as soon as I wiped off the stain I was thinking ... O hell ya I knew they were right. It really finished off the knife.

Dave, cant wait to show ya the sheath and take my rookie whoopin like a man lol. It came out great but you'll find my mistakes without trouble. Of course you were right, Hand stiching 7 layers of 9 oz SUCKS ! I only broke 4 needles LOL.
 
strahd71 - In a nutshell. Make yourself some "micro" chisels from exacto knives, get some wire, tiny pliers, tack hammer, and file. Draw pattern on handle and chisel straight down into the wood tracing your pattern in overlapping cuts. File an edge on one side of wire, pre shape wire a bit and insert one end into the chisel groove and begin tapping it in.

Theres more to it than that but you'll get the basic idea. Go to blademag.com and look in the HOW-TO section for an article on doing wire inlay.

-Josh
 
I like how the sheat turned out, it realy works with the knife. How did you stich the sheat? Did you punch or drill holes? I used to drill with a small bit then Bruce Evans showed me how do drill them with a sharpened finish nail and I haven't looked back since. Of course I still break needles now and then.

If your looking for work lights, what I did is go by Big Lots, a factory overstock type store. They had tempory swing arm lamps pretty cheap. I use a 100 watt bulb and they work great mounted to the work benches.
 
Will52100,
I'm basically going the same route as you. I'm using the other end of a 1/16" drill bit sharpened to a point and chucked in the drill press. Punched through like butter but not much room for 3 strands of artificial sinew. Could've went 3/32" but the stitching is nice and tight :D
 
Back
Top