Cut testing, 3V heat treat, ELMAX, D2

Nathan the Machinist

KnifeMaker / Machinist / Evil Genius
Moderator
Knifemaker / Craftsman / Service Provider
Joined
Feb 13, 2007
Messages
15,702
I'm tweaking on the heat treat for 3V for cutlery. The purpose of this test it to determine what effect these tweaks have on 3V and also to show my testing process.

This thread is going to be rather long and boring. The goal here isn't really to entertain so I'm going into detail that is probably not very interesting to most folks. c'est-la-vie
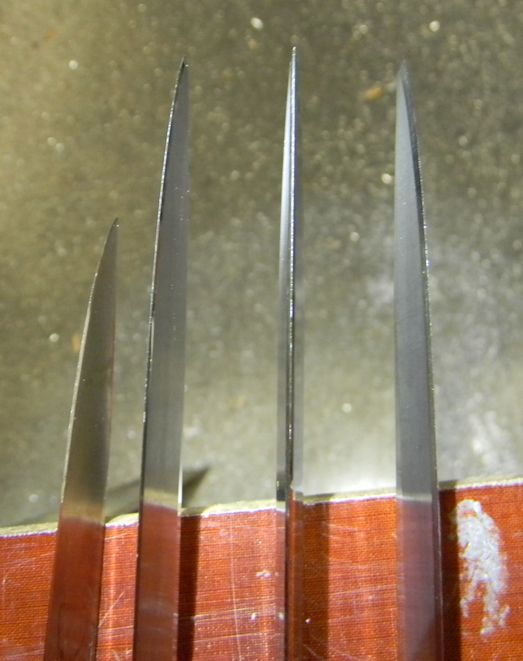
The test blades:

1.jpg~original


I have two test blades that are 3V that are geometrically identical. They're even the exact same Rockwell hardness (60). One was processed with an industry standard heat treat, the other was processed with a few tweaks. I don't know which is which, it's a blind test, they're stamped on the tang under the scales. As I'm posting this I know the outcome of this test, but as I'm writing this I have no idea what is going to happen.

Just for giggles I'm also throwing in an ELMAX blade of a similar design and a D2 blade. The D2 is unfortunately a very different design but I'm including it because it is a known standard, however all four blades are HRC 60 and are sharpened to the same 13 degree per side edge angle, microbeveled and stropped and for all intents and purposes are starting out the same.

The skinning knife is normally sharpened at 13 per side. The larger knives are not. However I'm interested to see the effect of the tweaks on fine edge stability and 13 per side is fine enough for significant differences to appear and some folks who are more concerned with cutting performance than durability may push it that fine.


The first thing is to cut cardboard. They all cut an identical amount of the same cardboard. They're mixed up during the test so they all get a broad sampling of the material so no single blade is overly subjected to any particularly abrasive bit. This takes a little while and now my arm hurts. The cuts don't use the entire blade but are limited to about 2" in the belly of the blade. The outcome is evaluated by looking at the cutting edge under bright light and 10X magnification.

All of the blades are significantly dulled, only the D2 will still shave hair. All will still scrap a few hairs here and there.

2.jpg~original


It is worth noting that shining a light on an edge and taking a closeup picture of it makes every little imperfection look like a parking lot. These are all still relatively sharp at this point.

Best: D2, HRC 60, 13 deg per side, there are a couple shiny spots where primary carbides may have pulled out but over all it is still reasonably sharp. It is worth noting that this is not remotely an industry standard heat treat for D2 anymore and at this point I would have been surprised had it not come out on top here because this part is what it does well.

#2: ELMAX, HRC 60, 13 deg per side, won't shave hair but still cuts well.

#3 & #4, HRC 60, 13 deg per side, both 3V samples are about the same, not far off of the Elmax and the difference between the two is too close to call. Given the much lower carbon and carbide content compared to the Elmax there is surprisingly little difference.


more to come...
 
Test two, cutting leather:

Leather can actually be quite nasty to cut. I believe it might be due to naturally occurring silicates in the hide that are very abrasive. The key thing to consider when cutting leather is that each piece of leather is different and even a single piece can be different from one spot to another. So the only meaningful data you can derive from cutting leather is comparative between samples and then only if you mix things up so that variations in the material are evenly dispersed. All of the blades are somewhat dull now. The D2 came out on top again.

3.jpg~original


Best, D2 - this is D2's time to shine. After this I expect it won't do so well.

#2, Elmax - not far off from the D2

#3 3V, test sample A. Not far off from the ELMAX. UPDATE: test sample A turned out to be the new heat treat, I think this is a positive development.

#4, 3V test sample B. Not far off from test sample A. The two test specimens are very similar at this point but test sample B appears to be slightly more dull and has larger and more shiny spots.
 
About to get really tedious here folks. If you're not into tedious technical detail come back later, I'll smash up some cinderblocks or cut a Chevy in half or cut myself or something...


Test number three. This is the last of my standard test, though I intend to keep going after it.

This test is hardwood whittling. This is not as objective scientific as the other two tests because there is more of a human element to the technique but it is very valuable because it helps illustrate edge retention in real world use. The other two tests in soft abrasive media probably correlate well with things like automated CATRA testing, which can be a poor predictor of actual real world edge retention. This test, which involves biting into and twisting out of a piece of hardwood, gives us an idea of the edge stability. Because these samples are all sharpened to 13 per side (fairly acute) it can be said that we are looking at fine edge stability. There are a number of things that affect edge stability, many of which we can try to address in our heat treat. What it all boils down to is a clean fine grained homogenous steel at relatively high hardness has the best potential for edge stability. As you reduce the hardness (or use the secondary hardening hump which reduces the hardness of the matrix, even as the overall measured hardness goes up) you reduce the strength of the matrix, though too hard and it will tend to chip. Carbides, which improve wear resistance and can actually improve the strength of the matrix like aggregate in concrete can (and generally do) reduce edge stability. This is particularly true of larger secondary carbides that tend to form in the grain boundaries, a big problem in D2 and one reason we often want to avoid the secondary hardening hump with cutlery. Alloying such as large amounts of free chromium that contribute to corrosion resistance doesn't contribute much to the strength of the matrix reduces edge stability when found in the amounts required to make a steel "stainless". And retained austenite reduces edge stability. This last one, RA, is a bigger problem in cutlery than most people realize and is frequently the biggest weakness in industry standard HTs when applied to cutlery. The standard protocols are largely concerned with hitting a particular HRC with minimal distortion, dimensional changes and risk of cracking with little regard for fine edge stability because fine edge stability just isn't a major concern for most of the applications these steels were developed for. In practice, RA results in small areas of austenite (a soft weak structure) that doesn't convert and remains soft. These areas increase ductility of the matrix improving impact resistance in thick sections and reducing dimensional growth associated with martensite conversion. But, in a knife edge they also act like the perforations in a postage stamp, allowing a fine edge to fold over or simply flake away under stress. Modern metallography has shown us that the amounts of stabilized retained austenite found in many complex steels can be significantly greater than was once believed. So, the purpose of this test, and therefor the reason for this thread, was to see if techniques used to reduce RA in other similar complex steels had an effect in 3V.

Sorry about the length of that just now. Wow...

The hardwood I'm using for this test is some very old, very hard, Osage orange. With the cutting edges at 13 deg per side, this is actually a brutal test. I wish you could be here to see and hear this, it makes me cringe. Normally when I do this there is a fairly large spread from best blade to worst, with the worst failing in dramatic fashion with edge damage visible at an arm's length. So this particular test is notable because there isn't a huge difference between test samples. All of these samples have pretty good fine edge stability.

The results:

4.jpg~original


The best is 3V, test sample A. EDIT: this is the new HT. Despite the abuse it withstood it is almost none the worse for wear. The edge stability of this sample is very good. In my experience, even a very clean homogenous simple steel such as W2 doesn't beat this by much.

Second best is the Elmax. This is a surprise to me because it is a very high carbon, high carbide stainless steel and I did not expect it to have good edge stability. I expected a high carbide stainless at HRC 60 and 13 degrees to chip out, but it held up. This may be due to the fine carbide size and even carbide dispersion of the 3rd generation PM steel offsetting what I think would normally be a crippling amount of carbide.


#3 is 3V, test sample B

#4 is the D2. This is actually pretty good for D2. Fine edge stability is not its strength. I'm surprised it was beat by a stainless, but honestly the spread between the specimens was pretty close this time.

This normally ends my cut tests and this is where my area of experience with this subject matters ends. At this point I would conclude that the heat treat for 3V test specimen A was somewhat superior to specimen B for these tests, though the difference was not as definitive as I would have liked. Edit: The superior blade, specimen A, was the blade that received the modified heat teat. At this point it would appear to me that the industry standard heat teat for 3V may not be completely optional for some cutlery applications but the difference between the standard HT and the tweaked HT is not a big deal.


more to come...
 
However I will continue with increasingly abusive tests. Generally I stop here because this represents about the limit of reasonable use that most knives would be subjected to. If you're making a skinning knife or a kitchen knife you've covered your bases here as it pertains to heat treat and you can draw conclusions from what you've seen to this point. However the 3V knives are being built for service men, not chefs, and I need to know how they behave when pressed beyond "normal" use. The purpose of this test was both to determine if 3V responds to heat treat tweaks for edge stability (it does) and to know which heat treat performs more reliably in rough applications.

The next test is a cheap parlor trick that any knife can do well at with thick edge geometry: cutting nails

5.jpg~original


This is a cheap parlor trick because in of itself it tells you nothing about the overall quality of the knife, it says more about the edge geometry than anything else. A relatively soft cold chisel can cut a nail, but that doesn't mean it can hold an edge or cut well. So the ability to cut through a nail is not the hallmark of a good knife (for example it would pretty much universally indicate a pretty bad sushi knife), it is simply the hallmark of a tough edge. But in this case, with the edge angle a very thin 13 degrees per side none of these edges are particularly durable at all. It is, however, a perfectly valid test in this case because all the knives are sharpened to the same angle, and the little 2 penny nail is not so big that primary bevel geometry is going to come into play. So in this case the differences in the blades will be very telling.

The damage:

6.jpg~original


Best: 3V, test sample A (modified heat treat)

#2, Elmax. This is surprisingly good for a stainless sharpened this thin.

#3, 3V test sample B (industry standard HT)

#4 D2. Come on, it's a hard thin D2 skinner and it was run through a nail. Twice. I can't believe it didn't break. Try this with your pretty little Sebenza some time...

I cut two nails with each blade.

Here is a backlit detail shot of the two 3V blades. The one on the left is test sample A (modified heat treat). Even though this was not a properly scientific test, it is always very interesting to see two blades made from the same sheet of steel with almost perfectly identical geometry and even the same measured Rockwell hardness behave a little differently like this. I believe this is the difference between minimized retained austenite and tetragonal martensite verses carbon lean martensite, large secondary carbide fraction and perhaps higher levels of RA.

7.jpg~original


more to come...
 
bah!

...trying to get the forum to take my post here...


I'll try spoon feeding it...


Moving forward into genuinely rough testing I'm going to reprofile the blades from a very fine 13 degree edge to a much more robust 20 degree per side edge that is more typical on a rough use knife. The little D2 skinner is going to drop out here. I already know what will happen to it and, for me, the purpose of this test is to evaluate a tweak to the HT of 3V. At this point the standard HT sample is the control, I'm including the ELMAX for my own curiosity.

To start I cut larger 6 penny nails, then I drove the blade tip first through one side of a cinder block and then I made a couple of cuts into a cinderblock aided with a four pound hammer. I was a little hesitant to post the nails and cinderblock bit on this forum because this sort of "testing" is easily dismissed as showboating parlor tricks and hype. However testing a knife to reflect how it is going to be used means beating on a knife that might reasonably be subjected to very rough use. This is not a kitchen knife or a skinning knife or a handy dandy little utility knife and some of the folks who carry them wouldn't think twice about beating it to death. So this is a straight forward and relatively repeatable way to finish up an otherwise normal cut test. Does it break under this use and how does the edge compare to the control sample? And most importantly, has the heat treat tweaks had any major unanticipated effect on gross durability?

[video=youtube_share;NO3pmcyr8wA]http://youtu.be/NO3pmcyr8wA[/video]
 
Last edited:
and here is the damage:

8.jpg~original


The one on the right is the new 3V heat treat I'm going to use, the one in the middle is the industry standard 3V, the one on the left is Elmax.

Same thing, different shot:

9.jpg~original


10.jpg~original


Best: 3V, test sample A (modified heat treat). The edge dulled and there is some small chipping near the tip, but over all it has the least amount of edge damage and it is still sharp enough to cut. The chips would take a little work to sharpen out, but otherwise this could be touched up and put right back to work.


#2 Elmax. I'm a little surprised that a relatively thin high carbide stainless held up to this at this hardness, I kind of expected it to break. The edge is definitely boned and it doesn't cut very well but nothing really bad happened to it here. There is noticeable edge damage where it cut the nails.


#3 3V test sample B (industry standard HT). It's also pretty dull. The entire edge is smushed up a little where it was up against the cinderblock and the edge rolled over in a couple spots but there doesn't appear to be anything actually missing. Overall, the spread between all three knives is less that I had expected. I'm putting this one 3rd because it can no longer cut and the very tip bent over.

This concludes this knife test. I know there are many things that were not perfectly scientific, please understand I'm simply trying to illustrate certain things I do when trying to evaluate a new steel or a new heat treat or a new pattern. Simply chopping up a bunch of rope and randomly beating on it is very subjective and perhaps you got into a length of dirty rope etc. Having standards to compare against and using a repeatable test process helps reduce certain variables and testing in different media and in different kinds of cuts helps paint a more full and detailed picture that goes beyond a simple impact and CATRA type testing. I always wanted to show there are some things you can tweak with 3V and avoiding the secondary hardening is a valid option with this steel. It performed very well and may have performed better than the control which was processed with the industry standard snap temper before cryo and the secondary hardening hump. Lot of ways to skin a cat.

Sorry for the length. Thanks for following along.
 
Great post, really..Kinda goes along with a post I made a while back about 3v and the lower temper vs industry standard, sub-zero vs no sub-zero etc..I agree with the problem of RA also..I read all the time people say "RA" dosnt hurt anything, by crucibles own admission A2 and d2 can retain up to 20% RA..How can you not think that's a problem?
Again, great post..Thanks
 
Nathan,

Your threads just ooze with information. This was a very useful and informative study that highlights real world use. CARTA data and charpy V notch numbers don't tell the whole tale when it comes to edge retention and stability.

ELMAX is a really cool stainless. I've long believed that it is every bit as tough as a simple carbon steel like 1095 at the same hardness. Looks like your test results add more credibility to ELMAX as the king of toughness in the stainless realm.

I'm curious to know what HT protocol you use for the tweaked 3V piece. The manufacturer recommended HT definitely does not bring out the best in 3V. In my experience it has outstanding toughness with lower austenization temps. My latest run of 3V was done at 62 and the edge retention is really great at that hardness but in a truly hard use knife like your pig sticker/pointy stabby thingy I think low soak temps and a hardness of about 60 makes a winner.

Your d2 is very impressive. I've never liked D2 and always thought it was the worst of all worlds--Not stainless but enough chromium to make it brittle, enormous carbides etc... Maybe I've just never used a properly HT blade in D2. The nail test really made me say WOW.

Thanks so much for taking the time to do these tests and posting the results along with an in depth write up. I think I can speak for everyone here in saying we really appreciate the hard work and time you put into your posts. Your CNC threads have changed the way I make knives.
 
Great work Nathan. Thank you for putting so much detail in your posts and for testing the different ht protocols. I'm not surprised at the results for the lower temper 3v or Elmax for that matter. I am curious if you plan on testing corrosion resistance for the two 3v blades.
 
Great post

Thanks Nathan
 
Fantastic work Nathan!

Thanks for taking the time to do this. Top notch work as always. Love that blade design!
 
Great test. Thank you. It reminded me of the guy that did the destruction tests. While they weren't scientific I did buy a knife from Shrade on the strength of the test because it was so far past any thing I would do to a knife. You didn't take it to the point of destruction but still the idea applies.
 
Now you have me wanting a small blade similar to the d2 model but in Elmax. Great test. Thank you.
 
Thanks for that, Nathan ! Lots of work there. I'm very pleased to see the results that Elmax had. I like that steel and it's "buddy" M390. Frank
 
A great thread and some really informative testing. I don't think you need to worry that you weren't completely scientific - as you suggested these knives are hardly going to be used in controlled circumstances. A lot of random factors and weird behaviour will apply to their use/abuse. I think you've given us something of real value. Thanks.
 
Thanks for sharing this Nathan. Do you plan to share the H/T differences?

It's the same drum I've been beating on for years. Avoid the secondary hardening hump and therefor utilize the tweaks needed to prevent an RA problem when using the lower tempering temperatures such as rapid quench, no snap temper (sub zero without delay) etc. Real straight forward, no magic voodoo here.

In reality, there is probably a lot more RA in the high tempered 3V than you'd think. There is this conception in the industry that once you hit over 900F three times that all that RA decomposes but that is not always the case. To my knowledge no one has really scrutinized 3V, but some of the most current literature has taken another look at M2, and I'm not sure they're really that different. And the most current literature that I've seen on M2 shows that even after three high temperature tempers there is still a whopping 20% RA. Makes you think doesn't it? D2 also.

On the 3V in sample A, everything leading up to the quench was by the book middle of the road. The primary difference was a rapid quench heading directly into full cryo without any delays. Given the good edge stability and the lack of denting it appears to me that took care of the RA despite the final tempering temperature was only 400 F. That sounds really low, but this is a lath martensite with no more carbon in solution than a spring.

What's weird is when you consider all the changes that happen to the other 3V sample on the way up to 960 for it to end up the same hardness. It's those differences that are interesting to me.
That's exactly how I decided to do mine and it was stellar in testing..Aust', plate quench,straight in sub zero then 3x 400° tempers..
 
Back
Top