cutting burl

Joined
Jan 17, 2008
Messages
3,721
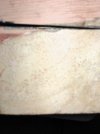
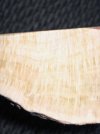
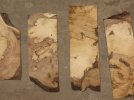
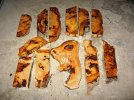
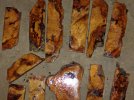
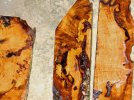
i'm wondering if there is a specific way to cut burl to get the best results(pattern). do i let it dry and just paint ends or is it better to remove bark, saw into blocks maybe 2''x2''x maybe 18-20'' and wax till dry. im figure it will probably be a couple years before i can use it, unless i do something to speed it up, but wanted some info on how to cut to get best results....

also wondered if anyone every tried to build a drying kild, maybe with a ceremic heater and a humidifier mounted in a steel cabinet,and alternated them periodically to dry??? or maybe just let mother nature handle it and wait a few years to use it.

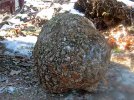
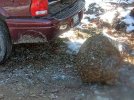
btw this thing probably weighs about 100 , or maybe it just seemed like it due to the fact it's about a half mile back in the woods ya see last weekend i was hunting and spotted a small tree only about 10'' dia, and about 6' up in it was an enormous burl, im not sure i could even get my arms arround it..............well me being me went directly back, grabbed chainsaw, and chopped it down, cut the burl section and attempted to drag it out like a deer. well that wasn't happening, and the trail it was off of was to rough for the lawn tractor, so i will be taking a sled back after thanksgiving and loading it up and dragging it this way.


thanks

andrew
 
I remember reading in David Bowe's "Step by Step Knifemaking" where he build a cabinet with a light bulp and foil in it that dried wood.
 
Heck Andy, ya shoulda just hefted that bugger up onto yer shoulder and humped it back to camp:-)
 
birdog4, i said "100 lbs" was what it weighed, i was being conservative, it was posssibly a bit more. and i aint that little (push'en 200) but as awkwardly shaped as the log was, i dont think i coulda carried it more than 10'. maybe with a pack, like they use to pack out horns and game....ya know what i mean cuz
 
I've cut up maybe 10 good size burls, ranging from whole spruce burls to whole thuya burls. I've also cut some really big slabs of things like amboyna. I don't know what that suggests, but I'm glad to share what seemed right to me.

The best burl figure is near the outside so don't trim off too much to get that first flat surface. That outside slice will be eyes - as opposed to rays, but after that, all bets are off. Trying to read a burl from the outside is like trying to read the thoughts of a woman. Good luck! You can listen carefully to what she is whispering to you, but it may be just bait. ;)

I like to cut pieces around 3 1/2" x 3 1/2" x 6". The idea is to end up with good wood at least 1 x 1 1/2 x 5 -and with luck, a bit more. I use the 3 1/2" dimensions because you never know which way the burl is going to 'turn' With these dimensions, you can get 3 x 1" slices (with some wiggle room) by 2 x 1 1/2" widths - (also with some wiggle room). Because the dimesions are the same, you can - for each piece - decide which face you want for your show sides (1 1/2") and which for edges (1"). You may also choose four 1 1/2 x 1 1/2 squares if you like fat through tangs.

The 6" length is to allow a little more wiggle room for checking that might have to be trimmed off. It's a shame to see a crack that just kept moving through 24" of burl. Better to lose one 6" length than a full long one.

As for drying, my experience (and this is not conventional wisdom) is that a 2 year drying period produces the same losses as a 150 degree night in the kitchen oven. (There will be losses either way.) When you send them for stabilizing, there will likely be some more losses, but that will be the end of it.

With wood, there are no scraps. Put them on ebay. There are craftsmen who do inlays, earrings, pen turning and more.

Good luck - enjoy the mystery!

Rob!
 
very informative Rob!, i appreciate you taking the time to respond. and the way you said to cut makes more sense than cutting long pieces.

andrew
 
are you drying the whole burl in oven at once or after cut??

would the heater,humidifier idea work?

once one side is cut flat, do you lay it on that side and just slice of pieces, or cut off all the exterior sides with eyes thenm slice it up?

andrew
 

Attachments

  • IMG_1643_edited.jpg
    IMG_1643_edited.jpg
    20.4 KB · Views: 71
  • IMG_1648_edited.jpg
    IMG_1648_edited.jpg
    25.9 KB · Views: 89
have 3 big boxes of this spalted maple burl, it's not heavily spalted but it has nice figure and color. ive been sitting on this stuff for about 8 months. it was laying dead for at least 1-2 years. i took several burls from the tree, the thing is, theres alot of good hard burl wood, but there's a good portion that's punky and soft.

will stabilizing this make it hard enough to use?? or will it still be to soft to take a nice polish??

andrew
 

Attachments

  • spaltedmaple (1).jpg
    spaltedmaple (1).jpg
    51.4 KB · Views: 66
  • spaltedmaple.jpg
    spaltedmaple.jpg
    61.7 KB · Views: 106
Andrew stabilizing it will harden it up where you can use those pieces. As far as drying I read an article about taking some old windows and making a box out of them with a small fan on the inside. All you really need, depending on the size of the box is a small computer fan. All you want is to keep the air moving on the inside of the box. You put the basiclly glass box on the south to get the most sun. You stack the wood with spaces in between them so air can move through them. Hope this is making sense to you. If you seal the ends of the pieces then it will slow the movement of water from the ends to fast and keep checking to the min. The windows are ususally pretty easy to find for free if you just look around some. Good luck with it, let me know how it goes.
 
Andrew stabilizing it will harden it up where you can use those pieces. As far as drying I read an article about taking some old windows and making a box out of them with a small fan on the inside. All you really need, depending on the size of the box is a small computer fan. All you want is to keep the air moving on the inside of the box. You put the basiclly glass box on the south to get the most sun. You stack the wood with spaces in between them so air can move through them. Hope this is making sense to you. If you seal the ends of the pieces then it will slow the movement of water from the ends to fast and keep checking to the min. The windows are ususally pretty easy to find for free if you just look around some. Good luck with it, let me know how it goes.

thanks, ill keep that idea in mind, how long on average does this method take?? as apposed to putting up on rafters for a few years??

you say those pieces will be usable , but a few are so punky that i can easily break in half at 1 1/2'' thick with my hands. will they be usable?

andrew
 
I made a drying box out of and old mini fridge 2-75watt light bulbs and an thermostat. Set the thermostat at 95 and stickered the block. Some of the wood was very wet and had shrunk badly by the time it was dry. It took about a week. I did get in and wipe out the moisture on a daily basis. I did this before sending to K&G for stabilizing. After I took the blocks out I put them into ziplock bags to prevent ambient moisture. Final moisture levels were under 6%.
 
a c richards.... i like that idea as well. i guess its alot of trial and error. and im to impatient to sit on this wood for a few years, as i need some new handle material and cant afford to purchase alot at the moment (just got laid off last week)but thats ok hunting season is here anyway.......lol

i put 5 block of my maple burl in the oven at 150, gonna leave them in over night, they were never painted or waxed and they have been sitting in the closet in boxes for months. been oven for about an hour or so and no cracking so far. i put a small pan of water in ther to prevent them from drying to fast, but im gonna take it out now.

andrew
 
Andrew I have used the oven before to just make sure some of the wood I had was dry. You need to leave in there for more than an hour or two. I put the oven where it would barely come on and off, about 120-150 degrees and left them there overnight for several nights and then let the equalize during the day. Worked pretty good. Have not tried it on real green stuff though. The othe idea I was telling you about will get it down to 6-8% in about 1-2 weeks depending on the amount of sun and the temp it gets too. Once you make the box you will be set from now on. I will add one point to the box though, it was a set up to acutally do lumber, 16 foot pieces, so doing a small box and with the pieces cut so small it will probaly do it in just a few days.
 
Andrew I have used the oven before to just make sure some of the wood I had was dry. You need to leave in there for more than an hour or two. I put the oven where it would barely come on and off, about 120-150 degrees and left them there overnight for several nights and then let the equalize during the day. Worked pretty good. Have not tried it on real green stuff though. The othe idea I was telling you about will get it down to 6-8% in about 1-2 weeks depending on the amount of sun and the temp it gets too. Once you make the box you will be set from now on. I will add one point to the box though, it was a set up to acutally do lumber, 16 foot pieces, so doing a small box and with the pieces cut so small it will probaly do it in just a few days.

when i said take it out ,i meant the pan of water. i leaft that in for an hour or so. the wood is in the oven still and it's been there all night.

andrew
 
here's some better pictures of the maple burl i got a bunch of now. has some spalting but not a whole lot.

andrew
 

Attachments

  • maple burl-01.jpg
    maple burl-01.jpg
    84.9 KB · Views: 50
  • maple burl-02.jpg
    maple burl-02.jpg
    83.8 KB · Views: 40
  • maple burl-03.jpg
    maple burl-03.jpg
    81.1 KB · Views: 47
finally got that sucker outta the woods this week at the camp, weighs 206 #'s weighed it with the bathroom scale. YIPPIE!

andrew
 

Attachments

  • burl (4).JPG
    burl (4).JPG
    118.7 KB · Views: 61
  • burl (5).JPG
    burl (5).JPG
    120.8 KB · Views: 47
not sure what to do??

should i cut it length ways(split), then paint surfaces,remove bark, and let dry for a bit?

or cut into smaller but still oversized blocks right away then wax/paint
 
Back
Top