Cutting spalted slab ???

Joined
Feb 28, 2006
Messages
3,494
Hi Folks,

In my never-ending pursuit of figuring out just what the heck I'm doing, I have another question or two. This time about cutting up a small slab of dried spalted maple. (I scored a couple of stumps at the dump when visiting my folks last summer in NH!) It slab is two inches thick...

attachment.php
attachment.php


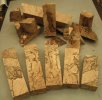
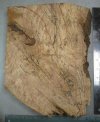
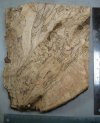
I penciled lines on the surface 1.5" apart. They can be seen on the side shown in the first photo. My idea was to end up with ripped pieces 2"x1.25" and then to cut them into into 4-5" pieces. It then occurred to me maybe the orientation was wrong. I can see the figure on the two existing surfaces (what would become the top and bottom of the handles with this approach). Would the figure be as dynamic on the sides of the cut pieces if I did it this way? Or should it be done differently all together?

I'm in over my head! What should I really do?

Thanks, Phil
 

Attachments

  • SpaltedSlab.jpg
    SpaltedSlab.jpg
    45.2 KB · Views: 267
  • SpaltedSlab2.jpg
    SpaltedSlab2.jpg
    48.5 KB · Views: 264
Last edited:
Phil,
I find that trying to lay out the pattern in only 2 dimensions is misleading. The handle will be a curved ,three dimensional object, and will not necessarily look like the flat board. I try to align the grain along the handle as much as possible, and align the burl or spalt pattern as it looks best. I often cut one test strip from a block and rough out a handle to see what looks best ,before cutting up the whole block.

Sometimes rotating the alignment will give a very different look. In the case of macadamia,beefwood, lacewood, she-oak, and many burls, if you align it one way it looks lacy/swirly, turn the block 90 degrees and it looks entirely different, often dotted or speckled.These patterns may not show until you shape it out. On woods like this I cut test blocks on both axises, and see which looks best after grinding the curves.

On other woods, cutting at a diagonal will change things. This will work for heavy, grainless burls, and some very unusual patterned woods. I cut black palm at 45 degrees to the grain ( width), and at 30 degrees to the thickness. This allows me to cut a 4" X3/4" board and get 5"X1" scales with heart shaped figures covering the surface. It looks just like fish scales. If you cut the board at 90 degrees to the grain you will get a smaller handle that has only small dots. Cut it along the grain and you get stripes.

Stacy
 
Nice stuff, just a warning, wear a resperator, while cutting it.
Spalting is caused by fungus (correct spelling?) Don't get the dust in your longs, it's a health hazzard
 
Phil,
I find that trying to lay out the pattern in only 2 dimensions is misleading. The handle will be a curved ,three dimensional object, and will not necessarily look like the flat board. I try to align the grain along the handle as much as possible, and align the burl or spalt pattern as it looks best. I often cut one test strip from a block and rough out a handle to see what looks best ,before cutting up the whole block.

Sometimes rotating the alignment will give a very different look. In the case of macadamia,beefwood, lacewood, she-oak, and many burls, if you align it one way it looks lacy/swirly, turn the block 90 degrees and it looks entirely different, often dotted or speckled.These patterns may not show until you shape it out. On woods like this I cut test blocks on both axises, and see which looks best after grinding the curves.

On other woods, cutting at a diagonal will change things. This will work for heavy, grainless burls, and some very unusual patterned woods. I cut black palm at 45 degrees to the grain ( width), and at 30 degrees to the thickness. This allows me to cut a 4" X3/4" board and get 5"X1" scales with heart shaped figures covering the surface. It looks just like fish scales. If you cut the board at 90 degrees to the grain you will get a smaller handle that has only small dots. Cut it along the grain and you get stripes.

Stacy

thanks Stacy - very informative---marekz
 
I agree with Stacy's comment about aligning with the grain and shaping a test piece to see what happens. Looks like the grain goes a few different directions with this piece. If I were cutting I would cut parallel to the bark pocket that runs at a 45 angle.
slab.jpg


If you wanted to cut for the best quality and look possible you could cut out a window in a piece of cardboard a little bigger than a knife handle. Then place that on the slab and position it for the look of the grain and blacklines. Draw the outline then position and repeat for the next one. A lot of cutting and waste this way but every handle block would look great.

Good luck. Looks like nice wood that should look good no matter how you cut it. Sometimes mistakes will reveal a cool look you hadn't thought of.
 
Last edited:
THANKS you guys! Very informative. I'm learning a lot.

Mark, given the slab is 2" think, how wide would you cut the strips/blocks? I had run the slab through a cheap planer. I was thinking I would plane the other surfaces of the cut strips prior to cutting them into block. What do you think?
 
The way I would do it is make the first cut and look at that surface. Next decide which surface has the better looking face. The flat of the slab or the edge you just cut. If the edge looks better I would cut a strip 1&1/4 wide. If the flat of the slab looks better I would cut a strip about 2 inches wide. After each cut look at the new edge and make the decision which surface presents the better face as before.

I would not use a planer. With figured wood the grain moves around a bit so you risk tearout. Also the spalting makes that more likely as well.
 
I remember a few years ago an editor at a woodworking magazine died from breathing spores from spalted wood he was working with. Does anybody remember any details about what happened?
 
Well I cut it today. Here's a pix of the five handle pieces (drop offs and scraps in the back).

attachment.php
attachment.php
 

Attachments

  • SpaltedMaplePieces.jpg
    SpaltedMaplePieces.jpg
    42.2 KB · Views: 89
Last edited:
Phil can you put a picture up of the slab before it was cut next to your cut pieces.-thanks-marekz
 
Those look great phil!

Thanks. They look way better in person!

beautiful, needs to be stabilized.

Yes indeed, stabilization's the next step (someday).

Looks like you got it right Phil:thumbup:

Mahalo. I had lots of great guidance!

Phil can you put a picture up of the slab before it was cut next to your cut pieces.

Done. I guess I got about 50% yield. The big drop off chunk in the back of the photo it the lower right corner section of the slab. There's still a good piece of figured wood in there, just not spalted. Some of the other scrap pieces could probably still yield little usable pieces for things like spacers and small steel fire striker handles, etc.
 
Back
Top