- Joined
- Feb 16, 2010
- Messages
- 3,668
Someone liked my grinder and wanted me to make a WIP/Tutorial on my conversion. So, here it is with lots of pictures.
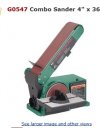
When I started I bought a 4x36 3/4HP grinder from Menards. They currently have them around $80, same at HF and other places. I thought that you just needed a way to fit a longer belt on the grinder and this could be done by adding a wheel to the top of the grinder. This is what I came up with.

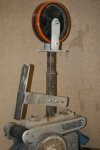
I made an upside down "T" out of 1"x1"x1/8" angle and 1.5" square tubing. I wouldn't recommend stainless, it's a pain to weld compared to mild. I welded a couple brackets near the ends to keep it square. Right next to the brackets are fasteners that I use to bolt it to the top of the 4x36.

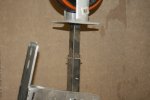
For the contact wheel, I got an 8" caster from Northern Tools. I checked through a few and chose the best one. You're looking for one that rolls oothly and doesn't wobble. Wobbling is BAD! They cost $40 at northern. I welded the caster frame to a 1 1/4" square tube. I drilled and tapped 4-40 threaded into the 1.5" tube, 4 on each side. Two on top and two about 2" down. This allows fine tuning of the rotation of the contact wheel for tracking. Not the best design, but it was cheap, easy, and effective. This is the caster used http://www.northerntool.com/shop/tools/product_40272_40272&issearch=18927.

Replace the bearings in the caster, the ones it comes with are junk. You need 1 3/16" x 1/2" lip bearings.

Don't forget to wrap 5-6 loops of electrical tape down the middle of the caster. This gives it a crown and allows the belt to track perfectly on the caster.

Lastly, you will need to balance the caster. Loosen the bolt holding it so it freely spins. The heavy part of the wheel will be at the bottom. I attached magnets to the top of the wheel as shown. Until it's balanced the magnets will revolve to the top. When it's balanced the magnets will no longer revolve to the top. You can also drill out the heavy part of the wheel until balanced, but this is much more time consuming.
Lastly, you might want a platen. This also requires some welding. I used a 2" wide aluminum plate and welded aluminum plates to the sides. Mild steel would be much easier to weld. Bolt them on both sides of the support tube and they are sturdy and square to the contact wheel.
If all goes right, you've converted an $80 grinder that is by all accounts useless for blade smithing into a very usable 2x72 grinder with a 12" flat platen, 8" contact wheel, 24", 12", and 3" slack grinding abilities. Concerns were raised about the tension spring not being strong enough, but I've never had the belt slip. The built in tracking, however, is completely useless.


When I started I bought a 4x36 3/4HP grinder from Menards. They currently have them around $80, same at HF and other places. I thought that you just needed a way to fit a longer belt on the grinder and this could be done by adding a wheel to the top of the grinder. This is what I came up with.
I made an upside down "T" out of 1"x1"x1/8" angle and 1.5" square tubing. I wouldn't recommend stainless, it's a pain to weld compared to mild. I welded a couple brackets near the ends to keep it square. Right next to the brackets are fasteners that I use to bolt it to the top of the 4x36.
For the contact wheel, I got an 8" caster from Northern Tools. I checked through a few and chose the best one. You're looking for one that rolls oothly and doesn't wobble. Wobbling is BAD! They cost $40 at northern. I welded the caster frame to a 1 1/4" square tube. I drilled and tapped 4-40 threaded into the 1.5" tube, 4 on each side. Two on top and two about 2" down. This allows fine tuning of the rotation of the contact wheel for tracking. Not the best design, but it was cheap, easy, and effective. This is the caster used http://www.northerntool.com/shop/tools/product_40272_40272&issearch=18927.
Replace the bearings in the caster, the ones it comes with are junk. You need 1 3/16" x 1/2" lip bearings.
Don't forget to wrap 5-6 loops of electrical tape down the middle of the caster. This gives it a crown and allows the belt to track perfectly on the caster.
Lastly, you will need to balance the caster. Loosen the bolt holding it so it freely spins. The heavy part of the wheel will be at the bottom. I attached magnets to the top of the wheel as shown. Until it's balanced the magnets will revolve to the top. When it's balanced the magnets will no longer revolve to the top. You can also drill out the heavy part of the wheel until balanced, but this is much more time consuming.
Lastly, you might want a platen. This also requires some welding. I used a 2" wide aluminum plate and welded aluminum plates to the sides. Mild steel would be much easier to weld. Bolt them on both sides of the support tube and they are sturdy and square to the contact wheel.
If all goes right, you've converted an $80 grinder that is by all accounts useless for blade smithing into a very usable 2x72 grinder with a 12" flat platen, 8" contact wheel, 24", 12", and 3" slack grinding abilities. Concerns were raised about the tension spring not being strong enough, but I've never had the belt slip. The built in tracking, however, is completely useless.
Attachments

Last edited:
")