Hey all! Please forgive me if this question has been asked before.I want to give making a hammon a try, so I went to ace and got some high heat furnace cement, put it on the blade in a neat pattern, and heat treated and tempered. I polished the blade back out, let it sit in muriatic acid, and nothing. Is this because ferric chloride is needed? Thanks!
-
The BladeForums.com 2024 Traditional Knife is available! Price is $250 ea (shipped within CONUS).
Order here: https://www.bladeforums.com/help/2024-traditional/
You are using an out of date browser. It may not display this or other websites correctly.
You should upgrade or use an alternative browser.
You should upgrade or use an alternative browser.
Do You Need FC for hammon?
- Thread starter Nic.
- Start date
- Joined
- Nov 4, 2010
- Messages
- 400
No Nic,
Ferric chloride is not needed. You should actually be able to see the hamon with out doing anything. If you can't, no amount of polishing and etching is going to make it appear. But if you know the hamon is there, you can etch with any type of acid to bring it out. A lot of makers use white vinegar or lemon juice, or both. Each one does something a little different in bringing out the hamon.
What were your steel type and heat treat methods and do you have a picture of the blade?
-Adam
Stacy E. Apelt - Bladesmith
ilmarinen - MODERATOR
Moderator
Knifemaker / Craftsman / Service Provider
- Joined
- Aug 20, 2004
- Messages
- 38,524
Muriatic acid needs to b diluted 100:1 for etching a hamon. It is for the final white stages of shiage togi. In concentrated form it would wipe out the hamon, and require re-polishing.
For the darker stages, FC, vinegar, lemon juice all will work. I like 15:1 FC.
For the darker stages, FC, vinegar, lemon juice all will work. I like 15:1 FC.
- Joined
- Jul 7, 2013
- Messages
- 2,614
Isn't the manganese content a bit high in 1084 for hamons?
You can get a hamon in 1084. Not as dramatic as other steels though
- Joined
- Jul 27, 2003
- Messages
- 5,699
Steel type, quenchant and proper heat treating is more important than etchant.
Stacy E. Apelt - Bladesmith
ilmarinen - MODERATOR
Moderator
Knifemaker / Craftsman / Service Provider
- Joined
- Aug 20, 2004
- Messages
- 38,524
Clay technique is also important. It varies depending on the steel and quenchant. Too much or too little will make the hamon vary or disappear.
I did a shirogami ( Hitachi white paper steel) blade last night with a water quench and will try and take a few photos later today.
I did a shirogami ( Hitachi white paper steel) blade last night with a water quench and will try and take a few photos later today.
- Joined
- Mar 26, 2009
- Messages
- 2,228
In my experience with 1084, the hamon is a different animal than a Japanese style hamon-both with clay and with a torch differential harden...more of a wootz look to the line, or a differentiation in grain structure.
White vinegar and crocus cloth (the iron oxide variety) give a very nice final hamon.
White vinegar and crocus cloth (the iron oxide variety) give a very nice final hamon.
- Joined
- Aug 16, 2012
- Messages
- 104

The first picture is 1084. No clay used. I used an oxy acetalyne torch method taught to me by mastersmith Jim Crowell.
The second knife is 5160 cleaver using same method without clay

- Joined
- Aug 16, 2012
- Messages
- 104
Both brought up to 1000 grit then etched in a 4:1 water/ferric chloride mixture
- Joined
- Aug 16, 2012
- Messages
- 104
Stacy has forgotten more than I could ever know so take anything he says as gospel. These are just my own very very limited experiences. Here is that same 1084 skinner at 400 grit. You can faintly see the hamon.

Then brought up to around 800 grit I get it ready for etching

Right after the mixture

I'm still working on my fit and finish
Then brought up to around 800 grit I get it ready for etching
Right after the mixture
I'm still working on my fit and finish
- Joined
- Aug 16, 2012
- Messages
- 104
A dark room and an acetylene torch. You basically sit down by your quench and "draw" with the acetylene torch. You start at the bottom ricasso end and slowly heat from ricasso to tip. Get a red hear then move on. Keep on moving the red heat to whatever pattern or depth desired until entire cutting edge is glowing red. Then quench quickly. Then temper as normal.
Stacy E. Apelt - Bladesmith
ilmarinen - MODERATOR
Moderator
Knifemaker / Craftsman / Service Provider
- Joined
- Aug 20, 2004
- Messages
- 38,524
Yes, the edge quench or edge heat gets a hamon like pattern, but is slightly different than a true hamon. In a hamon, all the steel becomes austenite, and in the quench, the edge cools quickly o miss the pearlite nose ( and becomes martensite later on). The clayed area falls behind the nose and becomes pearlite. The border of these regions is a cloudy mix of pearlite, and martensite ( it used to be called troosite in the days before SEMs). There are different type and size floating martensite crystals in the matrix in and above the line.
In an edge heat/quench HT, the spine usually never gets to austenite (remaining pearlite), and only the edge converts.
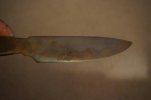
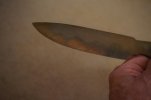
In the couple of poor quality photos below, the blade has been water quenched and is shirogami ( hyper-eutectoid with virtually no alloying). After the quench it was cleaned lightly on the grinder to check for any micro-cracks, dipped into FC for a few seconds, rinsed, and tempered. The hamon is visible as a wavy line. The martensite is darker than the pearlite. The blade is also dark and has colors from the tempers at 400°F ( that will polish off). When polished the hamon will have various contrasts and multiple layers. The bottoms of the curves don't show it much now, but there should be thunderheads and lightning bolts coming from them when it gets polished.
In an edge heat/quench HT, the spine usually never gets to austenite (remaining pearlite), and only the edge converts.
In the couple of poor quality photos below, the blade has been water quenched and is shirogami ( hyper-eutectoid with virtually no alloying). After the quench it was cleaned lightly on the grinder to check for any micro-cracks, dipped into FC for a few seconds, rinsed, and tempered. The hamon is visible as a wavy line. The martensite is darker than the pearlite. The blade is also dark and has colors from the tempers at 400°F ( that will polish off). When polished the hamon will have various contrasts and multiple layers. The bottoms of the curves don't show it much now, but there should be thunderheads and lightning bolts coming from them when it gets polished.
Attachments
Thanks for the pictures! That's neat. I have no idea what that paper stuff is you talked about, I'll have to look that up. It seems like there are a few ways to get the desired effect, I'll have to toy around and see what I can make work! I have acess to an oxy-acetylene torch, so I might try that "drawing" the hammon with the torch and getting a differential hardness.
Thank you for all the replies guys, I'm excited to see what I can do with this!!
Thank you for all the replies guys, I'm excited to see what I can do with this!!