Drop Point Hunter Design. I'd like some opinions

Joined
Feb 28, 2007
Messages
184
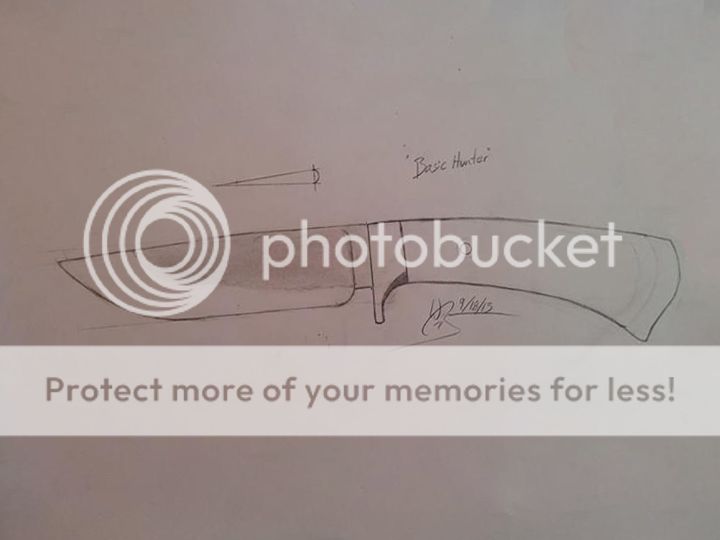
I've finally gotten down to drawing out a design for a drop point hunter which is one of, if not the number 1, favourite knife styles. It's based off of many of J.Doyle's knives and I think it's a decent design, but I've never actually held one to inspect it for specs and design or even what kind of grind they have.

If you guys could critique, give suggestions, make some design changes or something similar, that would be wonderful.

Not bad for a first time drawing out a knife, eh?


555595_10151857742846506_175997221_n.jpg
 
Last edited:
Blade...I have some old lawnmower blades from CRex. I'm really wanting the hamon to be a large difference in colour. Like an imitated san mai.
Fittings: I'm thinking bronze/brass
Pin: Preferably a mosaic
Handle: Dark wood. Maybe walnut, dyed maple, or I'll head over to the lumber yard and get me some dark hardwoods.
 
If you want a hamon, use 1095 or W2...if you want a good blade, use knife steel not lawn mower blades.
 
1095 is what I was thinking about if I were to use known steel, but I didn't know the hamon-ing properties of that steel. Good to know.
 
Wow. I drew this out free-hand (and it being my first knife drawn out) so I wasn't expecting any level of accuracy. Over All Length is 9 1/4" and the beginning of the finger guard (1/2in exactly) is EXACTLY in the middle. So 4 5/8" for blade and 4 5/8" handle. 3cm wide blade @ wp. and I'm thinking 5mm for the spine, Rounded.
 
If you want a hamon, use 1095 or W2...if you want a good blade, use knife steel not lawn mower blades.

I agree it's too nice a knife to waste all the time and effort to try and save a couple of bucks using lawn more blade steel.

I would add another rivet or tang hole to the rear of the handle and maybe round the bottom of the butt a little. But all that can be done after you see how it feels in your hand.
 
I thought about another rivet. I haven't quite decided if I want it to be a hidden stop-tang or a thru-tang construction. I typically like the idea of a thru-tang peened over more than any other method.

And I've heard that 1095 is pretty good for the hamon before, and I think the method was 3 normalizations, clay coat, bring to non-magnetic, hold, and dunk in 130*F canola oil. I'm looking for a preferred/time tested method for a super contrast in the hamon.
 
Also, I'm thinking of making my own refractory clay. I've seen some Japanese smiths (I think) use a mixture of hardwood ash and water (along with other ingredients, to taste). Am I crazy in thinking that I remember it being that simple?
 
Unless you have outstanding control of your austenizing temps over time, and a really fast quench, you are likely headed for an experience in frustration in chasing a hardening line ("hamon"). Non magnetic is not sufficient for even caveman-style HT on 1095.

The devil is in the details. Mower-blade steel is likely a waste of your time IF you want a hardening line and is definitely a waste of time IF you want a cutter.

I too suggest you ditch the scrap blades. Read and re-read the heat treat stickies and learn why 1084 is more likely to give you a usable tool if you are somewhat new to this. Use your time/known materials wisely and get the basics down first.

The design looks very similar to a generic Doyle knife - you could do much worse for inspiration! Personally, the only change I would make is slightly less drop to the handle and possibly a more continuous top line between handle and blade. These patterns are meant to be comfortable and safe in every position and that much handle drop is awkward - especially in an upside down grip or blind up in a body cavity IME.

Please post your progress and enjoy the ride.
 
I've got a bunch of lawnmower blades here that I'll gladly send you if you'll cover the postage!

Having said that, that metal is absolutely useless for a knife blade and you're wasting time trying to make it work. It could be the best high-carbon steel ever invented. Or, it could be case-hardened mild steel from a chinese foundry that specializes in making cheap rebar for the pakistani construction market. You just don't know what you're getting, and cannot heat treat it properly. But, hey, it saves you ten dollars, right......

As for the design, I'd bring the spine of the blade up flush with the handle. Knives just look better that way.

Then I'd put a smidgeon of curve to the edge instead of having it dead straight until the sweep up to the point. The eye doesn't like it when the edge is parallel to the spine, and I usually add one or two millimeters worth of angle to make it look right. It doesn't take much.
 
Don't waste your time with homemade refractory clay. Even the caulking size tube from the hardware store can provide more consistent results. Rutlands, sairset, etc will work. Brine is much better for a hamon, fast oil second, and other oils third. If you are worried regarding a crack, I have done a 6-7 second brine quench, let the water evaporate, then finish the quench in fast oil or heated canola. Consistency with HT is very important. I recommend at minimum a pyrometer to know your temps, rather than a magnet. Auberins can set you up for well under $100.00 for a pyrometer. Soak at the lower end of the austentizing range for best results. This is a fascinating process, rewarding, and frustrating. Others have described it as "love/hate" and I would agree.

Polishing a hamon is a very personal experience too. There are many ways to do it, each with their own strengths and weaknesses.
 
The reason I have considered the lawnmower blades is that CRex has used them in many of his blades and has determined them to be adequate for blades, he says they work and treat about like 5160 and it seems like 1095 or W1 would be WAAAAY better. THOUGH, a huge consideration for this blade is the hamon. I tend to think that this particular design without a hamon (considering most people will go straight for mirror polish) is just plain. Plain and ugly.

Here's an updated design for the blade. I hadn't even noticed that the spine and the handle weren't flush until someone said anything. At which point I was very disappointed with not only the design, but also with myself for drawing it that way.

Thanks for the hamon info, Willie
x555595_10151857742846506_175997221_n_jpg_pagespeed_ic_bcgEvsDfDWa.jpg
 
Last edited:
Back
Top