EERF Grinder Question

Joined
Jan 2, 2014
Messages
15
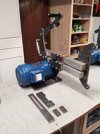
I have just about completed an EERF Grinder build. I downloaded the CAD file from Wilmont and had the parts water jetted. I have almost all the parts assembled but I can't figure out how the tool rest attaches to the tool rest bar. The rest and arm are easily recognizable but there are 2 small rectangular parts that seem like they are part of the tool rest system but I can't figure out how to assemble them. Does anyone know how the EERF Grinder tool arm and rest go together or have a picture of the completed assembly?
 

Attachments

  • Grinder pic (2).jpg
    Grinder pic (2).jpg
    9.1 KB · Views: 114
I'm in the same boat.I had the old set of plans I downloaded years ago. Had the parts waterjet. I'm in the process of putting it together. I cant figure out the rest goes together. Can't wait to get it running.
 
The slotted part allows 2 screws to fix this to the underside of the tool arm via 2 screws. The notched plate is the work rest that wraps around the platen or wheel. That can be welded together or screwed. The 2 little pieces I have no idea. What I worte is based on a kmg setup and it looks like those parts are a copy.

This link should help you see what I am describing.

http://www.beaumontmetalworks.com/shop/item.aspx?itemid=64
 
Sorry we missed this request back in January. The EERF design is horrible when it comes to the tool rest. Take a look at what I did and it will work much better. It's rock solid and can be removed with just a twist of the knob.

Replace the 1.5" solid square bar with 1.5" square tube with 1/4" wall. A piece of 3/4" x bar fits nicely inside.
View attachment 489022
 
Thanks Guys, I spent a few hours cleaning up the holes so I could start drilling and tapping. I had a few issues with some of the smaller holes not being perfectly round when they came out of the waterjet. All I did was cleaned them up with a brand new USA made drill bit. I found the Princess Auto stores asian brand ones are not so good.
The tool rest will probably be modified once I get to that part of assembly.
 
Back
Top