Electrical gurus please. Found an AC transformer at work, work for etching?

Joined
Dec 5, 2009
Messages
1,528
Whenever we have a defective battery charger or jump pack, we have to disassemble it. This transformer was inside the case and I'm curious if it would be suitable for my DIY etcher.

Here are the specs:

Class 2 Transformer
Model: YH-U41156600A

Pri. 120V 60Hz 15VA
Sec. 15.6AC 600mA


I assume the "Pri." is input voltage and the "Sec." is output?

Will this little transformer put out enough juice for the AC marking side of a DIY etcher?

Thanks!
 
The voltage is good.

The amperage is low.
The usual designs for this specify a 2 amp transformer.

If you use it the transformer may heat up and burn out, or it may work and just be a little slower than the others.


I say use it, make the box you use big enough for a larger transformer and swap it out later if you need to.

Salvation Army and Goodwill stores are a good source for those transformers too.
 
Last edited:
You need a DC unit to make the impression. The one you have would probably work for blackening the impression.
 
Justin, I picked up a decent little DC unit at work too. Ill have to double check the specs. Now all I need is a stencil and some proper solution/electrolyte for stainless.
 
Do yourself a favor and get a 24volt , center-tapped, 2 amp transformer (48VA).... and get a bridge rectifier.
That will give you 12 or 24 volts and AC or DC. A few switches and you are ready to go.

You will tank yourself for getting the power to do the job when you see the depth and sharpness of the etch, plus the darkness of the mark.
 
Stacy, thank you for the suggestion! Can you provide any parts links?

Btw, I gave the little AC transformer a try on some junk steel just a few minutes ago. Polished it up, degreased it, made a quick stencil from some electrical tape and an etching pad from a qtip, salt water electrolyte. Worked pretty good considering the small amperage output, plus it was fun seeing the guys at work look at me all weird as I blackened some letters onto a piece of steel.
 
If I didn't have a good etcher I would buy a cheap automobile battery charger and make one. Everything is already there. Just need mount a DPDT sw and the find the bridge rectifier. Disconnect wires that go to battery and connect them to center taps on sw. New lines from rectifiers DC outputs to one outer set and then install an addition set of wires to where the AC come into the rectifier and run those to the other outer set of terminals on the switch. Done.
 
Battery charger is a cool idea. Care to provide a quick schematic on the wiring of the rectifier into the charger?
 
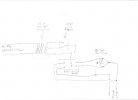
A 6V/12V battery charger is a center tapped transformer that is fed into a bridge rectifier. There are three output wires from the transformer. The two end ones give 12VAC, and the center to either end will give 6VAC. This is controlled by the 6V/12V switch, which has the center tap and one end tap going to it.
The output of that switch goes to the bridge rectifier, along with the other end tap. A DPDT switch added in these two wires would allow you to switch from AC to DC. Cut the wires from the 6V/12V switch and put them as the center ( in) of the DPDT switch. One of the other set of contacts goes to wires cut ( to the bridge rectifier), and the other set of contacts goes to the output wires from the bridge rectifier ( the ones hooked to the charger clips).

Switching the 6V/12V switch will change from Hi to Lo. Switching the AC/Dc switch will send either AC from the transformer directly to the clips, or to the bridge rectifier, which will send DC to the clips.

Attached is an ugly schematic.
 

Attachments

  • schematic 001.jpg
    schematic 001.jpg
    16.6 KB · Views: 23
Last edited:
Back
Top