Richard338
Gold Member
- Joined
- May 3, 2005
- Messages
- 7,601
View attachment 1753583
View attachment 1753586
View attachment 1753587
View attachment 1753591
Disclaimer, I’m just a guy who likes to make knives, I have not made a living making them. I learned machining from the internet and YouTube for the most part, so my knowledge is narrow compared to a machinist. I think setups/fixturing is an interesting and critical part of cnc knifemaking. I’d be very interested to see what other people have come up with. I’ve tried several different methods of work holding and setups.
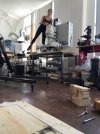
This is my current setup:
First op: Barstock is held by pitbull clamps. Downside of this is that they have a very short clamping range, so precision ground stock works great, but rough stock sometimes needs to be cleaned up to fit.
A 1/8 mill does almost everything, bores the holes, etc. That runs for a while, then engraving and chamfering. If I need to knock a few thou off the thickness I’ll put in a 1/4 end mill and face the stock here. If I need to take a bit off or take off that cpm scale/pitting I’ll do that here too, flipping it.
Second op: flip the barstock and screw it down. Again 1/8 end mill does everything but chamfers and engraving.
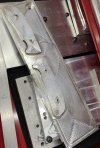
Handles op 1: same as the barstock, 3/16 end mill does holes, then an 82 degree countersink
Handles op 2: screwed down to the fixture as shown. Area is raised so a 1/4 ball mill can use the side flutes to profile, then the ball to contour the tops.
I use a 1/8 mostly because it can reach all the holes etc without being too large. I used to spot, drill, preream, and ream the holes. For putting scales on a blade, boring the holes and then finishing them to size with the same end mill works great. The threaded standoffs are up to .005 over sized anyway so no point in making .25 hole with multiple tool changes. The boring has been consistent.
I harden the blade after machining and finishing. So far I’ve only used air hardening steels. They stay very clean with foil wrap so cleanup after heat treat is re-hand sanding. Might be more efficient to harden a blank and then machine it and be done. That’s something I’d like to try sometime but haven’t. Some of the steels I like to use would be really hard to sand out machining marks by hand in a hardened state. I don’t see why a tormach couldn’t do hardened steel. I think you would have to nail speeds and feeds and it would be real slow.
For speeds and feeds I’ve found FSWizard pro to give working numbers on the first try almost every time when I set it to 70%. I was always having chatter with g wizard numbers.
I think the fixture could be improved by finding a way to clamp with more clamp range. I think I might make the next one bolt to the table instead of the vise.
A different setup would be needed for cranking out lots of knives from a big sheet of steel or handle material.
I’ve thought about trying oil hardening steel. I think I’d try doing one the same way but hardening with pbc powder and seeing if that gives enough protection. Could harden a blank but with this setup it would be a barstock blank, so I’d worry about getting good through hardening. A different setup where you have a profiled blank, then heat treat, then do the bevels might work.
Side note, I give a .01 or .015 step over for the blade flats and .001 for the plunge. It seems to be a good compromise between speed and finish. I’ve tried ball and bull end mills but they don’t seem to give any better of a finish, with the parallel tool path.
Advanced Knife Machining WIP, Pointy Fighter
This will be a somewhat technical WIP covering machining techniques that I frequently use in my shop, as applied to knifemaking. As more advanced machine tools become more common in many of our shops I believe that some these techniques might become more prevalent in other makers shops. I plan...
If you are machining knives, you might like to read this old WIP from Nathan.


")