Etch resist question?

Joined
Dec 8, 2005
Messages
1,239
Hi all I am trying to find a etch resists that can be applied to handle material so I can etch a damascus full tang. I had used fingernail polish before but was unhappy with the results. Was wondering if there was a wax base material that can be applied with a brush. Any help would be appreciated.

Thanks
 
Depends on the handle material. One method is to use a good grade of electrical sealing tape (Bi-Seal) and tape the handle tightly. Many just use regular vinyl electrical tape.

Another method is to dip the handle in a pot of low temp wax.Beeswax works well. When done, warm the bees wax with a hair dryer and wipe off with a cloth. Keep hating/wiping until it is clean.Buff and it should shine.Solvent can aid any from nooks and crannies.The melted wax can be brushed on,too. Warming the handle with a hair dryer first helps.
Stacy
 
I think that he wants to etch the blade and spine all the way around without ruining the already in place handles.. I know that the correct way would be to finish the blade and handle and then take the scales off to do the etch. Then make the permanent attachment...I have trouble with this as well..No matter how careful I am, I tend to screw up the etched spine when finishing the handle installation.
 
I've done a lot of full-tang damascus etching with handle materials in place.

Using Ferric Chloride, I would just mask with electrical tape as Stacy has mentioned. (I've found that hydrochloric lifts the tape more easily for some reason.)

I wouldn't do it on wood handles unless they're stabilized, because there's bound to be a little leak here or there and you don't want a stain. I was reasonably careful masking around where the brass or silver bolsters were, but I'd just shine 'em up after the etch (The little discoloration would clean up when you go over everything else with 1500 or so after the etch.)
I found, however, that you can get flash plating onto your steel from the non-ferrous materials exposed to the acid, so that's a good reason to minimize exposure of anything but steel to the acid.
 
You would have to be very careful (and lucky)to not ruin the handle with that technique.Unless you were absolutely positive that no etchant could get under the scale, you might create a worse problem.
Stacy
 
Louis you are right on track. I have tried using electrical tape and mask it off very time consuming and results are not good I get the etchant getting under in spots. I have also used finger nail polish the problem I have with that is that it does not flow well, you do not get a clean line along the spine. I have also temporarily glued the scales on finished and etched then glued and pinned the scales. Problem here on that one I used some stag scales and when I reassembled it just seem to not quite line back up. My thought is finish the knife apply a very thin layer of a wax then I can etch and just clean up the wax and I am done. Well it sounds easy right :D.

This is the one I took apart to etch and reassembled.
StagHunter2_07a.jpg


The one I am doing now has stabilized burl scales and when the etchant gets on the scales it darkens it a lot.
 

Attachments

  • Stag Hunter 2_07a.jpg
    Stag Hunter 2_07a.jpg
    20.2 KB · Views: 11
Hi Joe

One that I am etching now is an integral with stabilized redwood burl and I used electrical tape and keep getting leaks :mad:
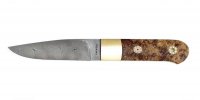
. I am also doing 2 pattern welded bird and trout knives that will more than likely have stabilized wood as well.

Stacy

I had to start over with the finish on this knife 2 because of leaks what a pain.
 
try putting the thin Nickel silver or brass or copper liners between the handle scales and the tang,finish out the handle and tang then disasemble only leave the scale and liner still connected together.This will aid in keeping everything all lined up on re asembly.Soft handle material (anything but synthetics) can wallow out some when being drilled and then the pins get a little loose fitting after sliding a pin in and out a couple of times,but the spacer material holds the hole shape better.At least this fixed the problem you guys are having for me when I was having the same problem of scales not matching back up.Plus it looks really cool when the knife is finished.
Bruce
 
Years ago at Batsons symposium Rob Hudson was demonstrating,I asked him how he did the flamed edges.Finger nail polish was his resist at that time,But he also added that he etched the whole knife after assembly (he used wood handles almost all the time).He said he wrapped tape around the handle and then sealed the ends of the tape with finger nail polish,now here is the kicker,he purposfully flamed the edge around the guard and butcap,this seales the edge and didnt let any leaks get into the seam between metal and handle material.Just thought I would pass that on as a idea to use if you can't get the seam sealed from leaks,just make a wavy edge on the steel and when done that part will shine and look like you did allot of extra work on the handle,plus no leaks...
Good Luck

Bruce
 
I use the dissasemble-reassemble method. If I have a spot I need to sand for a better fit I just go ahead and sand it, then touch up the spot with a Qtip. It doesn't take long to get a nice finish back once the whole blade has been properly etched. If it does not match up in color lightly wetsand the entire spine with a worn out piece of 2000 paper.
Matt
 
Thanks Bruce that is some good tips, I did not think about going over the seams with nail polish. I will give that a try.
 
You would have to be very careful (and lucky)to not ruin the handle with that technique.Unless you were absolutely positive that no etchant could get under the scale, you might create a worse problem.
Stacy

I never got enchant under scales, but I used to use epoxy and pins on those (Don't think the etchant could get under the epoxy and the stabilized woods I used seemed pretty impervious to it as well.)

Of course, you use the REAL electrical tape---the extra gooey stuff that costs about $8 for a tiny little roll. ---not the stiff cheapy stuff.

Here's a picture of one of the many of these knives I did about 1995:
 

Attachments

  • old-knife.jpg
    old-knife.jpg
    24.1 KB · Views: 48
Good looking knife Mike,

The way I do it if I can't take it apart and put it back together after etch is to mask off the handle and gaurd with 3M masking tape, the light tan regular old brown painters/frezzer type. I first wax and oil the handle, then lightly wipe down with acetone and a clean shop towel, then mask. The blade part has most times already went through a couple etches and the handle generaly gets one. The masking tape works pretty good if your real careful. Thinking of using alignment pins on the next one and screwing the sucker together though.
 
Matt

The wife has been hiding the Q-tips when she thinks I need to etch a blade :lol

Joe

Ya no problem getting the etchant under the scales and all it does is darken the very outside of it a light sanding and the wood comes back just more work than I want to redo. That tang looks sweet would like to see the rest of the blade :D. Joe that tang looks sweet would like to see the rest of the blade.

Will

Thanks for the compliment, I will have to try the masking tape it is easier to use than electrical tape.
 
Joe

... Joe that tang looks sweet would like to see the rest of the blade.

Well, you asked for it ...
I was wrong earlier ... I was doing these in '96-'98 so don't look too close:o
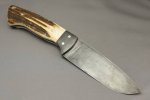
...I made a LOT of them--steel and all. They were simple bread-and-butter kind of knives.

But yes, I etched them after final assembly. I found it much easier to do all the grinding/shaping when it was all together. The tape seemed to be sufficient for masking in ferric chloride anyway.

It's an interesting thread because I'm now looking for a way to mask some stainless damascus that is etched in full-strength hydrochloric acid. I've found that it lifts everything I've tried including asphaltium, nail polish, lacquer paint, you name it ... still looking.
 

Attachments

  • old-knife2.jpg
    old-knife2.jpg
    14 KB · Views: 39
Joe nothing wrong with a bread and butter style knife most of the time I am drawn to very simple knives. I have a soft spot for anything pattern welded and have always love a good twist pattern nice job. Thanks for showing the rest of that knife.

Have you thought about a wax? That is the road I am exploring trying to find a wax that I could paint on the handle material and just etch to my hearts content. I was thinking wax because it seems to not be affected by the etchants I could be wrong though.
 
The full-strength hydrochloric seems to lift everything. It eats the wax-containing materials I've tried. Might be OK for diluted ferric chloride, I think ...
 
I am going to have to play with some different resists and etchants to see what works and what does not.
 
gentlemen if i may make a recomendation you might try brownels (resist) that is used in bedding rifle part's to the stock you paint it on wait a little paint a little more on about 5 coat's worth cut away what you don't want protected with a exacto peel it off and etch . think painting on seran wrap real thin plastic .. i got a part number if you need it..
 
Back
Top