- Joined
- Oct 6, 2003
- Messages
- 252
A member in a previous file work discussion requested a tutorial on how i did a "twist pattern" design.
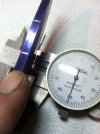
After profiling I use lay out dye and a micrometer to mark out two lines along the spine. One at 1/32" and another at 1/16".

I then mark my starting point and a line 3/4" up the spine. This distance works with a 1/4" file and 5/32" blank.
View attachment 422845
Start slow so the file doesn't skip and clean it often so you don't get pieces of medal making deep scratches.

I try to keep the file as level as possible to the spine and go as deep as the 1/32" line that I marked on both sides of the knife. Don't go too deep, you can't get it back. To start the second groove I measure and scribe a line about 1/32" parallel to the first groove and then deepen the mark with a triangle file. The line/guide for the second groove gets placed much closer to the first than you might think.


After profiling I use lay out dye and a micrometer to mark out two lines along the spine. One at 1/32" and another at 1/16".
I then mark my starting point and a line 3/4" up the spine. This distance works with a 1/4" file and 5/32" blank.
View attachment 422845
Start slow so the file doesn't skip and clean it often so you don't get pieces of medal making deep scratches.
I try to keep the file as level as possible to the spine and go as deep as the 1/32" line that I marked on both sides of the knife. Don't go too deep, you can't get it back. To start the second groove I measure and scribe a line about 1/32" parallel to the first groove and then deepen the mark with a triangle file. The line/guide for the second groove gets placed much closer to the first than you might think.
Attachments
Last edited:


