Finished new handle for old kukri

Bladite

ǝɹnsıǝן ɟo uɐɯǝןʇuǝb
Moderator
Joined
Feb 28, 2003
Messages
19,854
the long story short, the bone handle split, and died, and had to come off, and i happened to have some red oak of the right size, so...

new handle :) much with the carving, drillings, and sandings, and tung oil. pictured next to a 16" GRS for comparison.

attachment.php


the other project i did recently was making tuned windchimes for v-day for the grrl. they sound like church bells - very resonate.

bladite
 

Attachments

  • IMG_3306 small.jpg
    IMG_3306 small.jpg
    92.7 KB · Views: 767
I'll move this over to the main HI forum.

The Cantina was created so it could be periodically purged of off-topic content. I'd hate to see this great example of work on a khukuri lost in such a purge.

Bill used to mention that in Nepal the kamis expected the khukuris to last a lifetime but they expected to rehandle them every 5 years or so. I think HI has a high standard for handles and they generally last much longer, but a khuk-nut in my opinion should give some thought, as you have, to the eventual replacement of a handle or two.
 
i put this in the cantina, as it didn't seem to fit the topic of "HI blades or interests" as the blade isn't an HI product, even if i used an HI GRS in a comparison shot :> my kukri IS from nepal though, so ... shrug :)

EDIT: i didn't know the cantina was purged, either. weird.

bladite
 
yo bladite,
Looks sweet...I got a little khuk here that needs some rehandling love...When ya want me to send it? ;)
 
Leatherface said:
yo bladite,
Looks sweet...I got a little khuk here that needs some rehandling love...When ya want me to send it? ;)

gifts are always appreciated ;) oh, you wanted it back? shucks.

bladite
 
ShadowchaserUFP said:
could you describe the process of replacing the handle? Some of us are new to this type of re-working.
Jack

i'm somewhat new as well, in a way... remember maybe way back when, you got a carving kit that said "remove all the wood that doesn't look like the finished piece, sand, then stain, done!" it's like that.

first, you need a broken handle (swearing optional). then you remove the handle... in this case, and as with many rat-tail kukris from nepal, HI included, they are stuck on REALLY well two ways: the hilt butt piece is soldered on and with laha (himalayan epoxy), a wondrous concoction of laha sap, and ash, and probably blood, and uh "poop" (and i don't even want to consider what kind). let's just say this: even dry, it's stinky, and when you warm it up to do anything with it, my ghod. i grew up on a farm, and yes, i know that poop smell well. just like that. ripe :barf: .

like your fingers? mine too. protect them. now would be a really good time to take some thin cardboard as long as the edge of the blade, fold it up a few times, and apply it along the edge of the blade inside the fold of the cardboard (at least 2 times thick), and tape it on REALLY good; i used blue masking tape (less residue), but use whatever, you're going to have to clean up later anyway. if you're clumsy (i am), put some cardboard on the side and spine as well, and wrap the entire thing up. forget you have a knife under there.

remove the butt plate. it's probably soldered on, so if you can secure a soldering iron that's hott enough, melt the stuff off, smack it around or wick it off... that little diamond plate is the secure point. the buttcap itself is also probably glued on with laha. it might just pop off if you're careful, else you're going to have to boil it and pop it off. the way i did it, was to use a rat tail file, and slowly but carefully remove the solder material, and a bit more until everything came free.

so, you remove that handle; in my case, i put a plastic bag over the whole thing, many rubber bands to remove air, and keep water out, and held it in BOILING rolling water, without letting it touch bottom. for, oh, 3-4 minutes, then with a mitt or glove, twisted and pulled FAST (because laha cools and sets fast, but don't worry if you're too slow, just reheat that thermoplastic bad stuff). voila. don't even bother taking the handle out of the bag, just wrap it and hide it. really.

the exposed rat-tail handle is going to probably be stinky until it cools. run it under some water, and put outside. for about a month :barf:. so, it's cool, use a wire brush, file, old knife, rock, and scrap off any remaining laha. make the metal clean and good. so you should have an exposed tang, and well wrapped blade, safe from you, and you from it.

go find that metal piece that sits between the handle and the blade, your bolster piece i think they call it. clean it up good, and set it aside, don't lose it.

handle... pick some material. there's so much. synthetics, naturals...

next...
 
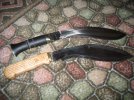
and ... part 2 of making the handle...

the way i went isn't the authentic way; almost all of those rat tails have a butt cap to help hold the handle on; that plate is physically attached to the rat tail, which helps keep things on. i want a butt cap free handle; which makes things a little harder. i put some filework onto the rat tail to give the eventual epoxy something to hold onto. later, if i rework this, i'll have to cut the wood off, and really clean the handle up, same thing if someone glue a handle on with a plastic bag, or other methods. i did consider putting a wee tiny pin through the handle, up by the fat part of the tail, but that's a later thing someday, maybe, not :)

the super easy authentic way imho: get a block of material, cut to desired length plus an inch or so to seat the bolster later, drill a hole the same width as the tail thickness centered and straight through. pick an end to accept the handle, and one for the buttcap end. mark centered on the handle end hole, the fat portion of the tail, you need to cut a slot now... place the tail on what will be the side of the handles, in the correct holding position (not upside down), and trace the tail to help with visualizing.

get a hacksaw or coping saw, and use a thin carbide hacksaw type blade (they make ROUND ones for tile! :thumbup:), or the usual coping saw blade. without make the butt cap end any bigger (be careful), keep the blade centered in that hole, cut a V shape internal piece out, picture the shape of the tail. don't make the hole too much wider than the tail either. this should give you a shape that fits SNUG and is aligned. take it slow.

okay, the blade should slip into the handle form nice, and be aligned. yay. car the handle shape you want. go for an authentic shape, or something curved with finger cut outs, etc. fit the butt cap end to the shape of the existing butt cap. cut a lip on the handle end to accept the bolster. voila! sand it, oil, stain, paint, etc.

use 1 hour epoxy fill the handle, slip the blade in with bolster on already ;) and in proper position, and pray :) attach butt cap/plate, solder, and whee. take pictures, tell us.

#

now, what i did made things harder, since i didn't have an exposed hole at the buttcap end. what i WOULD do next time is as above, but i'd make my handle a bit longer, shape it shorter after attachment, and use a wood plug to hide the hole :)

in my case, i used a lot of long, thin drills to cut out the edges of the shape i wanted, did some reaming, chiselings, and got lucky. i won't do it that way again without a drill press - very long work. otherwise, it's about the same...

#

another thing i though of was: get two slabs of material, one for each outside of handle, aquire the same material (but potentially a different color in the same thickness as the tail as "filler" or skip this step and route each slab deeper - a two piece slab sammich. carefully route out to above 1-2mm of depth into each of the slabs, the shape of the tail, so they sit in TIGHT... shape about 2-4 mm off the tail fillers to compensate, test for fit... then slather a LOT of glue on a slab, put the tail into the slot, drop the fillers on top and bottom (and "back" depending on if they are shaped or not), more glue, slap the top on, clamp and wait. naturally, i would have marked on the outside the exact tail placement, because i would later drill all the way through and add pins and such. so, now you've got a block of material ready to shape (bench grinder go!)... doing this with micarta might be yummy. or perhaps if you're ghetto, that super high density cutting board material.

that's about it for ideas right now.

bladite
 
The Cantina was created so it could be periodically purged of off-topic content. I'd hate to see this great example of work on a khukuri lost in such a purge.

Just in time too! I was about ready to email Spark about this shameless khuk "purging" going on in the Cantina:p (sorry it's smartass o clock in my timezone evidently)
 
Bladite said:
EDIT: i didn't know the cantina was purged, either. weird.

MauiRob said:
Just in time too! I was about ready to email Spark about this shameless khuk "purging" going on in the Cantina...

A bit of history. The Cantina was formed during a time when Spark was trying to trim the sizes of the BF databases. The HI forum is one of the largest parts. He found it was almost impossible to seperate the knife content from the non-knife content in the HI forum. The Cantina was created as a solution to this problem, in order to house the off-topic posts, with the idea that they could be periodically deleted. There has never been a purge of Cantina posts yet, but that is why the Cantina was created.
 
Am I allowed to say I don't like it? I do appreciate the work and the neccessity of replacing a broken handle, but I would send it back to Nepal or ask for a new handle to be sent over. Failing that, I would make one that follows the lines of the blade and is true to the original design. Well done though and it is your knife to do as you wish.
 
munk said:
I like the handle. It is an honest handle for a real tool.
munk

thankee! it was a fun project too, learned lots.

bladite
 
Andrew Taylor said:
Am I allowed to say I don't like it? I do appreciate the work and the neccessity of replacing a broken handle, but I would send it back to Nepal or ask for a new handle to be sent over. Failing that, I would make one that follows the lines of the blade and is true to the original design. Well done though and it is your knife to do as you wish.

yer allow to say anything you like, nearly :)

in my case, the original, authentic handle, well - let me be Frank here "it sucked". it was tiny even by the standard of the occasional small handled kukri we see coming in now, and it was disproportionate for this blade - almost the size of the handle on a 9" sgt khadka bilton? really. petite, hard to hold, and hurty. then it broke. what can ya do? sending it to nepal? i have no idea who made it. getting a new one? they're generally custom made per blade, and again, no clue who made it. also, if you did send your blade away, you MIGHT not get the same one back, if that means anything.

now, my thoughts were influenced by looking at the many handle designs, especially for kukris, machetes, etc that i could find that i like, and this is darned close to my idea - more betterly (not really a word there), it fits my hand like a glove. sure, next time i'd go for authentic. maybe. i was completely trying to be unique and go my own way this time though. i think i did okay.

so, you can hate it, that's fine. it's made for me :)

bladite
 
Yo Bladite,
I agree with Munk (dont tell anyone!) about it being a handle for a tool...If I had an ounce of talent I would make one just like it for my minikhuk...As it stands right now it has a handle from a bastard file on it...yup its ugly but i am working on putting something more aesthically pleasing on it very soon..
 
Bladelite,

What I like about it is that you did it yourself.:cool: That takes the effort. Your second handle/khuk improvement will be better. You will become more fluid with it. Plus now it will be on your mind. It works for me because of its simplicity and functionality. Personally I would never use red oak for anything. Its my least favorite wood. But that is just plain common opinion and has zero value to anyone but me. Its interesting that you mentioned a machette handle. Thats just what it reminded me of. I'd like to hear a performance review. I wanna know how it performs.

I'd also like to see some pics of those wind chimes. That sounds like a helluva project to me.

Good work. :thumbup:
 
Bladite said:
yer allowed to say anything you like, nearly :)

bladite

Well, at least I'm pleased I didn't upset you. Now that you have explained it, I think you made a great machete handle ;) It is a good achievment and you can always change it if you want to.

I thought Khukri handles were made by a handle-maker rather than the kami bladesmith? I know the scabbards are made by the sarki.

I bookmarked this site a long time ago and they stopped for a while but Terry and Sandi are back in business. I have an old scabbard that needs careful and sympathetic restoration so I kept the URL. I must get around to doing that. http://www.geocities.com/t_sarki/Sarki_Shop.html
 
so, you can hate it, that's fine. it's made for me! Originally posted by Bladite

There is something about this statement that rings my bell:D

If I may be so bold - finger grooves & a bit of belly will transform the aesthetics & may even improve the grip.

Its yours to play with - and good on you!!!:thumbup:
 
Back
Top