First 2 knives finished in 2013

Joined
May 18, 2009
Messages
1,831
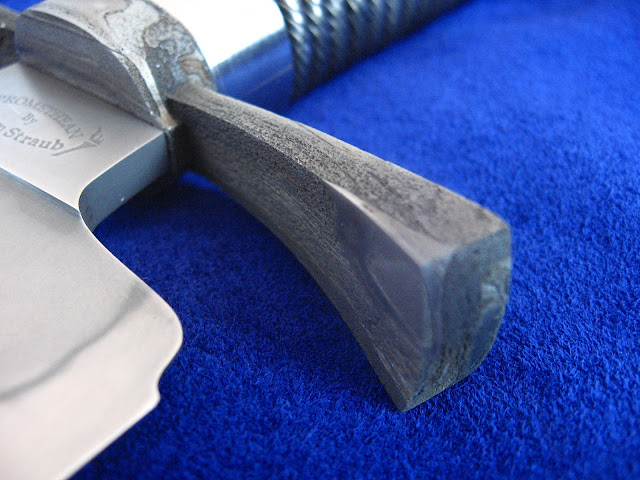
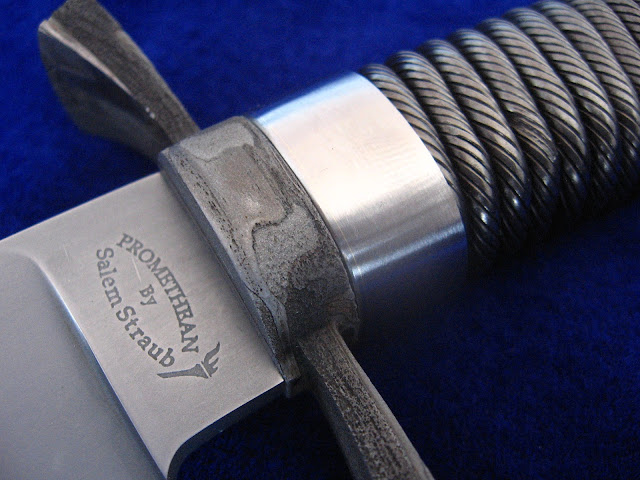
I'm still having problems on my hidden tangs keeping the transition smooth from guard material to the handle block. It seems a lot of people leave the handle slightly proud of the guard and spacer material. Maybe this is what I should start doing. I've just been trying to keep it smooth where you run your finger over it and it feels like one piece. I inevitably end up with what you see below.

I did get good results on the second knife with the hamon. Just need to work on getting my hand finish better. There are a few scratches that a couple more hours of work would have probably gotten out.

First knife is 1095/15n20 damascus with a forge etched wrought iron guard, bronze and black G10 spacers. The handle is bog oak.

bzsbd.jpg


v5h8qf.jpg


Second knife is W2 with red g10 handle and brass fittings. Thanks for looking and I would really appreciate feedback (especially constructive criticism).

2vlpnaa.jpg


1puous.jpg


2hzsf2d.jpg
 
I have the same problem. I think, like you said, the trick is to intentionally leave it a little proud. I have also started shaping the guard first, before shaping the handle, and then when they are both shaped to satisfaction, I assemble the whole thing. I also have found that I don't risk accidentally scratching the blade. After assembly, all I have to do is oil the handle....
 
Constructive criticism: Your pictures are not very good. I would recommend looking into getting a better lighting setup. I am not saying this to be mean, but to try and communicate the fact that the presentation will be very important. A Buster Warenski done with a 1 megapixel camera with flash doesn't look very good.
 
Constructive criticism: Your pictures are not very good. I would recommend looking into getting a better lighting setup. I am not saying this to be mean, but to try and communicate the fact that the presentation will be very important. A Buster Warenski done with a 1 megapixel camera with flash doesn't look very good.

You're right. I'm about to get more serious with this and a lightbox would definitely help. Thanks.


Everyone else, thanks!
 
Is there any reason why you don't finish the guard and handle together? I mean, get them close, then do your finish sanding so they are both getting sanded at the same time.
It seems I see a lot of makers, finish the guard and handle separately, then assemble.
On the handful of rehandles I did, I assembled the entire handle including guard, before I even started shaping it. When I was done, it all came out like one piece.
Am I missing something? I would understand if the guard was pre embellished or something, but otherwise, why do them seperate?

Because it was wrought iron and it had to be preshaped, etched/finished, then glued up. If I did that it would have removed the etch from the guard. A lot of it has to do with getting a tighter fit using alignment pins and what not.
 
Very nice Mitchell, Keep working at it you will get what you want. Way to go on the wrought iron.
 
Oh, I see. That makes sense.
Is there any way of doing the etching after? Like masking off the blade and handle somehow? May be more hassle than its worth, but otherwise I have no idea how you would assure a perfect fit.

I would be interested in the answer to this myself.
 
Good work. I especially like the second knife. With the guard on the first one, it can definitely help to shape in one piece with the handle. A 1/2" small wheel or so can get in under the guard and create a nice transition, or if that's not the look you want, you can get close on the grinder and finish with round files, then dowels and sandpaper. If you have put them together with alignment pins, you can shape the iron with the handle, take apart and etch, reassemble.
 
Good work. I especially like the second knife. With the guard on the first one, it can definitely help to shape in one piece with the handle. A 1/2" small wheel or so can get in under the guard and create a nice transition, or if that's not the look you want, you can get close on the grinder and finish with round files, then dowels and sandpaper. If you have put them together with alignment pins, you can shape the iron with the handle, take apart and etch, reassemble.

I start with the alignment pins then abandon them. When I put everything back together with the pins in place there are gaps. I tried shortening the pins then one of them got stuck and I couldn't get it out of the hole. I'm sure I'll get luckier the more I try.
 
I'm sure that's true. Here's a couple pics of one done with alignment pins and heavily etched wrought. Not that I'm claiming it's exemplary...

IMG_6756.JPG


IMG_6759.JPG


IMG_6761.JPG
 
Looks exemplary. On this one I forge etched and then blued the wrought. It gives it a deep blue kind of lush grained look. The same way Dave Lisch does.

That knife is really cool. Looks like it could be the focus of an action movie.
 
Last edited:
Back
Top