First Adz and HT problem

Joined
Jan 9, 2008
Messages
588
I am trying to decide whether I need to invest in som ht foil or not.
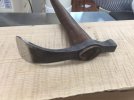
I just HT'd a Cruforge V adze at 1550 for an hour with no foil. The scale flaked clean off with 30 seconds of a wire brushing. Is there a metallurgical reason to use the foil, or is it just to keep the blade from oxidizing?
 
Last edited by a moderator:
That flake is the carbon that is no longer in the steel, so you will need to remove this soft layer to get to the hardened one. A foil well wrapped prevent this.


Pablo
 
Oxygen in the air at high temperature oxidizes carbon which goes off as gas . It oxidizes iron which forms scale. However the steel loses carbon, producing decarburized steel.
1550F for an hour will certainly cause serious decarb --you don't want that !!
 
Well, I kinda screwed up my RR spike hawk attempt with a failed weld job, so decided to make something where the whole piece was good steel, rather than weld an edge in.
I started with 1 1/8" round Cruforge V, squared it up, split it, drifted it, which didn't go quickly, and drew out the blade for this flat adze. The corners are rounded just a tad so they don't dig, but the edge is flat.
The next one will be curved for scorping out wood.
I liked working with the Cruforge V. It forged out fairly well, even for a beginner like myself. The edge is shaving sharp even after some extensive chopping. Impressive stuff.
Here's a few shots I took.
image.jpg
image.jpg
image.jpg
image.jpg
Finished Adze in next post
 
Finished Adze
View attachment 564376
View attachment 564377
View attachment 564378
View attachment 564379
I normalized the blade a couple times. Then soaked it 1 hour at 1550 before quenching in AAA.
Two tempers @ 400 degrees one hour each and cooled to room temp each time.
Handle is a sweeping taper for control, made from black walnut. Why walnut? It's what I had kicking around the shop!
Any design critique and comments are most welcome.

PS. I don't know why the photos worked in the first post, but are attachments in the second one.
 
I'm understanding this a little better now. I soaked it for an hour because the data sheet doesn't state any soak time, so I did so to be safe. Would 10 minutes have been sufficient?
 
If you don't understand something, the best time to ask is before you do it.

The word you clearly didn't understand is "Equalize". That means to bring the steel up to that temperature step until the whole blade is all equal to the oven temp. That takes a few minutes. Most people set equalize steps at 10 minutes when programming, just to be sure. Five minutes is actually more than enough.

So, the instructions say to pre-het the oven to 1200-1250F and put the blade in. Hold it at that temperature until it is also at 1200-1250F. Next you ramp the oven to 1500-1550F and hold it long enough to assure the entire blade is 1500-1550F. They you remove the blade and quench in oil. After this hardening, you temper for one hour at 400-450F, remove the blade and cool to room temperature ( just run water over it or dunk in a tub of water), and put back for a second hour at 400-450F. Cool off again and it is ready to clean up and finish.

Your adz is fine. You will have to sharpen back the edge a good bit to make sure you are in the good steel, but the main surface having more than the average amount of decarb will not matter on an adz.
 
"....PS. I don't know why the photos worked in the first post, but are attachments in the second one. ..."

You probably clicked "attachment" and not the photo image icon. Try again and see if you can't get it to post.

I am merging this thread with your other one on the adz HT.
 
image.jpgimage.jpgTried and failed to get photos to insert instead of attach. Perhaps it's a limitation of quick reply?

They posted after I removed them from the post. Go figure.
 

Attachments

  • image.jpg
    image.jpg
    57 KB · Views: 15
Last edited:
I do have a forging process question that applies to any drifted handled tool.
When I tried to draw the cheeks down in order to create greater purchase area for the handle, instead of drawing down, they drew longer. I think the drift acted like a fuller. If I want to draw the sides down do I have to do that very early in the drifting process?
 
Your shaping looks good! With an hour soak, I'd worry about massive grain growth. Simplifying things (because that's where I understand them :) ), the coarser the grain, the weaker and more prone to breaking the steel is. If you are concerned enough about it, triple normalize and re-heat treat. You can grind a bit to get past any de-carb that the extended soak caused after normalizing and before hardening if you want.

The drift should act as an internal anvil. If you will use a top and bottom fuller while the drift is in the eye, you should be able to pull the cheeks out wider.

What power hammer is that you're using?
 
Thanks Storm Crow. I had no idea that the longer soak could make the grain coarser. This endeavor to make blades has been one of learning through mistakes, which is just fine with me. Eventually the process will be more intensional and smoother. Anyway I love it!
I will try the upper and lower fuller tip next time.
My hammer is a home made 55lb Kinyon air hammer. Made by a gentleman with a lot more welding talent than myself.
Hits hard, but somewhat difficult to hit softly with.
 
At those temperature the foil is not necessary, and will get in between quenching operations.
just allow for a bit of cleanup after ht or get some PCB protective compound to shield the piece from the athmosphere
Nice tool!!!
 
Grain growth is a factor of time and temperature. Temperature is a far greater driver than time.

(not real numbers, but for example) One hour at 1500F will grow a certain of grain size. 15 minutes at 1650F will grow the same grain size. Five minutes at 1750 would make the same result. It is really above 1650 that the grain starts to grow rapidly. I wouldn't worry about your adz.

In forging, use the drawing peen of the hammer to move steel in the direction you want it to go. Then use the flat face to shape it. For pulling down the cheeks, drift the eye part way, then pull down (draw) the metal on the sides to make the cheeks. Start shaping and smoothing out the cheeks as you enlarge the eye. Use your grinder to shape the final profile of the cheeks.
 
Stacy, i would disagree some.
With a set temperature the grain will reach it's solution % and not grow grains larger for hours (K.Cashen did a comparison soak time up to 5 hours to show the point)...what happens over soak time is that the carbon in solution will spread evenly all over within the grain.
With an higher temperature you'll dissolve more of the alloy keeping the grain boundaries pinned in place, and the grains will enlarge.
The solubility is temperature driven and for every temp you reach a saturation. Once you have reached the saturation point you get a quite stable configuration; for the grain to enlarge, it needs eating more material from the boundaries into solution. If those alloy elements can't be added to the saturate solution, will stay in the boundaries keeping them from moving.

I bet things will move quicker in primitive steels, like before the Al killing process, and i suppose a hypoeutectoid strictly binary iron-carbon steel will exibit a rapid grain growing even at lower austenitizing temperatures.

But for the steels we generally use the only long soak concerns should be about decarburization. Anyway 10-15 minutes is a good soak timing to start with, but it depends on the carbon placement in the microstructure we are austenitizing.
 
Last edited:
Interesting. Good to know about the temp vs. time thing on soaking. I emphasize normalizing to students as cheap insurance, especially given the tendency to overheat and then work cold that many will have on their first projects until they get a feel for things.

Jonathans - Remember, first you get good, then you get fast. :) You might dig around on YouTube for folks building hammers the Brian Brazeal way. I took a class taught by him several years ago, and the fullers are how we spread the cheeks out so wide.
 
And steels with V and W in them will not exhibit grain growth at the austentizing temps we use. The V and W will pin the grain boundaries. Even at 1550°F (which I would not go that high), I wouldn't worry with grain growth on CFV, even with solid soaks. Steels like 1095, which contain nothing except the carbon and iron...grain growth is more of an issue...as there is no alloying to pin those boundaries.
 
Back
Top