- Joined
- Jul 11, 2015
- Messages
- 13
Hey guys,
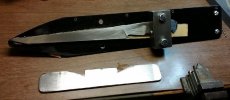
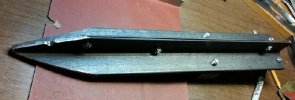
I am in the middle of making my first blade but hit a spot where I felt I could use a little constructive criticism... This is a 4" hunter/outdoors blade made of O1 that I'm making entirely with hand tools (except an electric drill). I JUST finished filing the bevels using a jig similar to what Aaron Gough uses to get his FFG bevels. I'm aware that I have a lot of finish sanding to do but this is straight off the file. The issues I am having are:
1) My plunge line isn't super crisp. I'm not sure if this is something that I should keep attacking with the file on the jig or if it's just a product of doing it by hand and I should move on to sanding. Will sanding help these clean up at all?
2) I am having a hard time determining if my pin holes are even. In the even that they aren't, do i just move them and re-drill?
Any other feedback or criticism is very welcomed, like I said this is my very first knife and I want to do a good job.
Thanks in advance!
http://imgur.com/u4ZqQxk
http://imgur.com/of2k086


")