First knife complete

Joined
Nov 23, 2008
Messages
437
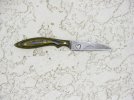
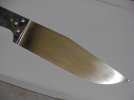
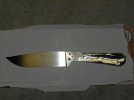
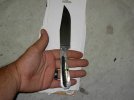
Well here it is folks. Mini Parer custom fit to my wifes hand.
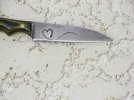
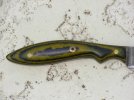
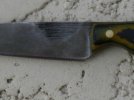
specs. O1 tool steel, 6 1/4" OAL, 2 3/4" cutting edge, brass pins front and back, mosaic center, home made black and gold felt my-carta scales, ferric chloride patina, and wispy heart electro etch.

Yes, This is one ugly knife that appears to have been dragged behind my truck for a few miles but think with some use and natural patina added it'll be the little knife with big character. Wasn't gonna finish it after taking the bite out of the side of the blade but figured it would continue being a learning experience and it definatly has been ! Got first use from the KMG, first go at heat treating, first use of home made handle material, and first use of my home built electro-etch machine on this blade :D

Here goes the UGLY :barf::barf: self assesment
Chewed out side of blade. Didn't put enough taper in the tang. Geometry sucks (edge not thin enough). Needed a bit more of a ricasso to keep finger away from the sharp stuff. Tiny dip in the taper right at the front of the scale. Used a piece of contact paper to make the stencil for the etch so it's not great (Got to use my etcher on a blade though). Put the heart etch too low on the blade. Got a flat spot on one scale with the grinder so I had to match the other side to it.
Overall, I love it !!:D It's Ugly in a good way.
I'm thinking about tweaking the design a little making it with more of an average sized handle with a bit more finger safety keeping the patina and heart etch ( may tweak that also) and call it the "Signifigant Other". What do you guys think ? How about girly colored handle materials ? Pink and Purple or baby blue. How about light green and grey?

Aside from poor rookie-azzed execution of the grinding and the aforementioned mistakes tell me what you think of the design, concept as whole (intended as a gift for your lady), use of finish treatment,etc.
How or what should I change to make it more to YOUR individual liking.

Be brutally honest with me folks, I can take it.

Handle and bolster material is comming tomorrow for #2. The design for #3 is set with a few details yet to be decided.

Thanks everyone for you previous help answering questions and your comments and opinions on my first knife. The next one is gonna be much much better quality fit and finish, I promise !
 

Attachments

  • a 037.jpg
    a 037.jpg
    79 KB · Views: 203
  • a 038.jpg
    a 038.jpg
    72.5 KB · Views: 200
  • a 039.jpg
    a 039.jpg
    71.1 KB · Views: 126
  • a 042.jpg
    a 042.jpg
    40.2 KB · Views: 136
overall it is nice. I like the lines. the handle looks like it would comfortable especially for a woman.

Now let see the second one!
 
What you said seems about right, but I just wanted to say that I don't care for the colors in the handle. It seems too green in the gold, and I don't think that the greenish color goes well with the mosaic pin. Just my opinion though.
 
Here is my thoughts: Overall the profile of this paring knife looks comfortable to use, I like larger handles than blades on paring type knives, my personal feeling is this improves the control of the movement when cutting freehand a fruit or a vegetable.
You know the flaws better than me and you already explained them, although I don't agree with you, the heart is placed just fine for me, it looks real cool.
You forgot to mention, butt and front pins would be placed at the same distance from edges of the scales. The Blade would be more performer if it was ground more thinly.

My last comment, what the heck, it is a cool first knife and it will be much more valuable if you give it to your dearest. After all, you are aware of your mistakes and you are capable of learning as far as I see. No knife can be perfect enough, but if it is done from the heart, with passion and love it is almost perfect, what is lacking is the experience but it can be gained in time and it is not as valuable as what you have there. I loved this knife, I think your approach to your work is great...
 
Well you know better than we what's wrong. 1st knife? looks better than my 20th!!!

One thing to consider as far as design for future parers, a paring knife is often used upside down.

Now make your 2nd and 3rd and 100th :)
 
I told you it would be fine brother.You have as many skills and as much heart as I have seen in a new maker and as I told you I expect you to go far.Just always remember "it's all in the details".Also I made you a drilling fixture, to keep those fingers safe.Take care and looking forward to see your next one.Dave:):thumbup:


http://dcknivesandleather.blademakers.com/
 
Very Kewl First Knife, and even cooler that you learned from it and will pay closer attention to detail on the next one. :D

Jason
 
Nice first run Josh! If your target users are women, I would try to show it to as many as you can and ask them what they think about the handle comfort, the heart etch, colors...etc. If you're wife is unlikely to tell you what she really thinks (mine probably would have no problem!), try to find some women who will give you a more honest appraisal.

Based upon what I've seen of your next knives, you seem to be improving at light speed. Keep up the great work!
 
Foxbat -The dimensions of this knife are a bit odd for me, or most people for that matter. My wife is 5 ft and I think her hands are small for her size. I was shooting for an ergonomic handle with nice lines. I think she'll like it.

Go Mike- the yellow kinda gets washed out where it is thinned out and you can see the black comming through. I even used double layers of yellow trying to prevent the see through effect, not thinkinking about the shape of the hanle thinning the yellow layers around the edges. Would've been worse with single yellow though. My wife is from a bit south of Pittsburgh and is a Steelers fanatic so that was the motivation for the color choice. Thanks for pointing this out .
Galadduin- Thanks for your comments, especially about the pins. I think in my exitement I may have drilled the scales with the back pin in the wrong hole. LOL. I like a look of symetry (spelling?) with evenly spaced pins and either messed up in layout or pin hole choice. I drilled a bunch of hole to reduce weight so I could've got the wrong hole. I think from now on any weight reduction holes will be much larger than the pin holes. Thanks again.

Fred- Agreed. She's a fantastic woman and I'm lucky to have her. The first knife just had to be hers. When she first saw it she said "It looks dirty, at least I won't have to worry about messing it up" LOL

Will- Thanks for the comment:D It's good to hear things like that from experienced makers, Makes me feel like I'm on the right track ! Much to my dismay she does the majority of her vegetable prep upside down cutting right into her thumb. I got her other parer blazin sharp and she uses it everyday and hasn't cut herself once. I actually had this in mind when sloping the top rear of the tang down a bit. Cupping the knife upside down this helps get the edge a little closer to her short thumb

Dave- I turned the drill press down to 300 RPM and drilled the tang for bolster pins. Used wd-40 as coolant and took it easy no problem. Clamped tang directly to the table this time:D. Curly maple and brass from Sheffield Supply should arrive tomorrow and it's on. I took your advice and went to the hobby shop and stocked up on some brass pins copper tubing and piece of copper sheet for project #3. I've been working on some practice wire inlay also. Thats Awesome about the drilling fixture !!!. I'll be shopping for a cross slide vise a.s.a.p . Thanks alot for everything you've done for me already. I'm gonna make proud with #2 and show ya your time working with me isn't wasted. I'll be looking forward to our next get together.

Jason- Glad you like the knife. I'm trying to keep focused on everything I'm doing both good and bad so I'll not only learn from my mistakes but also learn what works for me. I really feel like I'm in a good position to improve my skills fairly quickly having not just folks like yall here but also having Dave (DCknives) I can question, consult, or visit in person to get help with any problems.


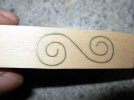
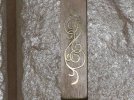
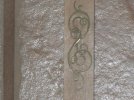
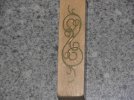
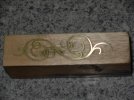
To everyone- Here's a couple teaser pics of my #2 knife and practice wire inlay. I worked some more on the wire tonight but gotta upload some pics still
This knife is a long clip point with a coffin-esque handle. Its 8 1/2 overall with 4 1/4 cutting edge and currently hand rubbed to 400 grit. It's getting brass bolsters and curly maple with wire inlay. as always comments are welcomed and appreciated.
 

Attachments

  • a 027.jpg
    a 027.jpg
    31.1 KB · Views: 43
  • a 029.jpg
    a 029.jpg
    39.5 KB · Views: 53
  • a 032.jpg
    a 032.jpg
    50.4 KB · Views: 53
  • a 019.jpg
    a 019.jpg
    31.6 KB · Views: 41
I think you need a tang stretcher.... That tang looks about 1/2" short of being really great.

Pretty neat knife, the hand rubbing looks great. I think you brought the plunges in too deep at the spine, does the spine "cut in" where the plunges meet it? I think that a coffin handle looks better with a lot of little pins rather than the "normal" 2 or 3.

Just my thoughts but heck looks like you're making a better knife than I do. :thumbup:
 
Will,
I think your right about the tang. I've got about 200 or so designs sketched out on paper but most of them are not drawn life size. I've got 4 or 5 designs with either similar blade or similar handle shape but they were intended to be more like 5" to 6" blade length. When proportioning the blade length down I also proportioned the tang down to match the profile of the sketch. . Oops. I'll pay more attention to that detail next time I go from mini sketch to life size. This knife wont be gifted, I'm keepin it for myself. I shortened the blade thinking if it ended up in the trash less steel wasted and I'm not a hard core survivalist more like weekend tent camper so I wanted a medium size blade big enough to get by with for heavier chores but more suited to general outdoors tasks. Kind like what peaople would call a bushcrafter but with hell of alot more style. Thats why I'm not too worried about a bit less handle.
You are correct also. Bit into the spine just a tiny bit grinding after heat treat but it became even deeper after hand rubbing the finish. It's comming along so nicely otherwise I just don't have the balls to take the tang back to the grinder. This blade looks great but in-experience still shows. The angle of the plunges are a tough off. Not real bad but off nevertheless. I Also planned to have more ricasso but kept pushing the plunges back trying to get them evened out. I was doing great with my left hand and not so much with right and I'm right handed. I just wasn't FEELING right and realized that I was holding the tang entirely different with my right hand... Duh. I also had my blade just about perfectly matched up several times prior to heat treat and kept getting SKIDDING of the blade on the belt resulting in a nice gouge somewhere on the blade and creating the need to keep grinding to remove the gouges. I figured out after quite some time that my push stick was too long and connecting with the belt once in awhile causing the skidding. I was also concentrating on arms to the side, body side to side motion but was digging into the edges of the belt once in awhile also. Realized that I was standing with one foot forward of the other f-ing up the smooth side to side.
So this blade is looking good but the important thing is I'm figuring out the mechanics of grinding without screwing things up so often. Ive Learned alot in a short time and feel that my next blade will be much improved over the first two. Which is the goal . Thanks again for the compliments - Josh
 
Last edited:
If you know where to go on the next one it really will help you to do better as far as you are concerned and that will really help to move you forward. Expect a few steps backward (?) on the next ones. Give yourself a chance . It will happen for you . Perhaps it may take a bit longer than you expected, but it will happen. Frank
 
Here is an updated pic. I did bugger up the wire in the middle of the main scroll but pretty sure I know why. This is NOT a well planned and drawn out pattern. I just quickly scribbled it on to get some practice before the main event. Also Keesler talked about using side cutters to cut the wire but this cuts the end to a point giving crappy fit where there are crossovers so I'm thinking I may flaqtten the end of the wire in the grinder after cutting to get a better fit. And I didn't get enough taper on some of the scrolls that split off the side of the main scroll. I feel like it looks pretty good for a first try and was a great learning experience. -Josh
 

Attachments

  • a 045.jpg
    a 045.jpg
    103.5 KB · Views: 18
  • a 046.jpg
    a 046.jpg
    90.1 KB · Views: 16
  • a 048.jpg
    a 048.jpg
    78.9 KB · Views: 21
  • a 049.jpg
    a 049.jpg
    58.5 KB · Views: 23
Frank,
I'm not beating myself up over anything just trying to be my own worst critic. If anything I'm doing better at the start than I ever expected. I tend to have an analytical mind and replay things in my head after the fact like a session of blade grinding. Re-hashing the things I did help me figure out whats right wrong or indifferent with my process. Thanks for your input it's a great asset in my self improvement process
-Josh
 
Here is my thoughts: Overall the profile of this paring knife looks comfortable to use, I like larger handles than blades on paring type knives, my personal feeling is this improves the control of the movement when cutting freehand a fruit or a vegetable.
You know the flaws better than me and you already explained them, although I don't agree with you, the heart is placed just fine for me, it looks real cool.
You forgot to mention, butt and front pins would be placed at the same distance from edges of the scales. The Blade would be more performer if it was ground more thinly.

My last comment, what the heck, it is a cool first knife and it will be much more valuable if you give it to your dearest. After all, you are aware of your mistakes and you are capable of learning as far as I see. No knife can be perfect enough, but if it is done from the heart, with passion and love it is almost perfect, what is lacking is the experience but it can be gained in time and it is not as valuable as what you have there. I loved this knife, I think your approach to your work is great...

I couldn't have said it better myself. Josh, you have a great attitude and obviously the eye and talent for this work. Not to mention the huevos to try things most people wait much longer to do, i.e. tapered tang and wire inlay. Keep it up!
 
Josh, I think it looks great. As some have said above, its way better than my first.

If I had one criticism to make its that maybe you're putting the cart before the horse a bit. Tapering tangs makes the process a bit more complicated. Fitting scales and practicing grinds is more important at this point I think. Though, it looks like you've got the grinding process of tapering the tangs down pat.

Really, I can't wait to see more of your work. I like the lines of the knife, and its curvey, and not all blocky and straight. And your handle is nice looking too.

More knives. Keep making them. I made my 200th knife recently. I'm finally starting to develop IMO.

What helped me a lot was reworking knives I had already finished. You'll see flaws in the coming days that you didn't see before, and you can learn how to fix them by reworking knives you are planning to keep. Your thick edge, for example. That can be reground right now today, and you can learn how to thin them up. Use a caliper.

Or, not. Your first knife needs to stay around. It teaches you a lot about your current knives.
 
Thanks for your comments guys ! I've always had the mindset that I can do do just about anything with some effort on my part and a good teacher. I've also always thought that OTJ (On The Job Training) is one of the best teachers there are so might as well dive in head first and get my hands dirty.

I figure that if I start making knives with the features I want , tapered tang, embellishment, high end sheaths etc. the learning curve may be a bit steep in the beginning but I'll come out way ahead in the long run.
 
Back
Top