first knife of mine-WIP

Joined
Jun 20, 2009
Messages
364
Here is a WIP thread I am starting With great thanks to Nathan and Bill. I have received alot of great stuff from Nathan including: 0-1 steel, black linen micarta and pin stock. And I have gotten instruction from Bill Burke on how to grind a knife into a great mellow convex edge.
I learned on Bill's Burr King, which is incredible. I need to get my own 2x72. I can definitely tell all the nubies that if you can afford it, buy or make a 2x72 grinder. the 2x42 craftsman does not work anywhere as easily as the 2x72 Burr King.

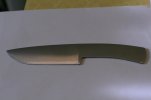
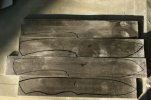
So here goes, I made four designs: i am going to use #3 in the first pic. ITs a design of a knife i already have. It is a great design but the handle is too short and the blade steel is lacking .

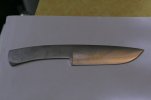
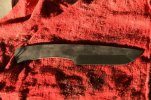
The second pic is of course the profile pic. I modified the handle a little bit after handling the blade blank to accommodate my blocky hands and stumpy fingers.

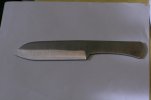
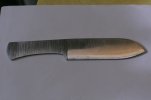
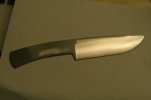
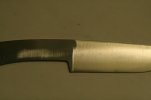
The third and fourth pics are of my first attempt at grinding with my temperamental 2x42 craftsman grinder that is way too fast. If you look close there is a small dark spot at the bottom of the blade to the left of the middle at the edge. I think that is caused by the grinder speed being too fast and difficult to handle. The spot is not an overheat spot but where too much material is taken off. During my practicing on so flat bar steel from Lowes, I noticed the same problem at the exact same spot. The edge may be too thin in spots(.020) for the pre heat treat but I think I can just shave a little off the edge. I haven't quite got the grind technique down on my 2x42. Like I sad, it is very difficult with that machine. and as you can tell by the pics that the grind is very uneven and needs work. I am going to have to get together with Bill Burke again soon. Ide like to finish this knife before the 23rd of December because I would like to show my family when the arrive for the holidays...My fingers will be crossed.

Please let me know what you think. and and all opnions/advise welcome.

Thank You Nathan and Bill.. without you two I would be spinning around in circles chasing my tail.
 

Attachments

  • 052.jpg
    052.jpg
    69 KB · Views: 110
  • 053.jpg
    053.jpg
    99.9 KB · Views: 100
  • 056.jpg
    056.jpg
    22.1 KB · Views: 160
  • 057.jpg
    057.jpg
    24.4 KB · Views: 130
Last edited:
Nice work on your first knife! Keep us posted with the progress!

I'm too chicken to show pics of anything I've done so far, I love seein' pics from others!
 
Nice work on your first knife! Keep us posted with the progress!

I'm too chicken to show pics of anything I've done so far, I love seein' pics from others!

It's good to share most people here will have nothing but go suggestions for you, and it will help you grow as a maker
 
Andrew, that's looking really good so far. That dark spot on the edge is the beginning of what we call a 2-inch line. On 2x42" or 2x72", that's a common problem to have. What happens is that as you are grinding and you move the edge of the belt into the plunge, there is a tendancy to pause there or slow down and you are trying to preserve your plunge. That's good for the plunge, but you tend to develop a groove at the other edge of the belt, 2 inches away from the plunge.

There are several methods to overcome this that you'll earn as you gain experience grinding. One is to avoid pausing too long in one area. The other that is more useful as your skill increases is to actually rock the knife on the belt a bit so that you lift off of the far edge of the belt when you're working the plunge area. This takes practice, as it's easy to start digging in at the plunge and create a gouge there when you rock the blade. You really have to have control of what you're doing. My suggestion is to try to avoid pausing for now and as you get more confident, you can try just slightly rocking the blade as suggested above. I think .02" at the edge will still be fine for heat treating, especially on a convexed bevel as there is more meat directly behind the edge. You can do what you suggested and just take a smidge off of the entire bottome edge of the knife to even things out. I usually shoot for between .03" and .02" pre-heat treat.

Those are some good looking designs overall, and it's a great job so far on a first ever knife! I look forward to seeing this progress. Remember, that since this is your first blade, you are going to make mistakes and kick yourself thinking that you've ruined the entire thing. However, almost every mistake has a remedy, so when you find yourself making dumb mistakes or getting flustered, put the knife down and go do something else for a bit. Come back to it with a clear head and work slowly, and you'll figure things out. Feel free to ask questions here as they come up, and take advantage of the opportunity you have working with Bill.

Glad we could help out, and keep the progress updates coming.

--nathan

thankyou much Nathan,
I do pause to try and better the plunge line... ill have to try and correct the problem after heat treat. I need to finish the blade near the spine ... kind of get it more even and then drill my holes for the handle material. I can not wait to use the black linen micarta! I think ill have to shape by hand instead of with the 2x42. the first knife I built I used canvas micarta and it showed burning. dies the linen show the same problems?

Thanks
 
They should turn out good, be sure to drill your hole for pins, bolts or tube before HT its pretty tough after.

Are you making a 45 degree bevel on your edge before you start grinding, this way you dont have to have the perfect angle to protect your edge from overgrinding.

If you use a sharp belt and light pressure you should not have burning on micarta. I keep mine wet to limit dust even though I wear a mask and have a dust collection system. The micarta dust is a real irritant. Its pretty easy to hand sand the micarta as well.
 
I do actually try to make a more extrieme angle my forst grind to kind of establish a center line on the blade. and actually havent needed to scribe a center line in the first 4 ive grinded.( 2 0-1 steel and 2 nicholsen).

As far as the micarta goes, ill try to keep it wet when im doing the inital shaping with a finer grit to see if that helps.

I havent had time to do any more on the blade but hope to do the finishing work before the heat treat. I will post more pics soon.

They should turn out good, be sure to drill your hole for pins, bolts or tube before HT its pretty tough after.

Are you making a 45 degree bevel on your edge before you start grinding, this way you dont have to have the perfect angle to protect your edge from overgrinding.

If you use a sharp belt and light pressure you should not have burning on micarta. I keep mine wet to limit dust even though I wear a mask and have a dust collection system. The micarta dust is a real irritant. Its pretty easy to hand sand the micarta as well.
 
Andrew, if you're able, work the micarta on the slack portion of the belt to avoid too much burning. Let me show you a few old pics to give you an idea how I shape handles.

I start by thinning the front of the scale a bit using the platen:

IMG_6543.jpg


To get something along the lines of this:

IMG_6544.jpg


Then I start by thinning the top and bottom of the scales like so:

IMG_6541.jpg


To get something like this:

IMG_6547.jpg


That's all I do on the platen. Then I switch to a slack belt and blend the profile to a smooth organic curve:

IMG_6549.jpg


IMG_6556.jpg


The finished result typically looks like this with black linen micarta:

IMG_6805m.jpg


Or like this depending on your micarta. I finish up to 400 grit on the belt and hand sand at 600 followed by a light buff with white compound.

ChristmasLBK-Sherman003-1.jpg


Sorry the pics have a variety of handle scales from several different knives a good while back.

Keep in mind there is no right and wrong when it comes to how you shape the handle. This is just how I do my knives. There's a million ways to skin that cat, and you can mix a variety of methods to get what works best for you and your style.

--nathan
 
Last edited:
heres a small update: I finished the grinding and prepped for heat treat on the blade. I am finding out the the platen on my 2x42 is completely crooked. I found that out by trying to give the blade i think what Bill Burke called "distal tapering", which, as a matter of fact, i do not know even know what is. Ill have to look that up. but anyways, If you can see in the new pics below that the lower edge of the handle right at the end is rounded a bit. Which I did trying to give it distal taper. I tried to fix it by flattening it by just grinding it across the belt it wirked a little bit but in going to have to ask Bill if I can use his burr king to fix it all the way. If I am going to use my 2x42 for grinding my blades I am going to have to get a ceramic platen to flatten the crappy craftsman platen out...well enough babble... Heres the pics

Oh yeah... Im drilling the holes for the scales when it gets warmer here.. It's -5 here now.And I work in a car port. Ill have to get pics of my space up here to show you guys.

Oh yeah.. theres a peek at the next project that im making for my dad for his sailboat. Its a knife design that I kind of copied out of a sailing magazine.
 

Attachments

  • knife #1 005.jpg
    knife #1 005.jpg
    21 KB · Views: 6
  • knife #1 006.jpg
    knife #1 006.jpg
    23.5 KB · Views: 6
  • knife #1 008.jpg
    knife #1 008.jpg
    23.6 KB · Views: 7
  • knife #1 010.jpg
    knife #1 010.jpg
    25.7 KB · Views: 8
Thanks for the tips Nathan, I need to try the slack portion to help cut down on the burning. And I think I will try to get a small in-line potentiometer to slow it down a tad for handle materials. I know its bad for the grinder but i think it wont hurt to try.

Andy


Andrew, if you're able, work the micarta on the slack portion of the belt to avoid too much burning. Let me show you a few old pics to give you an idea how I shape handles.

I start by thinning the front of the scale a bit using the platen:

IMG_6543.jpg


To get something along the lines of this:

IMG_6544.jpg


Then I start by thinning the top and bottom of the scales like so:

IMG_6541.jpg


To get something like this:

IMG_6547.jpg


That's all I do on the platen. Then I switch to a slack belt and blend the profile to a smooth organic curve:

IMG_6549.jpg


IMG_6556.jpg


The finished result typically looks like this with black linen micarta:

IMG_6805m.jpg


Or like this depending on your micarta. I finish up to 400 grit on the belt and hand sand at 600 followed by a light buff with white compound.

ChristmasLBK-Sherman003-1.jpg


Sorry the pics have a variety of handle scales from several different knives a good while back.

Keep in mind there is no right and wrong when it comes to how you shape the handle. This is just how I do my knives. There's a million ways to skin that cat, and you can mix a variety of methods to get what works best for you and your style.

--nathan

WOW... I need to start typing on the bottom when I quote...
 
Back
Top