- Joined
- Aug 4, 2008
- Messages
- 88
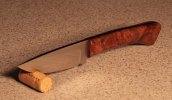
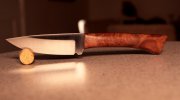
Calling it my first knife is a little bit of a stretch, I've mucked around on the grinder before and put together a couple of kit knives. But this is the first knife I've finished all the way from grinding the blade, heat treating it, and adding a handle.
I need to give it an edge though... this scares the hell out of me. I'll do some searching and find out how to go about it. I would hate to screw it up now.
This whole knife was actually just a rush experiment - something to fill the time while the glue was drying on the main knife I'm working on. I wanted to see if the burl I had laying around was any good, and just wanted to try a few other things out.
I have a bunch of knife pics on my hard drive, I found one that I liked and drew inspiration from it. No idea who made the original and apologies if this is your design.
This is 3/16" O1 stock, all grinding done post heat-treat. I wanted to see how difficult/easy it was to grind small blades entirely after HT. Blade length 4.5", Overall length just shy of 10".
Far from perfect, but it was a good learning experience and I thought It worth finishing up. Hopefully I'll have some better work to show when I get around to finishing the other one.
Thanks for all the help and advice getting me to this point!
Attachments
Last edited:

