first time firing forge (pics)

Joined
Sep 29, 2005
Messages
580
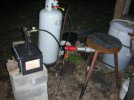
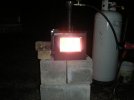
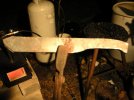
Here's the first time I've fired my forge. I'm going to downsize my burner tube to a 1" from 1.5 after some advice from AC Richards I just haven't done it yet. . I also got rid of the leaf blower and ended up getting a shaded pole blower. I have some endcaps I'm insulating right now to close off the ends and leave a small opening in one end. As always advice or comments welcome. Thanks

forgefire3.jpg

forgefire2.jpg

forgefire1.jpg
 
I started with a 10" diameter pipe and 16" long I think and put in 2" of Kawool with a 1/4" of satanite on top of that and I'm going to put ITC on top of that.
The way I am doing my end pieces I will lose 2" more inches on each end. Now for the short answer it is about 5.5" in diameter by 12" long.
 
Not a clue because I've never been around a forge. I have a batch of knives I"m finishing up and when I do I'll order a thermocouple. If I order it now I"ll play with the forge and won't get nuttin done. I did cap off the ends an stuck a file in it one day for fun and it melted in two.
 
Please tell me how youmade the burner. I made a forge much like yours but was not able to get the heat you are getting. I appears that most of the fuel is burning out of the forge. I of course am not using a forced air design.

Thanks,
 
I used Indian George's tutorial to make the burner. I used a 1/4" nipple that was placed in the 1.5" elbow. I drilled a hole in the elbow to fit it in then welded it back up. From there I put a cap on the 1/4" with a 3/32" hole drill in it. Mine is a forced air burner and now has caps on both ends to hold the heat in. If I get time tonight I'll take pictures of my burner since I cannot explain it very well.
 
I'm curious? When you say "caps on both ends" ,exactly what are you referring to? A photo would help.
Stacy
 
I meant I caped off the ends of the forge. I closed them off with pieces of metal I cut from plate and insulated with 2" inswool, satanite, and ITC. I could have used fire bricks, but I had enough insulation and clay left over I made pieces that fit over each end instead of spending more money. With them wired the way they are I can easily pull the ends off to redo the interior or patch it whenever I need to. Whenever I get around a welder again I'll weld a latch of some sort instead of the wire holding them in.

frontforge.jpg

forgeback.jpg


forgeside.jpg


Also are some pics of the blower and burner. I couldn't get the pipes apart to show you the cap on the other end of the 1/4" nipple and 3/32" hole drilled in the end, but you get the idea.
burner.jpg


blower.jpg
 
Gotcha.
I was not sure if you were saying you sealed both ends off. With one end closed and one with a window ( like you did) , the forge will operate much more efficiently.
Stacy
 
Received a new forge from in trade from a customer. Gave it a test spin last night! Took some 5160 that was 11 inches by 1/2 by 1 1/4 and this was the result. Keep in mind up to this time my choice was coal or a one brick. This is a huge step up from the one brick! :D
 

Attachments

  • kniveS 003.jpg
    kniveS 003.jpg
    52.6 KB · Views: 43
  • kniveS 005.jpg
    kniveS 005.jpg
    36.4 KB · Views: 40
  • kniveS 008.jpg
    kniveS 008.jpg
    58.1 KB · Views: 48
Looking good. Do you have to run both burners or can you get by with just the one? Lets see some pics of the knife once it's done.
 
both burners are connected to one valve, so no option as far as one or two burners. I do have a one brick forge I have expanded to 1 1/2 bricks, but they are the hard firebricks. I have forged with it for 1 1/2 years. After seeing the posts about soft bricks, I am now wanting to build a small brick forge out of the softer bricks. Can you have too many forges?
 
Awesome picture. Shows the "swirl" of the flame going around the forge.
 
Charlieridge I tried explaining to my wife forges were like her shoes you can't have too many and she doesn't see it my way.
 
Back
Top