Floating pin vs. tightening pin on Folders

Joined
Nov 22, 2010
Messages
21
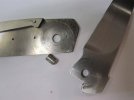
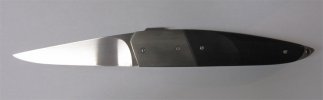
Hi There everyone - I'm new here and relatively new to knifemaking too, especially folders. I'm currently working on my second folder. As a result of being shown by someone who uses this method, I've used a floating pin (basically a piece of 5mm stainless shafting) for the pivot pin and I'm having difficulty getting the blade to run as firmly along its travel as I would like. This is no doubt as a result of the fact that this method does not allow you to remove ANY play because the pin cannot tighten + the fact that the spacer/stop pin have to be EXACTLY the same thickness as the blade (I've milled the titanium to make washers). Are there any folks out there who have tried this method as well as a screw/threaded tightenable pin and can give feedback? Will post photo as soon as I'm done working on it.

thanks,
James
 
firstly im new to making as well, but it is my understanding that using a pivot pin as you describe is more common on slip joints using brass that is peened to adjust pressure. You may want to try a detent ball that rides on the tang to give it a bit of drag.


-Xander
 
Hi Xander,

It is a liner lock with a detent ball, which as you put it does add drag. In my understanding the detent ball shouldn't really be relied upon to correct fit etc.

The problem I really have with the floating pin method (though I have seen it done brilliantly on others knives) is that there is no allowance for wear. i.e should the relieved titanium integral washer, gall against the blade - what then?
 
nope. no teflon or nylatron or anything else for that matter. The washers are integral i.e. made by milling out a recess around the the pivot hole on either liner.
 
zaph1 - I use a special oil mixture, but that is not the point. The question is referring to a floating pin vs. a tightenable pin and the differences in play. I'm aware that any method will need some sort of washer and or lubricant.
 
It sounds like you are using a pin kind of like a slip joint. If it's not threaded, then what, is it peened? I'm sure it can be done pretty well, but to me it seems like that would present some problems. I take apart and re-assemble a folder many times while I'm getting the lock right, and if it needs maintenance or repair later, it's as easy as taking out a few torx screws. I'd go with a more standard pivot, like a sexbolt type. Alpha knife supply has some good ones.
 
I understand exactly what your talking about....I use "floating" stop pins in all of my liner lock folders. My method is to place the stop pin through the blade, and mill out the travel slots in the liners. I use a 3/32" harden dowel for the stop pin. I mill the liners with a 7/64" end mill to provide clearance. The stop pin need to be a couple thousandths shorter than the overall thickness of the assembled liners to prevent the pin from rubbing on the bolsters or handle material when everything is assembled. If you're doing it the opposite (stop pin is stationary in the liner and the blade is slotted), then the pin does need to be exactly the same length as the assembled liners are wide

I've tried doing what you mentioned with milling the liners to create "washers"...this has two issues....

1. It's VERY difficult to get it just right, so that everything works well when the folder is assembled. (it works well with slipjoints, but not with liner locks.)
2. IF you can get the final assembly/adjustment right, due to the blade contacting the Ti during it's travel (opening/closing), very often you will get some galling on the Ti...generally in the first few days after assembly....that will make the action terrible.

After experimenting with the method you described, I reverted to bronze bushings, and bronze washers on all my liner locks.....the Ti to steel contact and the overall difficulty of getting it "just right" is enough to drive a man to drink! :)
 
Last edited:
What is keeping your knife from flexing, if you are using a floating pivot pin?

Spreading open I guess I should say?

If I understand you correctly, you have nothing up front maintaining your spacing?
 
I find the explanation kind of hard to understand. If the integral "washers" have been made by milling a recess in the liners around the pivot, how is that cavity anything resembling a washer unless you do something like press a bronze bushing into it?

I could see how it would be in integral sort of washer if the TI on the insides of the liner was milled down uniformly over the whole liner surface, leaving a raised area around the pivot that the blade would contact when pivoting, but that seems like a crazy way to do things.

Ed, I get the stop pin thing, but I think he's talking about the pivot pin... at least that's how I understand what he said.

???
 
You may be right Salem! Looking back at the initial post, I might have assumed some things...that might not be right.

This is one of those instances where a pic would really help! :)
 
Hi guys,

sorry for any confusion as a result of my bad explanation. Ed, I get what you are referring to but Salem is right. I'm talking more about the pivot pin. The problems you have listed with the milling of the washers ARE enough to drive a man to drink *sips beer.

Brian - what you have just pointed out is one of my main problems with this method. It is really lacking in overall strength in my opinion as a result of not having anything to stop the liners from "spreading open".

Salem. The second option you have mentioned is what I do - sort of. I don't mill ALL over the liner.

Have taken a couple of pretty ugly photos for you guys. But hey its after 11pm in South Africa and I'm tired:yawn:
 

Attachments

  • Blade,pivot,liner.jpg
    Blade,pivot,liner.jpg
    47.9 KB · Views: 69
  • folder.jpg
    folder.jpg
    11.6 KB · Views: 59
The lines remind me a bit of a Jurgen Steinau... I'm kind of scratching my head over the design somewhat, I can see however that you have some grinding, milling, and hand sanding skill.
 
It is possible to make fine adjustments to the length of your pin by lapping in against sandpaper on a surface plate while holding it square by running it in a hole in a block. You can lap off a few thou in a hurry if the pin isn't hardened. If the pin is hardened you can do a variation of this on your knife grinder.
 
Salem - thanks! I like Jurgens Knives. Lemme know what about the design has you scratchin - I'm keen for feedback where I can get it.

Thanks for the compliments. In terms of milling, I do everything on an old emco unimat with it's little milling head. Tricky to get it right since everything on there is about one tenth of the size I would like :)

Nathan - length of the pin is immaterial. It just rests there, the bolsters stop it from falling out. It isn't being clamped or anything and doesn't effect the fit at all.
 
It boils down to you must have something keeping the knife from spreading at the pivot.

A typical pivot with a screw, a peened pin, etc...

Your liner is pushing on the blade, and spreading the knife open, with nothing to counter it.
 
From your pictures, it looks like the holes in the blade and liners are not precision surfaces, and neither is your pin. ?
 
James, I was just scratching my head because I didn't get how it worked. I see now that what kind of looks like the lock bar in the first pic is actually the spacer/stop on the spine. And I get that the pivot is kept by the bolsters, I hadn't seen it done this way before. So it seems that you have not yet cut the lock, or that it will be a slip joint? It seems like Brian is right on with the need to fasten the liners together in the front somehow. Just a thought, but maybe if you put a threaded stop pin in, like a sebenza? That would hold the liners together up front, your stop pin would still have to be exact length.

Just my 0.02, I've not yet made a lot of folders either. Keep up the good work.
 
Thanks for the feedback guys - you are right. I want to have the pin hidden behind the bolsters though. Do you know of any such screw type pivots which are low enough in profile to be hidden behind the bolsters?

Joe-bob - not sure what you mean, but they're about as precise as I can get em with my current tools and knowhow.

Salem - It is a liner lock - lock is on opposite liner not shown in the picture.

thanks again guys. Getting new ideas for the next one every day! :)
 
Back
Top