Forged W2 Tanto Work In Progress

Daniel Fairly Knives

Full Time Knifemaker
Moderator
Knifemaker / Craftsman / Service Provider
Joined
Jan 9, 2011
Messages
16,486
I started up a somewhat traditional style Japanese Tanto yesterday, check it out!

This one is being made from a piece of Aldo's W2 steel. I started with a bar about .33" thick and 8" long. It is now about a foot long and roughly 3/16" at the thickest. The forging goes to about .125" along the bottom edge area with lots of distal taper and a tapered tang.

If heat treat goes well I'm going to do a Tsuba (Guard), Tsuka Maki (Cord Wrap) and most likely some fittings... Habaki (fitting in front of guard), Kashira (pommel cap) and possibly a Fuchi (ring behind Tsuba).

This is more of an interactive learning process thread... not a how to. it's how i'm doing it! :D

Here's the start, please feel free to comment, help out, etc! :) This is only my second forged knife and my first attempt at anything like this so I'd really appreciate the comments and help!


Forged! That is my current anvil setup, I have a crowned and flat face!


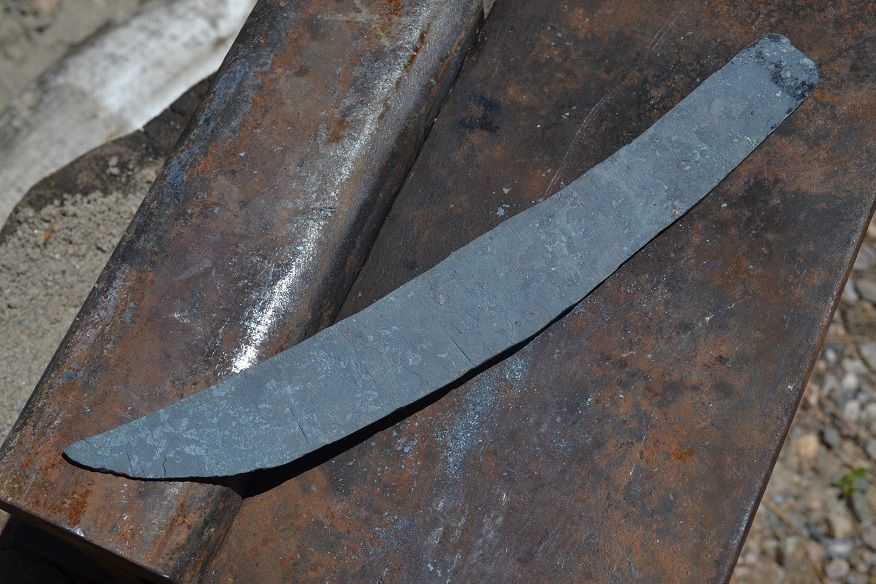
I'm really happy with the distal taper and tapered tang. This is my second forged knife. Spine up view


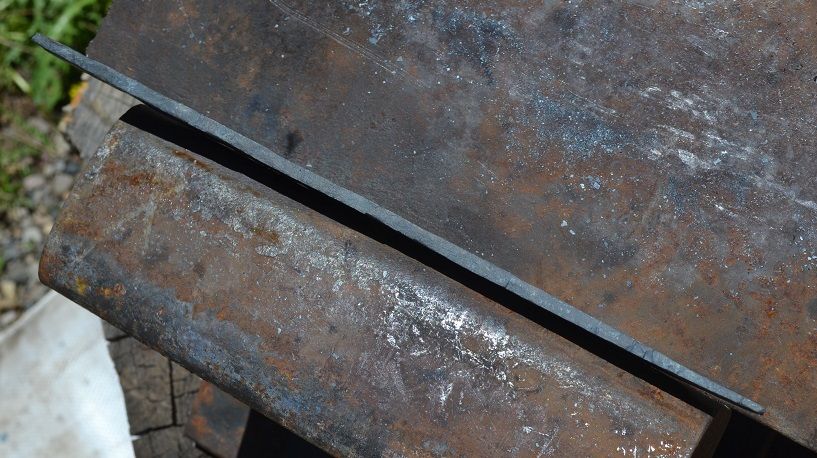
Edge up - It's pretty even besides some flare at the tip that I easily filed out.


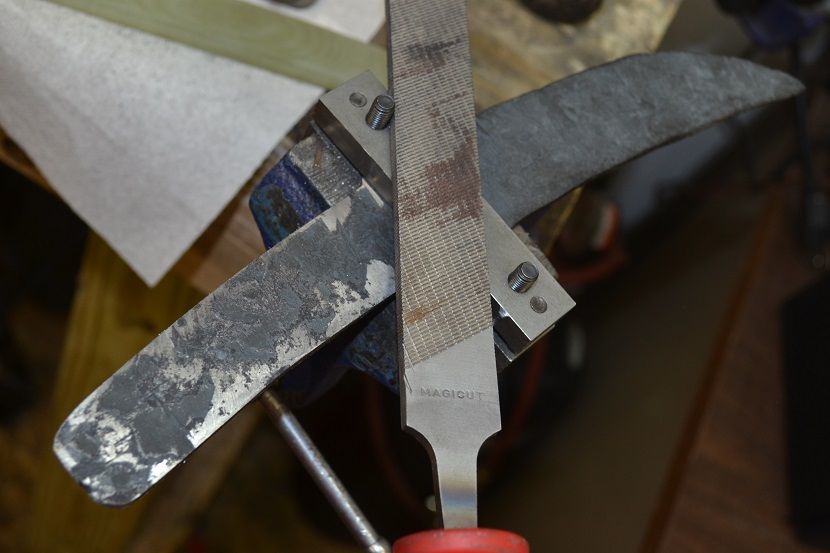
The file guide is on and I'm using a Nicholson Magicut to even up the spine. I'm also cutting in a shoulder for the Tsuba. I used round files to cut in the shoulders for less chance of stress risers.

Is it correct to position the Tsuba right behind the shoulders? If I need to file further for the Habaki that will happen. I have studied a lot of pictures and think this is correct but am not sure.


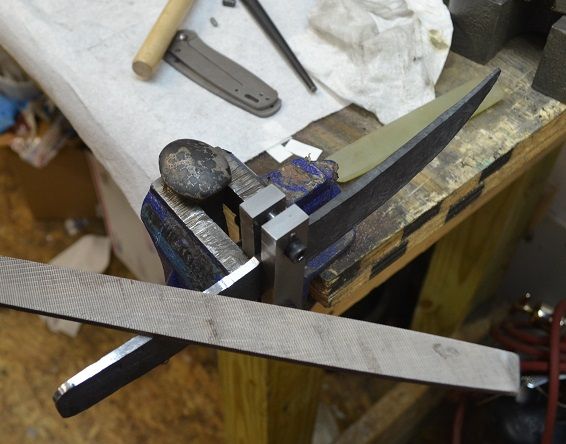
I'm starting on the tang. This may be ground through later if I pull the grind all the way through. My forge seems to be holding heat well as I annealed this after forging and it files nicely.


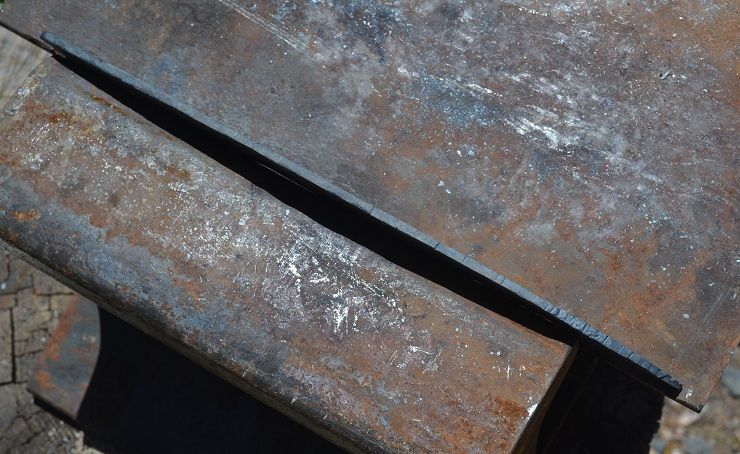
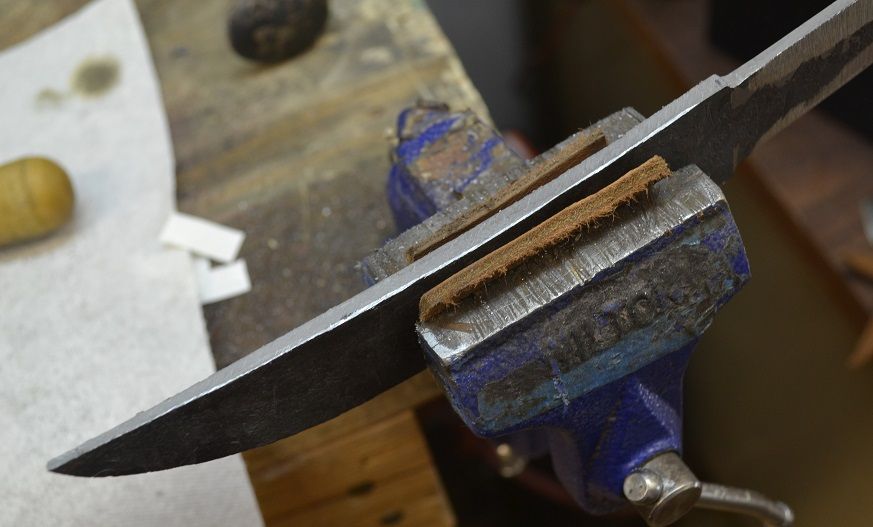
The spine has been draw filed to somewhat flat...


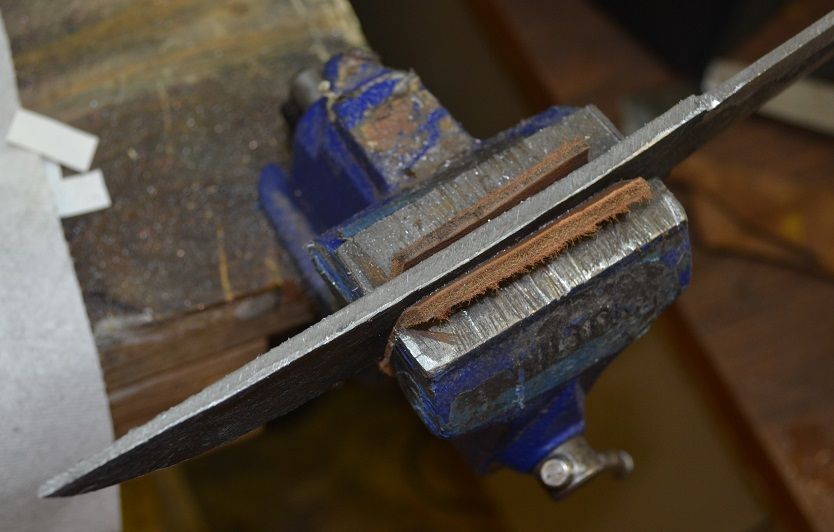
Better profile pic... it is hard to show the taper but there is a nice amount.


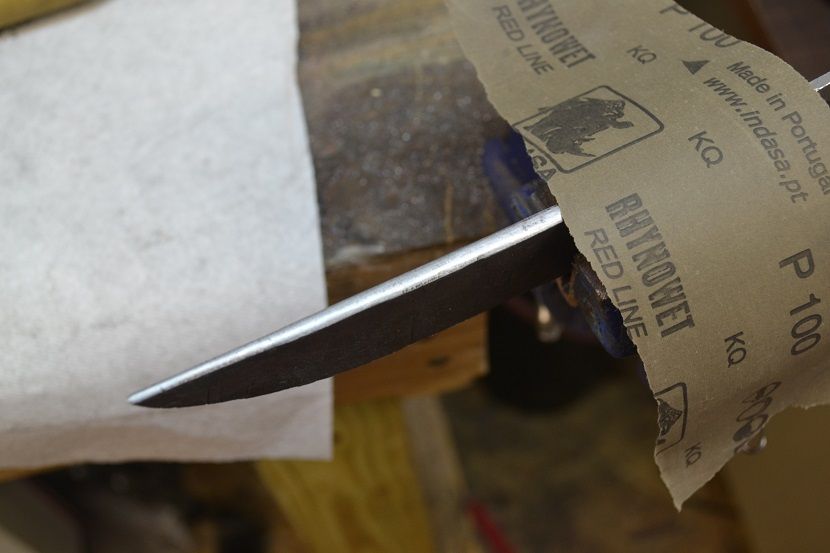
Rounding the spine. I' hoping to leave the Kuro Uchi (forged) finish on the flats and go with a rounded spine as opposed to a shoulder bevel grind.

 
Nice! i'll be following as you advance!
I would think the tsuba is going to butt against the seppa/habaki. Is the habaki who butts against the shoulders and "embraces" them more or less on the blade sides.
Forging is fun isn't it? :thumbup:
 
Looking very nice Daniel. I guess it may not be traditional, not sure about that though, but I like the idea of a rounded and maybe even well polished spine to contrast with the forged finish. Subscribed. Mike
 
Rounding the spine (mune) is fine. It is called maru-mune ( round spine).
The habaki seats against the machi (notches). On a tanto, a seppa between the habaki and tsuba aren't a requirement, but a small one is nice.

Consider copper for the fittings. It ages and patinates well, is easy to shape, file work, etc. A slice of copper pipe flattened can be shaped into a habaki easily. Pipe slices can be ovaled into fuchi and kashira, too. It brazes well with silver solder. Just do lots of anneal cycles as needed. A series of good long soak in livers of sulfur, some burnishing with 0000 steel wool and/or a light buff make it look like old shibuichi.

Resist the temptation to put a large tsuba on. Tanto tsuba are just large enough to keep the hand from sliding forward. They are not sword guards. About 1/4" larger than the wrapped tsuka is plenty. In the same way, try not to make the handle look like a katana/wakizashi tsuka. A tanto is a knife, and the handle doesn't need every whistle and bell. The tsuka should not be large or long. Often simple is elegant on a tanto. Remember when shaping the tsuka core that it will be wrapped and thicker. The finished handle should not be bulky. A smooth and proper size tsuka has the core smaller than the fuchi and kashira to allow for the tsuka-maki thickness.

While discussing tanto sugata ( blade shape), there is a predominate thought in the US that the tips are rather bluntly curved up....or even angularly shaped. That is not the case in most historic tanto. The tip ( kissaki) is tapered to a point from the edge. There is a demarcation where the edge (ha) ends and the kissaki starts, but it is all part of a fairly even taper and curve.
The short and abruptly curved kissaki are called ko-kissaki ( short tip). The most common are chu-kissaki ( medium) and O-kissaki ( long). The O-kissaki are the most graceful and "weapon" looking.

A few more "tips":
Make a bar of steel with a tang the same size and shape as the blade ( called a handle mandrel). Clamp it in the vise and put the tsuka on it while shaping and wrapping. A proper wrapping stand is nice, but a clamped bar is sturdy enough to do.

Use small spring clamps to hold the maki while wrapping and turning. The "wraps" have to stay tight. Don't be afraid to undo the wrap and repeat it if something isn't right.

Menuki are cool, but can cause difficulty in doing the tsuka-maki. They are definitely not a requirement on a tanto. Do your first tsuka-maki without one, or over a very thin and flat menuki. A folded piece of parchment paper with your name inside and the date are fine.

Put your makers mark on the tsuba, not on the blade.

A simple mune with the bevel coming all the way up ( hira-tsukuri - AKA FFG) is most proper for a tanto.....it is also a ,lot easier to do :) Shinogi are for swords.

The above info is just suggestions....there are no real "rules". Make the blade and handle as you wish. You can glue it up just like a standard hidden tang, file work the spine and tsuba, etc.
 
Nice! i'll be following as you advance!
I would think the tsuba is going to butt against the seppa/habaki. Is the habaki who butts against the shoulders and "embraces" them more or less on the blade sides.
Forging is fun isn't it? :thumbup:

Big thanks Stezann! I was pretty sure but the more I studied the more confused I became. Last night I watched a video where there were two steps. Sounds good!

Forging is a blast!


Looking very nice Daniel. I guess it may not be traditional, not sure about that though, but I like the idea of a rounded and maybe even well polished spine to contrast with the forged finish. Subscribed. Mike

Excellent! I think I will slowly move to more and more traditional with each one. Great to hear that and thanks for subscribing!


Looking good man, following.

Thanks Justin! How's the new forge going, it looks great.
 
Last edited:
Rounding the spine (mune) is fine. It is called maru-mune ( round spine).
The habaki seats against the machi (notches). On a tanto, a seppa between the habaki and tsuba aren't a requirement, but a small one is nice.

Consider copper for the fittings. It ages and patinates well, is easy to shape, file work, etc. A slice of copper pipe flattened can be shaped into a habaki easily. Pipe slices can be ovaled into fuchi and kashira, too. It brazes well with silver solder. Just do lots of anneal cycles as needed. A series of good long soak in livers of sulfur, some burnishing with 0000 steel wool and/or a light buff make it look like old shibuichi.

Resist the temptation to put a large tsuba on. Tanto tsuba are just large enough to keep the hand from sliding forward. They are not sword guards. About 1/4" larger than the wrapped tsuka is plenty. In the same way, try not to make the handle look like a katana/wakizashi tsuka. A tanto is a knife, and the handle doesn't need every whistle and bell. The tsuka should not be large or long. Often simple is elegant on a tanto. Remember when shaping the tsuka core that it will be wrapped and thicker. The finished handle should not be bulky. A smooth and proper size tsuka has the core smaller than the fuchi and kashira to allow for the tsuka-maki thickness.

While discussing tanto sugata ( blade shape), there is a predominate thought in the US that the tips are rather bluntly curved up....or even angularly shaped. That is not the case in most historic tanto. The tip ( kissaki) is tapered to a point from the edge. There is a demarcation where the edge (ha) ends and the kissaki starts, but it is all part of a fairly even taper and curve.
The short and abruptly curved kissaki are called ko-kissaki ( short tip). The most common are chu-kissaki ( medium) and O-kissaki ( long). The O-kissaki are the most graceful and "weapon" looking.

A few more "tips":
Make a bar of steel with a tang the same size and shape as the blade ( called a handle mandrel). Clamp it in the vise and put the tsuka on it while shaping and wrapping. A proper wrapping stand is nice, but a clamped bar is sturdy enough to do.

Use small spring clamps to hold the maki while wrapping and turning. The "wraps" have to stay tight. Don't be afraid to undo the wrap and repeat it if something isn't right.

Menuki are cool, but can cause difficulty in doing the tsuka-maki. They are definitely not a requirement on a tanto. Do your first tsuka-maki without one, or over a very thin and flat menuki. A folded piece of parchment paper with your name inside and the date are fine.

Put your makers mark on the tsuba, not on the blade.

A simple mune with the bevel coming all the way up ( hira-tsukuri - AKA FFG) is most proper for a tanto.....it is also a ,lot easier to do :) Shinogi are for swords.

The above info is just suggestions....there are no real "rules". Make the blade and handle as you wish. You can glue it up just like a standard hidden tang, file work the spine and tsuba, etc.

Big thanks Stacy, I just can't say enough!

I think I'll try a Habaki on this one and that is a good idea on the copper fittings.

I have been working with a bit of copper in hopes of making the fittings. This one will be all copper I think. I also recently poured some Shibuichi from scraps into a mold I made form local sandstone. Once I understand everything a bit better it is a goal to pour a traditional water cast ingot for the Tsuba and roll out some plate for the fittings. First things first though so making it through heat treat is my current goal.

I agree on the sizing, I'll be trying to keep the lines elegant without too much bulk in the handle area. Excellent advice on blade shape also! I'm hoping to keep mine as close as possible to the shape now, it depends how decent my forging is near the tip.

Thanks for the tip on the handle mandrel, I have a "filet waki" that may have been waiting for just this purpose. I have been on a mandrel kick (making jewelry) lately and got a ring and stepped round bracelet mandrel. They are way better for the hands/wrists and easier to work on. I really need to build a knife vise. I watched a ton of videos last night on knifemaking in Japan and really like the wedge type of vises they use... like my ring vise.

Good call on the clamps, I have never done a silk wrap but use them on the new school wraps I do.

Thanks on the Menuki too, so far I have used local dinosaur bone and made some from Ti also. The dino bone cabs were extremely tricky to get right. My big goal with the Menuki is to cast some in tufa stone...

I'm hoping to learn some very basic engraving for my mark eventually... I made a rising sun stamp out of A2 bar for my forged work and might make a bigger one. I thought my sig looked so out of place on my first forged knife that I didn't sign it with my normal sig.

Sounds great on the bevel, it is forged in pretty well so I think it will be very close to a traditional cross section once i'm done. I hope! It is much different grinding an already tapered blade as opposed to my usual stock removal. I like it!


Thanks again Stacy! I really appreciate the help!
 
Last edited:
Here is my first forged knife. I also learned the more traditional Ura and Omote (body and presentation side) knots and after a lot of practice used them on this one.

W2 steel with carved Ti Menuki


Here is some of my copper work... heavy duty cuff bracelets. Forest pattern! I'm also doing some hard soldering with bezels and bangles so far.


Shibuichi!

casting setup! firebrick, soldering torch, crucible, borax was used for flux but is out of the pic...


Raw casting and sandstone molds I carved.
 
You can use the actual blade for doing the wrap, but most like to keep it safe from scratches. The "mandrel is just a mild steel blade substitute that fits the handle reasonably.

A tsuka-maki vise can easily be made from a foot or so of 1.5" PVC, a piece of 1X2, and some wooden wedges. Shape the 1X2 more or less half round so it fits in the PVC. Glue it in the pipe. Use the wedges to lock the blade or mandrel in the pipe. You can make a simple stand ( basically a box) from 1" lumber with a half round notch on each end, and set the PVC blade vise on the notches and use bungee cord to hold it tight. You just twist the PVC to rotate the blade/handle from ura to omote as you knot. Even simpler is to screw a 2X4 arm ( like for hand sanding) on the workbench and bungee the vise on the arm.

I take the swivel jaws off the light weight el-cheapo clamps from HF. They grip just right.

Got you on the mandrel, the knife I speak of is in my "recycling" drawer. Now that I have the forge I might just save it though.

Thanks for the vise idea too, that sounds great. It's one of those things I need to work on... no more holding things in hand while working or sanding.


I'm going to do some more filing to have a nice seat for the Habaki then lay in the grind. I have decided to go all out and try the more traditional grind that extends all the way through the tang.

I'll do my final sharpening by polishing to the edge... does the edge remain thin under the Habaki so there is little transition to the sharpened edge?

Thanks again!
 
Yes, the edge is sharpened all the way back to the machi, and down the nakago. You can slack off the actual edge as you near the machi and just have a blunt edge going back onto the nakago. Just make sure the kasane ( thickness) of the nakago isn't any thicker along the edge than the blade at the machi.
 
Yes, poplar works well. Alder is my favorite. Other woods that work are linden, bass, tupelo, aspen.
 
Yes, poplar works well. Alder is my favorite. Other woods that work are linden, bass, tupelo, aspen.

Thanks! I have a bit of Poplar I bought a ways back so I could age it for Sayas. I did not think of Aspen, I should look as we have plenty, it would be fun to use something I collected locally. I have about an acre of it on my property that is great fun for testing deep cutting edge geometry.

What would be a good thickness for the Tsuba, 5/32"-3/16" to start with? 1/8" for the habaki and maybe some rolled out pipe for the soldered fuchi and kashira? I suppose that all may be on the thick side...

I have some 1/8", 1/16", 20 gauge and a bit of pipe scraps. I can probably pour a thicker piece from scraps in my ingot mold.

Thanks again for the help!
 
Daniel, this is too cool! It's crazy, I'm workin on pretty much the exactly the some project as you! I just forged a tanto profile out of an old (3-4 years) piece of Aldos W2 (it was good stuff) that I had messed around with a few years ago in the forge. I never finished forging it and the profile was all kinds of crazy, having a point on each end etc. lmao It was cause I had no idea what I wanted to make... I just wanted to bang on some hot steel at the time :D lol

But yea I just salvaged it by reforging it into a tanto 'type' blade the other day and was actually planning on starting the stock removal on it today, using files nonetheless! ( I thought that was funny since we both have perfect working belt grinders ;) ) I hope you wouldn't mind if I posted one or two pics a little later in here just to show you, and maybe get your input on it. I "STILL" have yet to make any japanese style blade, so I'd like to see what you think about my sketch, and I promise not to derail.. if not that's no problemm either. :)

It's gonna be the Shobu Zukuri type (sorry I can never remember all the proper terms), kinda like how some puukko are ground ya know.. I'm definitely not tryin to be exact to tradition, but I do want it to look somewhat traditional... I just wanna make something that looks cool and performs great :thumbup: :cool: lol

Anyway, I'll for sure be following this thread! And once again, it's great to have ya wih "us" on the steel squishing side :D ;)

Take care brother

~Paul

My YT Channel Lsubslimed
 
Last edited:
Back
Top