Forgin a Knife..

Joined
Jul 8, 2001
Messages
3,623
I was forgin out a fighter yesterday when I got a bright idea to take some pictures so I could show the gentleman that ordered it how it gets from one shape to another. Throught you all might enjoy seeing the also.

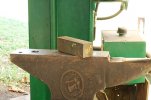
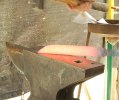
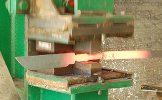
The first picture is what it started out at, Mr. Hansons w-2, the bar is
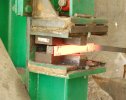
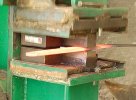
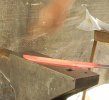
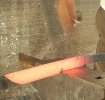
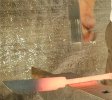
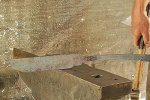
1 3/4"x 2" so I cut off a chunk and started reducing it to flat stock as picture 2 and 3 shows. Now that I have the bar reduced to about 1/4" x 1 1/2" I'm ready to start working up the blade.
 

Attachments

  • forginaknife1.jpg
    forginaknife1.jpg
    32.2 KB · Views: 143
  • forginaknife2.jpg
    forginaknife2.jpg
    40.7 KB · Views: 161
  • forginaknife3sm.jpg
    forginaknife3sm.jpg
    30.4 KB · Views: 161
Thanks Bill, this is going to be enjoyable. You are a Pro, and it'll be interesting to see how you get from here to there. Your client will enjoy it also. I've often thought about doing this for my clients, but I get busy with the procedures and just never seem to grab the camera. Looking forward to seeing yours!
 
Nice pics Bill.

I send, in progress, fotos, to customers. Especially those who have never seen or had access to a forge. They get to enjoy, the forging experience, through the fotos.
I'm forging some of the round bar stock I got from Don. I like how it worked under the hammer.

Fred
 
Now I'm start shaping the blade tip. Bear with me and my photos, I'm doing this by myself with a timer, so I have to hit the shutter button, grab the bar from the forge and start working it before the shutters closes. Any way picture 4 shows the beginning of the tip shaping and after a couple heats picture 5 shows the tip shape completed.
Now I took the bar to my power hammer picture #6, to work the bevels and thin the bar down some so I don't have to move a great deal of the bar by hand when finishing up the bevel forging.
 

Attachments

  • forginaknife4.jpg
    forginaknife4.jpg
    43.8 KB · Views: 108
  • forginaknife5sm.jpg
    forginaknife5sm.jpg
    34.8 KB · Views: 113
  • forginaknife6sm.jpg
    forginaknife6sm.jpg
    34.8 KB · Views: 123
This is a great topic!

I hope you do not skip any steps, I love to watch how the blade takes shape.

(on a side note; Most if not all the problems that people have had with knife makers here on the forum have all more or less been because of a lack of an understanding as to where the blade is at?...how far along is it?....How soon will it be finished?..and when will it be shipped?
But there really is no reason why knife makers and knife buyers have such a hard time getting a hold of each other with computer webcams and the internet.
I think that a high $ knife maker that takes an order should set things up so that photos of the knife in-work can be seen on line.
Perhaps a few webcams set up around the shop so that people can log-on and flip between webcams to watch their knife being worked on is in the future for the high-value knives?)
 
Bill, I could hear it scream the first time you had in on the press. It said "help me, help me". Pretty cool for something so darn hot!
 
In picture 7 I'm hand forgin the bevels in, its the ghost hand and hammer.
After I get the bevels fairly close to where I want them finished up I set the bottom of ricasso area Picture 8, I wait to do this because forging the bevels I always get a little more blade lengthening and the customer requested this blade be no longer then 8", so I set the blade/ricasso junction at 7 1/4" this will give me a 3/4" ricasso when finished.
With the ricasso area established I'll come back and do a bit more bevel forging just before I'm finished with the blade, but now its time to set the guard shoulder area and draw out the tang. For this I use my guiliotine fuller. This picture #9shows the blade in place and getting wacked. You always want to leave a little extra when doing this so you can clean it up and have plenty of blade to file the shoulders good and square.
 

Attachments

  • forginaknife7sm.jpg
    forginaknife7sm.jpg
    31.9 KB · Views: 94
  • forginaknife8sm.jpg
    forginaknife8sm.jpg
    45.5 KB · Views: 114
  • forginaknife9sm.jpg
    forginaknife9sm.jpg
    34.9 KB · Views: 120
Nice pics Bill , when you are selling a knife I never get your attached thumbnails ,but these I do get , must be something with my c/p , it happens with a couple other makers too .
 
Great thread! Certainly demonstrates how you do what you do very clearly!

If I may ask, Mr. Buxton, what type of steel is your fullering tool made of? Anything special? Are the fuller blades hardened at all?
 
What a thread! Thank you.
 
Now that the shoulders have been roughed in for the tang area its time to stretch out the tang. Its back to the press for the main moving and then I'll finish dressing it up by hand. This picture shows the tang getting stretched and then the next pictures shows the final dressing up and shaping of the tang.

Thats all there is to it, I will go back and do another heat or 2 to work the bevels in a little closer to the finished thickness and then its time for the normalizing cycles, I usually do 2 cycles using the forge and a magnet to relieve stress and reduce grain size but then I pop it in the oven for 3 accurate reducing heat normalizing cycles, next its off to the grinder.

Thanks for lookin,

Bill
 

Attachments

  • forginaknifeex.jpg
    forginaknifeex.jpg
    28.6 KB · Views: 109
  • forginaknife10sm.jpg
    forginaknife10sm.jpg
    39.9 KB · Views: 101
  • forgiaknife11sm.jpg
    forgiaknife11sm.jpg
    35.9 KB · Views: 110
  • forginaknife12.jpg
    forginaknife12.jpg
    25.7 KB · Views: 104
I am collecting these poto's (i won't if that is an issue!)
Please continue if possible. Get someone photo you grinding at various
stages. I'd love to see the fit and finish as well if that is possible.
I really do appreciate your effort to share what you are doing with this blade
Thank You
 
Thanks for the step by step process. Very cool.
 
Thanks everyone, this was fun to do I just wish it wouldn't have come to me in a senior moment and I'd have had it planned out better, but it gives everyone the gest of how I do it. Also I know there's lots of ways to do this stuff and this way might not be the way anyone else would do it, but its a way I've gotten use to over the last few years. So if it helps anyone along the way thats great.

heo- I know when I send out photos on my available list I often get several e-mails back saying fatal errors, I don't know what thats about, because most of the time they go through just fine the next time I send anything.:confused:

Mrpurple- the fuller blades were made from an old leaf spring I had laying around, no it doesn't need hardening. If your deforming the fuller your steels way to cold to forge and messing up your fuller tool will be the least of your problems.

Burchtree- Michael I'm planning on it, are you going, I think its the weekend after this coming one. April 14-15.

Tommegow- doesn't cause any issue with me, I'm just glad they helped. I finish ground the bevels and top clip this afternoon, I'll get a pictue of it before I go any farther tomorrow.

Thanks again,

Bill
 
Back
Top