-
The BladeForums.com 2024 Traditional Knife is ready to order! See this thread for details: https://www.bladeforums.com/threads/bladeforums-2024-traditional-knife.2003187/
Price is$300$250 ea (shipped within CONUS). If you live outside the US, I will contact you after your order for extra shipping charges.
Order here: https://www.bladeforums.com/help/2024-traditional/ - Order as many as you like, we have plenty.
You are using an out of date browser. It may not display this or other websites correctly.
You should upgrade or use an alternative browser.
You should upgrade or use an alternative browser.
Freon Tank Forge
- Thread starter Sirmasta
- Start date
- Joined
- Nov 9, 2009
- Messages
- 44,314
You might want to have a look in here for thi topic
http://www.bladeforums.com/forums/forumdisplay.php/806-General-Knife-Maker-s-Discussion
General Knife is about knives, not neessarily knife making.
http://www.bladeforums.com/forums/forumdisplay.php/806-General-Knife-Maker-s-Discussion
General Knife is about knives, not neessarily knife making.
- Joined
- Sep 3, 2010
- Messages
- 2,460
I have built a freon tank forge, and here is what I have figured out.
1. Do not go with a torch from HD or the like. A very simple venturi burner will do much better. Mine uses a torch and just doesn't put out enough heat.
2. 2 inches of inswool helps. 2 linear feet should be able to get 2 inches in a freon tank forge
3. Buy a couple firebricks if you can. They turn out to be really, really useful at times.
4. If it is for HT, then do not put the burner pointing directly into the forge. Put it at a angle. However, if it is for forging, then point that sucker down in there. You will get the mother of all hot spots.
Ask if you have any specific questions.
Here is mine I just finished. 2 1-inch layers of kaowool, topped with satanite then ITC-100. I'd say to make sure you get the satanite about 1/4" thick on the bottom and where the flames blast the side. I wish I would have gotten a bit more of a tangent on my burner, but it still swirls real good. You can see in this first pic how it looks after about 30sec of burning. Once I closed up the front with bricks, it really swirls inside and gets HOT. The 2nd pic shows how it is now with the bricks closing it off. The only thing I could have done better is to make sure the front face cut is a bit more flat so the vertical bricks match the face better. My left vertical brick has a tiny metal shim under the front of it to tilt it back and better seal up the left opening face. I bought a burner from Rex at hybridburners and I run it at 2.5psi only:


Thanks for the info and pic. Is a respirator important when cutting the ends of the tank? I have a painters mask? Also have you heard of the T-Rex burner? Is that one of the burners you are referring to thegeek574? Is kaowool board a must in this project? I'm waiting on my ITC100 and Kaowool from the suppliers in the mail. I'll post finished pics when done but will have more questions coming, I'm sure of it.
- Joined
- Nov 16, 2005
- Messages
- 1,880
Get one of Ron's z burners,I built a friend a forge using a helium tank,and used one of his burners and it works great:thumbup: will idle at 2 or 3 psi----
- Joined
- Sep 3, 2010
- Messages
- 2,460
you can buy a burner, or you can do it yourself. it will be the most expensive part, easily, though. you have to get a propane tank and then a regulator and hose assembly to either a venturi burner or a forced air. I am not sure if his is forced air or venturi, but both will work. Do your research and you will eventually come up with just the right thing for you.
- Joined
- Feb 28, 2002
- Messages
- 392
You can get away with a rigidizer and ITC, but a layer of satanite is much better. ITC is not desigen to seal and reinforce. Satanite will make for a much more durable forge. You can put a firebrick on the bottom, put a thick layer of satanite, or cast a layer of mizzou or kast-O-lite for a place to rest your work.
Wayne Suhrbier
Wayne Suhrbier
jorasco312
Knifemaker / Craftsman / Service Provider
- Joined
- Jun 9, 2006
- Messages
- 141
I copied the Reill freon tank design. Two layers of Kaowool, rigidized, about 1/4" coat of Satanite with an ITC-100 top coat. Floor is a 4"x11"x1/2" kiln shelf. I also used 1" thick ceramic fiberboard for the front and rear enclosures. The plans called for the rear to be seated within the shell - DON'T. It is a real PITA. Just make two 'fronts'. See the photos of the forge.
I also fabricated two 1/2" Michael Porter jet induction style burners for the forge. Burner ports are tangental to the top of the forge chamber.
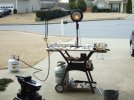
If you look through the forge, you can faintly see the rear opening. It's about 1.5"x3", large enough for a blade tip to slide through but small enough to prevent heat loss through the opening
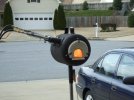
In post #7, 'thegeek' mentioned his plumbing. In the photo above of the forge on my roll around forge stand you can see the 20 pound bottle and my plumbing as follows from tank to burner: POL fitting > 4" hard (brass) line > ball valve (master/emergency cutoff valve) > 3 or 4" hard line > regulator > propane rated hose > 'T' fitting > Needle valves > 18" propane rate hose to each burner. That gives me plenty of stand off room between an accidental drop of hot work and the propane bottle.
I also fabricated two 1/2" Michael Porter jet induction style burners for the forge. Burner ports are tangental to the top of the forge chamber.

If you look through the forge, you can faintly see the rear opening. It's about 1.5"x3", large enough for a blade tip to slide through but small enough to prevent heat loss through the opening

In post #7, 'thegeek' mentioned his plumbing. In the photo above of the forge on my roll around forge stand you can see the 20 pound bottle and my plumbing as follows from tank to burner: POL fitting > 4" hard (brass) line > ball valve (master/emergency cutoff valve) > 3 or 4" hard line > regulator > propane rated hose > 'T' fitting > Needle valves > 18" propane rate hose to each burner. That gives me plenty of stand off room between an accidental drop of hot work and the propane bottle.
Last edited:
I had to decide between flat hard bottom brick or a curved bottom. I almost used a brick for the bottom, but I will make another forge later that is flat and flux resistant. I didn't have welding in mind for this one. I wanted a swirling vortex inside and wanted the burner entering at a tangent. I wanted the floor rounded to help the vortex. I used Satanite (that I got from Wayne) and have a pretty thin, maybe 1/8" coating on the top and right side. Then I went thicker on the bottom and left side where the flames hit most for the durability. I did it in coats since the Satanite will crack some and the next coat will repair the cracks. The Statnite doesn't cure if covered, so you can seal up a container and put more on 2 days later. It remains workable. Do that a few times and get nice build-up on the bottom and you'll be fine - or go the brick route. I'm pretty impressed with the durability so far on the bottom. Once you fire the Satanite, it gets hard like concrete. 1/4" thick and you're pretty good. I also didn't want a high thermal mass of a brick on the floor. Granted this is my first forge and I know I'll do a couple things better, but I get up to red hot in 5min or less, using 2.5psi. Don't forget your feed items for the propane too. You need a good regulator and hose. I got those from Wayne with the gauge so I could tell what PSI I'm at. the 10' hose is NOT too long, it's about perfect.
My tank was a propane tank. My burner is venturi. I bought 10lbs of Satanite and used 5. I used 1/2 pint of ITC-100.
I used a respirator when I cut my tank because I also sanded every bit of paint off it so I could weld on the furniture. I painted with 2000 degree paint from home depot.
Another tip I read online is to use a cone shaped object to flare the kaowool/satanite at the burner opening. Here is mine when I put on the first coat:

jorasco312
Knifemaker / Craftsman / Service Provider
- Joined
- Jun 9, 2006
- Messages
- 141
Deleted - double post...
- Joined
- Sep 3, 2010
- Messages
- 2,460
In post #7, 'thegeek' mentioned his plumbing. In the photo above of the forge on my roll around forge stand you can see the 20 pound bottle and my plumbing as follows from tank to burner: POL fitting > 4" hard (brass) line > ball valve (master/emergency cutoff valve) > 3 or 4" hard line > regulator > propane rated hose > 'T' fitting > Needle valves > 18" propane rate hose to each burner. That gives me plenty of stand off room between an accidental drop of hot work and the propane bottle.
Where did you get this stuff? I have balked at the cost of ordering the regulator.
jorasco312 and Dperk, I am impressed! Awesome construction and attention to detail. jorasco, You said the kaowool board was not seated in the shell. So what you did was use to hold in the outer shell? Ron called for a horshoe to be mounted and I noticed you used some type of steel elbows. Did you do any welding or brazing in your construction? The top opening that you made tangent with the curvature, did you use satanite to seal the gap were the pipe housing enters the tank?
jorasco312
Knifemaker / Craftsman / Service Provider
- Joined
- Jun 9, 2006
- Messages
- 141
jorasco, You said the kaowool board was not seated in the shell. So what you did was use to hold in the outer shell? Ron called for a horshoe to be mounted and I noticed you used some type of steel elbows. Did you do any welding or brazing in your construction? The top opening that you made tangent with the curvature, did you use satanite to seal the gap were the pipe housing enters the tank?
Sorry I haven't been back for a couple of days... life. I forged the three clips out of 1/4" mild steel rod and attached them to the tank shell with SS self-tapping screws.
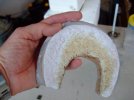
I am holding the end enclosure; 1" ceramic fiberboard, shaped to fit 'into' the opening (see next photo), brief soak in rigidizer, torch cured, several very thin coats of Satanite, each heat cured with torch and finally the inside surface coated with ITC-100.
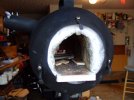
Above, the 'front' or working end of the forge. If you look closely at the clip at about the 4 o'clock position, you can see a little detail of the clip. Note my thumb is resting in/on the 'lip' carved into the inner side which provides a seal to prevent exhaust gas blow by. the clips are swung into place and tightened, holding the enclosure in place. Additionally, the floor is removable.. just slides straight out.
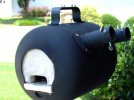
The above shot is of the butt end of the forge.. I didn't like it then and still don't. I have to remove the floor in order to remove the rear enclosure. It also requires a lot of fitting of the rear enclosure to the necessary dimensions to pass through the tank shell.. did I mentions PITA? Next time, I will replicate the front enclosure. that will permit one to work from either end of the forge, simply swap enclosures and fire it up.
Your question: Did you do any welding or brazing in your construction? Yes, I brazed the burner collar to the flange that is fastened to the tank shell and the vertical mount collar is also brazed to the flange on the bottom of the tank shell. I don't weld nor have welding equipment.. Taught myself how to braze.
Your question: The top opening that you made tangent with the curvature, did you use satanite to seal the gap were the pipe housing enters the tank? I made a form .. or rather I used a shot glass, as it was close to the dimensions needed for the flare in the ceramic fiber, for the form. Used very thin cardboard stock (grocery store shopping list - free) to form the cone around the shot glass, smeared vasoline on the outside of the shot glass and the stock as a release agent, ensured my opening through the fiber was large enough and the centerline was tangental to the forge chamber surface, smeared satanite over the fiber, the cone and put it there. Satanite is sticky... it doesn't 'flow' well.. so one really needs to have more Satanite in there than needed.. it will squirt out in the burner collar tube ... it can be removed later.. ensure the cone form is centered and leave it for a couple of days to dry. The vasoline permits the shot glass bottom to be tapped with the butt end of a screwdriver and it will pop out of the carboard cone. Remove any Satanite that oozed into the burner tube. No need to remove the cardboard stock.. just stick a torch in there and burn it out. I strongly recommend that the cardboard be burned out as the Satanite dries so slowly that my efforts to remove the cardboard cone ALWAYS removed some Satanite and ceramic fiber and left holes in the flare and caused me to say very bad words. And, finally, my torch diameter is just slightly smaller than the burner collar pipe.. I used a large washer and ceramic fiber, behind the burner nozzle, as a gasket to prevent air infiltration into the forge. The bottom of the shot glass and the burner collar pipe are about the same diameter.
Hope that helps..
jorasco312
Knifemaker / Craftsman / Service Provider
- Joined
- Jun 9, 2006
- Messages
- 141
In the bottom of the 3 photos above, you can see the side profile of the burner ports. The black pipe (bp) is brazed to the flange and does not extend beyond the flange, therefore does not enter the shell of the tank. My burners have a nozzle affixed and extends about 1.25" beyond the end of the burner tube. I have 2 layers of 1" ceramic fiber. The end of the burner tube is about even with the shell of the tank and the end of the nozzle is about an inch shy of entering the actual forge chamber and therefore is within the flared area of the ceramic fiber. I might as well add a few more photos.
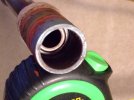
A close up of the nozzle end of the burner. Burner fabricated from 1/2" bp, 3/4" bp spacer and 1" bp nozzle. You can see the burner tube end, spacer and the approx 1.25" of the nozzle beyond the end of the burner tube.
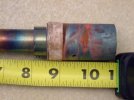
L-R: 1/2" bp burner tube; 3/4" bp retainer ring w/set screw; thin washer; ceramic fiber 'gasket'; nozzle w/set screw, overall length of the nozzle about 1.75". Not visible is the 3/4" bp spacer. Both the retainer ring and spacer were cut 1/2" wide.
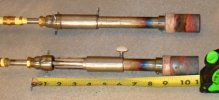
The burner portal black pipe is a size larger than the nozzle and is provides a slip fit. The gasket provides the seal to prevent ambient air from being sucked into the forge permitting the choke to control the atmosphere.

A close up of the nozzle end of the burner. Burner fabricated from 1/2" bp, 3/4" bp spacer and 1" bp nozzle. You can see the burner tube end, spacer and the approx 1.25" of the nozzle beyond the end of the burner tube.

L-R: 1/2" bp burner tube; 3/4" bp retainer ring w/set screw; thin washer; ceramic fiber 'gasket'; nozzle w/set screw, overall length of the nozzle about 1.75". Not visible is the 3/4" bp spacer. Both the retainer ring and spacer were cut 1/2" wide.

The burner portal black pipe is a size larger than the nozzle and is provides a slip fit. The gasket provides the seal to prevent ambient air from being sucked into the forge permitting the choke to control the atmosphere.
On mine, the pipe stub that holds the burner is not really in the tank. I ground the bottom of the pipe at an angle and made it fit the contour of the tank. So mine sits on top, mig welded in place. I don't think you need to have it IN the tank for any reason. If you did, it may heat up more instead of being separated by the insulation. If you have a larger hole and *have* to put it into the tank, I'd only go about 1/8" in vs 2" in.
