Frustrated....and a little irritated too

Ernie1980

Gold Member
Joined
Apr 19, 2012
Messages
8,109
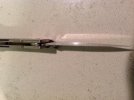
I tried to sharpen my little William Henry knife this evening, with poor results. The blade is zdp-189. I tried to keep the factory angle , and sharpened with diamond hones followed by stropping. The blade is light saber sharp: but only half of it!
I think it is part me and part a design flaw. Why would William Henry made a knife with only a 2.5 in blade and not either sharpen the entire length or put in a sharpening notch??! From the factory only about 2/3 of the blade was sharp, I somehow made it worse:confused:
As you can see, in my efforts to fix it I created a wider bevil towards the handle but obviously never hit the apex.
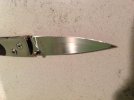
image.jpgimage.jpg
What do you when you get a blade like this?

Thanks!!
 
Use a sharpie to mark your edge so you can match the bevel. Check the edge frequently to make sure you're hitting the entire edge/matching the factory edge.

Remark with sharpie as needed to keep proper angle :) Take your time, take breaks, just relax.... If the sharpie is removed towards the shoulder too low, if the sharpie is removed towards the apex to high. Adjust accordingly

If the heel was never sharpened it will take more time in that area to remove the steel and match the rest of the bevel
 
It looks like you used a steeper angle towards the heel possibly... Is the stock of the blade thicker towards the heel on the edge or is the edge the same amount of thickness through out. If it does get thicker the bevel will go farther up the blade even though you're using the same angle. Which will require more material removed in that case at the heel. To match the angle though out

Hope this helps :)
 
The stock is thicker toward the handle, that is why it wasn't sharp from the factory. I tried the sharpie and kept the angle consistent for the entire blade, but the top part of the blade is flat from a lack of grinding. I don't want an uneven bevil, but might have to to keep the whole blade sharp?
 
You need to spend more time on the section that isn't sharp... Like you said it wasn't sharpened, so the bevel isn't the same there. Just use short small strokes on the heel section that isn't sharp to create the same bevel. It will take time and patience. You can purchase and round file from the hardware store to create a notch with it.
 
^^^^^^not helpful, troll elsewhere.

Thank you kwazy, I will look for a round file to notch the blade with and try again tonight when my mindset is a little better!
 
You won't get the heel sharp when the blade thickens like that without thinning out the blade all the way to the heel. I'd suggest marking (sharpie or masking tape) where you expect the edge to begin (after the heel has narrowed down - and a bit forward still) and sharpening from that point and forwards to get the part of the blade intended to be the cutting edge sharp.
 
Good luck bro!! Patience will be needed, relax, take your time, and breaks as needed.

Let us know your progress :)
 
^^^^^^not helpful, troll elsewhere.

Thank you kwazy, I will look for a round file to notch the blade with and try again tonight when my mindset is a little better!

I don't think he was trolling, but rather giving you some sound advice. I'm pretty good with freehand sharpening, but I always practice and always get a little better.
 
The blade stock is thicker near the heel, as can be seen in the radiused corner of the plunge grind as it meets the ricasso. The thicker steel will show a wider bevel at the same consistent angle used for the rest of the edge; this is typical and even 'normal' under the circumstances. The flip-side to that is, if one wants to keep the bevel width uniform along the full length of the edge, then the sharpening angle must be increased (made wider, or more obtuse) as the contact approaches the ricasso. This is further complicated by the fact that the radiused corner of the plunge grind will cause the blade edge to lift away and off the flat face of the hone, as the bevel curves outward to the ricasso. Much like sharpening a recurve, the only contact with the flat sharpening stone will be on the edge/corner of the stone. This is why sharpening the area near the radiused plunge will take much, much longer to complete, and therefore why it never seems to reach the apex.

When sharpening such blades, I've usually come to making a decision, one way or the other, as to how far back toward the heel I want/need the fully-apexed edge to go. That thick portion of steel, as the very thin edge transitions into and through the thicker steel near the ricasso, is always going to make for some very slow-going sharpening. It's a by-product of the designed blade grind: a very thin & hollow-ground, fine-slicing edge, supported and strengthened by a much thicker 'backbone' of the blade. The radiused corner of the plunge grind preserves strength in the blade, in preventing the 'stress riser' that'd be there with an abrupt 90° turn from the cutting edge to the ricasso, making the edge and the blade more vulnerable to cracking/breaking (with ZDP-189, that's a big consideration).

At times, with a couple of knives, I've tried to persist and fully thin the edge all the way back to the ricasso. On such a blade grind, even if it's made razor-sharp in doing so, the bevel will be VERY wide near the ricasso, and it's not pretty. Also makes for a very harsh, sharp and ugly-looking corner in the plunge, as the cutting edge abruptly meets the ricasso. To me, it's not worth it, in order to make that last 1/8"-1/4" of the edge sharp.

Don't worry too much about the variation in the bevel width near the ricasso, and just focus on fine-tuning the edge forward of that portion. Patience rules. :thumbup:


David
 
Last edited:
Not a design flaw, just something you overlooked when purchasing the knife. Future knife purchases will have the benefit of this foresight.

There's nothing to do with that except cutting a sharpening choil if you want even bevels.

This design pops up in traditional and modern knives and is something I try to stay away from.

Another option is to meticulously sharpen the area and once it is ground down, increase the grit until it better matches the factory grind marks.
 
David, thanks very much for the help! You always chime in with useful information

Skimo: you are absolutely right, it is def something I will look for in the future
 
Back
Top