Everyone knows what a pain in the @$$ grinding dust can be. When I added a dust room to my shop, I wanted to try and eliminate the problem, not just move it. I searched this forum and others to see what was out there.
Keeping the K.I.S.S. method in mind and using readily available parts, here's my take on the problem.
PARTS
Steelcity 1 1/2 hp, 1200cfm dust collector $299 (on sale)
Trash can cyclone lid $30
30gal galv trash can $32
6"x12" HVAC floor vent $8
6"x4" HVAC reducer $5
4" HVAC 90's (2) $8
23"x28" galv sheet metal FREE
misc parts-tape,caulk,hose clamps,etc $30
Assembly:
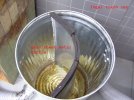
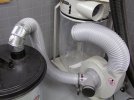
The first thing is to install the galv sheet metal baffle.(see pic #1) This will take some time and patience. (took me about an hour) Keep in mind you have to clear the intake and output of the cyclone lid and cut notches for the lid stiffeners.(see pic #3) I used 4 sheet metal screws through the side of the trash can to hold the curve of the sheet metal in place. You need a reasonably tight fit to the lid. I used 1/4"x1 1/8" foam tape on the top of the baffle to close any gaps.
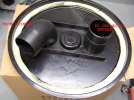
Once you have the baffle fitted, remove it and cut a 4" notch at the bottom. I started the cut about 3" from the edge and ended about the same.(see pic #2)
Next, using waterproof caulk, seal the bottom seams of the trash can and about 4" up the side seam. Reinstall the sheet metal baffle and caulk the seams where the baffle meets the sides of the trash can. Let caulk cure for 24hrs.
Add water to a depth of about 2" before use. I disconnect the 6" hose from the dust bag when using the cyclone and let it exhaust into the room.(see pic #4) I have seen no signs of grinder dust at all.
Keeping the K.I.S.S. method in mind and using readily available parts, here's my take on the problem.
PARTS
Steelcity 1 1/2 hp, 1200cfm dust collector $299 (on sale)
Trash can cyclone lid $30
30gal galv trash can $32
6"x12" HVAC floor vent $8
6"x4" HVAC reducer $5
4" HVAC 90's (2) $8
23"x28" galv sheet metal FREE
misc parts-tape,caulk,hose clamps,etc $30
Assembly:
The first thing is to install the galv sheet metal baffle.(see pic #1) This will take some time and patience. (took me about an hour) Keep in mind you have to clear the intake and output of the cyclone lid and cut notches for the lid stiffeners.(see pic #3) I used 4 sheet metal screws through the side of the trash can to hold the curve of the sheet metal in place. You need a reasonably tight fit to the lid. I used 1/4"x1 1/8" foam tape on the top of the baffle to close any gaps.
Once you have the baffle fitted, remove it and cut a 4" notch at the bottom. I started the cut about 3" from the edge and ended about the same.(see pic #2)
Next, using waterproof caulk, seal the bottom seams of the trash can and about 4" up the side seam. Reinstall the sheet metal baffle and caulk the seams where the baffle meets the sides of the trash can. Let caulk cure for 24hrs.
Add water to a depth of about 2" before use. I disconnect the 6" hose from the dust bag when using the cyclone and let it exhaust into the room.(see pic #4) I have seen no signs of grinder dust at all.
Attachments


Last edited:


")