Handle Shaping Sander, pt. 2

Joined
Feb 24, 2000
Messages
1,952
A few days ago there was a post about a handle shaping sander. Today I thought I would tell how I do it.
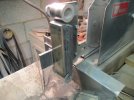
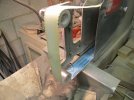
One of my grinders has a flat platen that can be removed and then used as a slack belt. I use Klingspor 312J flex scalloped belts , and on a full tang knife do 100% of the shaping on the slack belt using the scalloped belts. I get the belts from Pops.
On a hidden tang knife I might use a file but on a full tang knife it is 100% done with the slack belt.
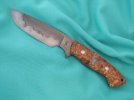
One of the pictures shows the set up with the flat platen, another shows the slack belt set up with a scalloped belt, and the knife handle in the picture was shaped with the slack belt set up.
 

Attachments

  • 001 (640x480).jpg
    001 (640x480).jpg
    60.8 KB · Views: 96
  • 003 (640x480).jpg
    003 (640x480).jpg
    60.4 KB · Views: 108
  • 006 (640x480).jpg
    006 (640x480).jpg
    59.6 KB · Views: 109
Ah, I see the problem. You're running your belt backwards.


:D

That's a very nice looking knife!

I use those belts on a progression of 1x42s for a lot of handle work too, but 1" belts don't need the scallops.

I doubt there's much price difference, but maybe better selection straight from Klingspoor.
 
Grizz, you have sharp eyes. Years ago at a Blade show I spoke with the Klingspoor representative and told him all I needed printed on the back of a belt was the grit size and direction. The Klingspoor representative told me it didn't matter which direction the belt ran. Since then I have ran them both ways and have not noticed any difference. In fact, if you run them one way, then turn the belt around you might get some increased life out of the belt.
 
From Klingspore reference web site:

Directional arrows are printed on jumbos for all materials that may be made into belts. No lightweight papers A, B or C will have arrows on them, but D, E & F as well as all the cloth backed material will. The arrow is used in the manufacture of lap jointed belts. It informs the belt line which side of the cut to size material will end up being the bottom of the lap and which end will be the top side of the lap so that skiving is done to the appropriate end. After the belt is joined, the arrow informs the customer of the direction in which that belt must be run. THIS IS ONLY APPLICABLE FOR LAP JOINTED BELTS! The arrow prints on all jumbos because again, we have no way of knowing what sizes or types of belt will ultimately be made from the jumbo. It’s very common for belts with same material and grit but different sizes to use different joint types. For example, the standard pump sleeve material CS309JF will always have a #1 lap. But a 3 x 132 in the CS309JF will usually have a #4 butt joint. Same material, same grit, different size and application. So even though the arrow is on all belts, you only have to pay attention to it if the joint is an overlap. Any belt with tape on the back, regardless of what the front looks like or the fact there are arrows on the backing, is a bi-directional belt! This can buy you some extra life as the butt or tape jointed belts can be run in one direction, then removed and put on to run in the other direction
 
And there is another one of those "facts" that I have always wanted to get the true answer for but never bothered to ask. Thanks for that.
Frank
 
I was only teasin about belt direction, but I do appreciate the information that generated. Thanks for that!

Pretty sure the only lap joint belts in my shop are leather.

I've never had any issue regarding belt direction except for that time I tried to sharpen a blade edge leading. It may have been my fault...

:D
 
Back
Top