Help building a forge

Joined
Dec 5, 2006
Messages
892
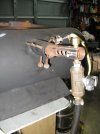
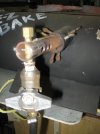
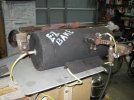
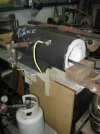
Can someone please please post a set of plans to build an atmospheric propane forge, that is, one that doesn't require a blower? I tried the links in the sticky, but couldn't download any of them. I have all of my firebrick, kaowool, and muffle tube (the tube that the blade sits in so it heats evenly). I'm mostly concerned with building the burners, I don't really want to buy them, because I can build them much cheaper. I also need to know the best way to position the burner, and finally, I need to know how to size both the burners and the vent. If anyone would be so kind as to help, I would greatly appreciate it.
 
I used this one because it was super-simple and looked difficult to get wrong.

http://www.backyardmetalcasting.com/oliverburner1.html

After I reach forging temps I can hold it all night long with about 1 lb of pressure. With this single burner I can hit 2000 degrees with no trouble.

-Mark


I built one of these as well. It was very easy and cheap. I can hear it going down the street when I get the mail. I used a regulator from a turkey fryer. It goes to 10PSI. I did have to put a longer hose on it though. I want my tank to be further than three feet from my forge.

It's very important that you use the right size drill bit. It must be VERY tiny - a #57.

Also remember to do a leak check. I found a small leak when I tested mine, which could have resulted in a very ugly situation had I just plugged it in and lit it up immediately after assembly.
 
We've got a 6" x 24" horizontal forge with three of Larry Zoeller's side-arm burners (one will run 350cu.in.) Don't need one of them. Welds just fine on two at 10-12psi. A person can build side-arm burners out of a good plumbing shop though you might have to order in the swept "T" reducer. The only thing we got from Larry was the design, forge coating, and his stainless flares. Larry has good stuff at great prices.

Mike
 
Not to hijack the tread but how much propane are you guys that are running 10 pounds of pressure using?
 
Not to hijack the tread but how much propane are you guys that are running 10 pounds of pressure using?

I don't have an answer, Martin. We make sure the 40# tank is full before getting serious with the big forge and haven't run out in the middle of things. Mostly I use a Bernzomatic JTH-7 and a "two brick" forge for blade forging and a 20# tank lasts "forever"...

Mike
 
Polish avenger, if using this burner, how far away should I position it from my forge, and how big should the hole be? Also, how big should my vent hole be and where should I put it? Sorry for all the questions.
 
I'm new to this myself; I'm pretty sure the hole for the nozzle should be as tight as possible. I simply notched out one of my fire bricks and tried to get it as tight as I could and the nozzle tip stops about half way through the 2.5" brick.

I believe there's a ratio of some sort for burner or nozzle size to exhaust hole size. I can vary mine, If I choke it off it goes more reducing; if I open it up it gets hotter and more oxidizing.
 
Polish avenger, if using this burner, how far away should I position it from my forge, and how big should the hole be? Also, how big should my vent hole be and where should I put it? Sorry for all the questions.

Questions are encouraged! It's my answers that sometimes annoy people.
Okay, burner placement has been completely trial-and-error. The first version of this forge was a breeze to tune...this one was a little bit of a bear. As you can see, my inlet (1 3/8" ID)is a fair bit larger than my burner, which is a good thing, because it allows my burner to be placed at an angle that agrees with the thickness of my refractory, letting it produce a nice 'swirl' inside the chamber. The tip of my burner is very close to being level with the refractory. As can be seen, the only vent hole is the great big one in the front. If I stack my bricks creatively, I can get a couple hundred more degrees out of her. I have two pyrometers attached (both, with thermocouples, salvaged from an old ceramics kiln); one to the front and one at the rear. It's surprising how long it takes for the two to get really close to each other in their readings.
-Mark
 

Attachments

  • img_0377.jpg
    img_0377.jpg
    24.3 KB · Views: 25
  • img_0376.jpg
    img_0376.jpg
    21.8 KB · Views: 26
  • img_0375.jpg
    img_0375.jpg
    20.4 KB · Views: 18
  • img_0374.jpg
    img_0374.jpg
    25.1 KB · Views: 23
  • img_0373.jpg
    img_0373.jpg
    25.5 KB · Views: 19
Mark,

Would you tell me what the theory is behind having the burner near the front... I would have guessed having it about the same distance from the back was "right".

Mike
 
Actually, the burner sits almost dead center of the usable interior, Mike. The interior of the forge has about 18 1/2" of length, and the burner is centered at 9 1/2" from the front. There's a fair amount of insulation in the rear.
-Mark
 
Back
Top