Help Save This 119

Joined
Apr 13, 2014
Messages
522
Not asking for money, just advice. I have lots of sandpaper and patience. I listen to advice. I have a 2" belt sander, a random orbital pad sander and I can imagine making a custom rubber sanding block that matches the radius of the hollow grind. I am fairly good at sharpening.

Someone who didn't know better took a coarse grinder to this 1987 Buck 119. Even the phenolic handle has a divot:


I'd like to help it look a bit more like the 1999 vintage 119 on the bottom. I realize it will be shorter when I am done.
 
Last edited:
For the grind marks, I normally start with 100 grit sand paper and go across the blade all by hand. I work up in grit to a 400 or 600 all across the blade by hand. I would first work the blade, then the tip and last the edge. I only use a buffer wheel to polish the blade.
 
For the grind marks, I normally start with 100 grit sand paper and go across the blade all by hand. I work up in grit to a 400 or 600 all across the blade by hand. I would first work the blade, then the tip and last the edge. I only use a buffer wheel to polish the blade.

This would be my first thought as well. I own a supply of 1000, 2000 and 3000 grit paper so I may keep going.

What would people suggest doing to the large gouges near the blood groove? (visible in the first picture) Seems like I will need to remove some serious metal to get them out.

Also the aluminum pommel and the phenolic handle are scratched up. What grit to start with on them? Can you sand/buff phenolic?
 
Yes, make the sanding drum to match the radius of the hollow grind. Just glue your belt together to fit it. Take the hollow grind up as high as you dare. Only change it maybe 1/8". Then blend in the flats to match that line. It really doesn't look so bad and it is a common picture of unknowing, has wrong equipment and little experience. Work slow and you can correct it. On the tip, sweep the belly up to meet the upper corner. Phenolic can be sanded. Start with 200 grit and work your way up to your taste. Tape the aluminum.
On the pommel start with 400 grit. It will shape up faster. At 6-800 grit it will start to look pretty good. Don't get too close to the shoulder of the plunge line. Working by hand you'll not get it too hot. The steel is 425M. So, a good grade. Save sharpening the edge for the final item. Good luck and post progress pictures if you can. DM
 
wouldnt a course grinder or bench grinder im assuming, possibly have ruined some of the steels heat treatment? guess youll find out once you get to putting the edge on it and if it holds or not.

regardless should be a good project to bring it back to life.
 
That's an idea. ^ Let Buck do it and pay them. Unless you really want to do it. You could send it in with a note that if they reject it, please return it as your not the original owner. Then you have your project.
Buck has the equipment to do a good job on it. DM
 
if it's sent back to buck and it has heat treat damage from the grinder.......what would buck do? will they test the knife for heat treat damage and then re heat treat it/be able to maybe remove until good steel is found? or just send it back if requested as such? curiosity is why i'm asking, thanks.
 
In the first pic it looks like the edge is not flat but has a slight wave. Is the edge itself straight? If so I don't know how to fix that. I can imagine the folks at Buck ever so slightly shaking there heads before pulling up there sleeves and walking to some power tools.
 
Well I tried it myself. I spent about 4 hours but I was watching football with a large towel on my lap, sanding away. So my "time" cost was zero, except that I could have been darning socks or playing the ukulele (my other during-football activities).

I spent about $5 on sandpaper (seriously).

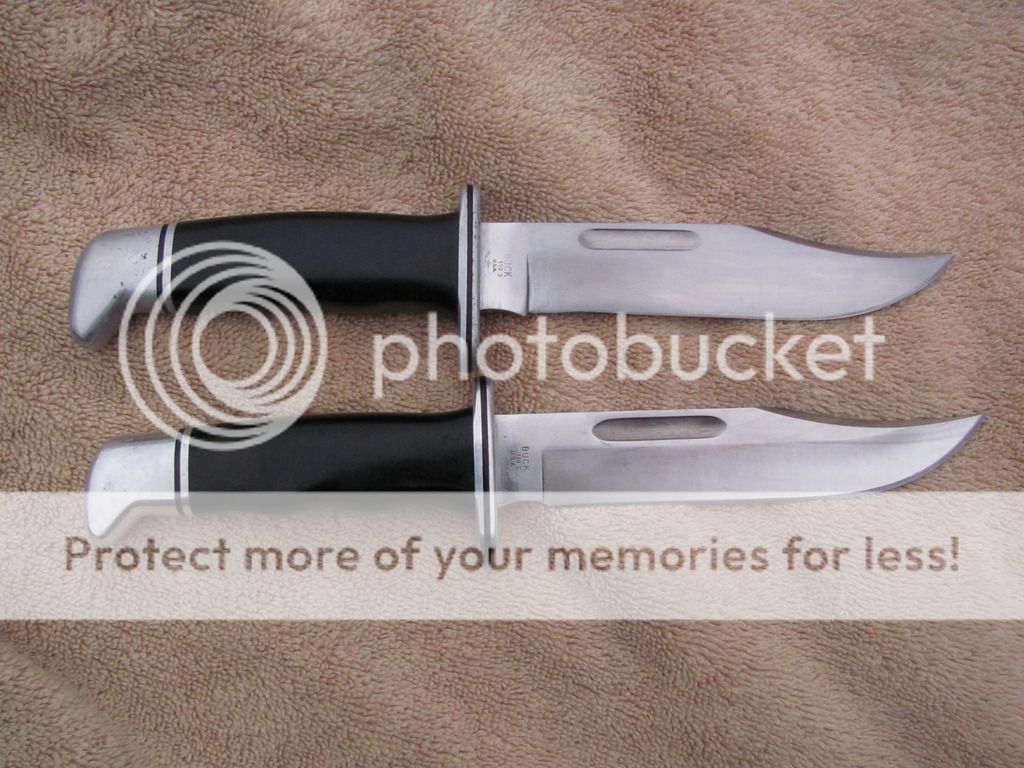
I sanded the blade with 100, 120, 150, 220, 320 grit. There were still some vertical lines visible but I gave up, I was tired. I knew they would stay visible when I transitioned from 100 to 120 but at that point I said "good enough!" I stopped with a satin finish at 320 to camouflage the remaining scratches.

I reprofiled the point very carefully on a belt sander. By very carefully I mean one pass, touch it with my fingers to ensure no heatup, one more pass, etc. It never got too warm to touch.

When the end was finally a point it had thickened (no surprise, I had done this before with a kitchen knife that had a broken tip). So I pre-sharpened the tip on my belt sander.

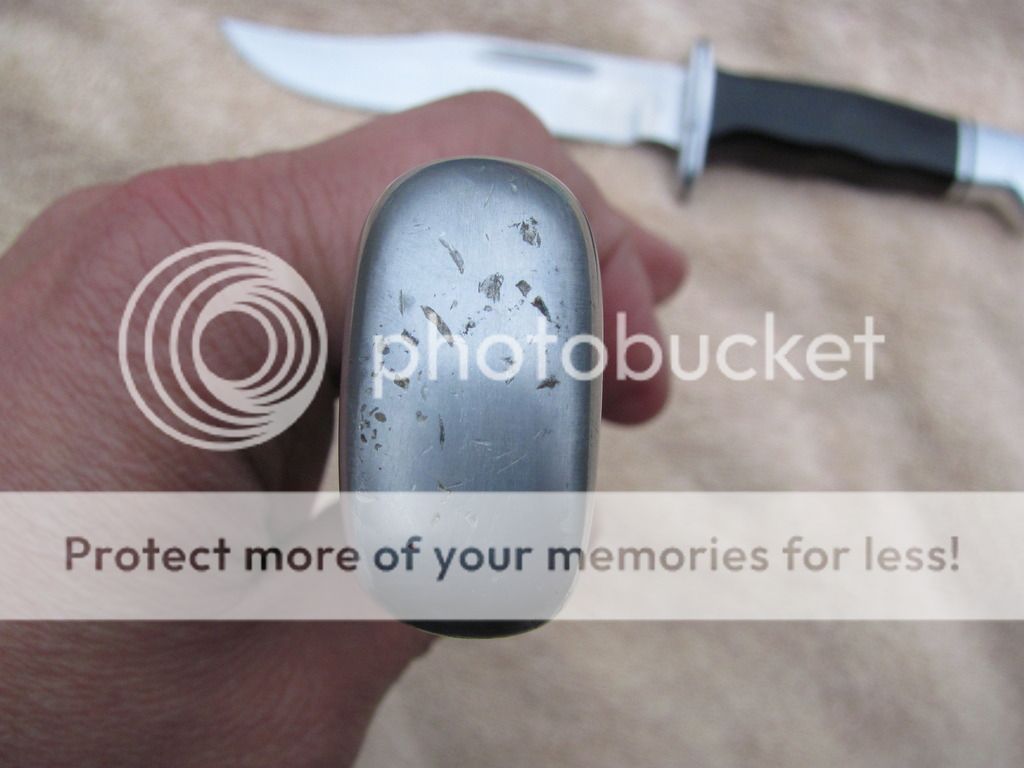
Then I started with 220 on the phenolic, working up to 400 with the pommel masked. At 400 I unmasked the pommel. I had not noticed serious crud beaten into the pommel! The hand guard also looks like it was dropped in gravel and then stepped on. I'm talking gouges and pieces of dirt or rock pounded in. I would have had to seriously reduce the size of the handle/pommel to remove them. I chose not to do that. I sanded the pommel and aluminum handle with 400/1000/2000/emery paper. The phenolic is not quite as glossy as the undamaged knife but it is close. The pictures do not show the difference in gloss of the phenolic, nor do they show the tiny vertical scratches that are still visible under a close inspection. But the satin finish hides the scratches enough for me.

I sharpened with my Gatco guided system coarse stone at 15 degrees to ensure I had nice shoulders above the bevel. I then put on a 17 degree bevel with a Lansky.

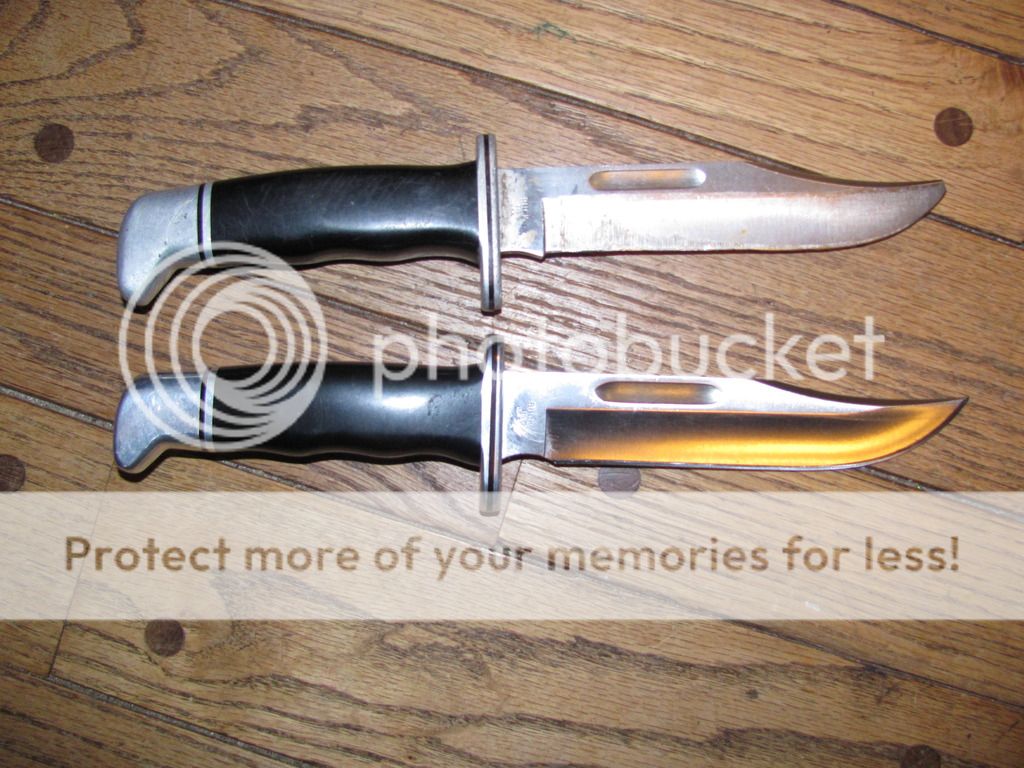
Most of the damage was near the choil/handguard. The close up shows that a fair amount of edge was removed about 3/4" from the choil - so the edge is not straight there. I would have had to remove a lot of metal from the rest of the edge to straighten that area out. I left it. If the knife gets used/sharpened a lot the edge will eventually straighten a bit. Alternatively if I am feeling really motivated some day I could reduce the entire edge enough to straighten it. Then I'd probably reduce the handle/pommel size enough to remove all the dings. At that point it would be a "119 minus" and I would give it to a kid/small handed lady. But that is probably a weekend worth of labor.

The restored knife is on top in the pictures below:


Last edited:
Nice work, will be a great user! Thanks for taking the time to post about the rehab. Preston
 
Came out great!

How about some serrations near the guard to camouflage the part of the blade that was overground?
 
Came out great!

How about some serrations near the guard to camouflage the part of the blade that was overground?

Objectively this is a great idea. I'm not much of a serration fan, but it is a very good idea.

I will have to read some accounts of adding serrations to see if it is within my skill/patience zone.
 
Back
Top