Hi, I am new to Blade Forums. I have put handles on a couple of full width,full tange blades but have never put a hilt on a skinny tange. I have some ideas, but would like to get it right the first time.
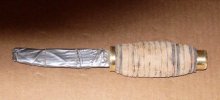
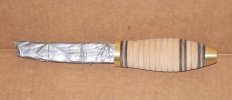
I will use a Frost laminated blade with a full tange. It will be a working knife so beauty is not important to me.
Bolster/guard - I am thinking of using stainless steel washers, I am not sure how thick I should make it.
Wood - is elm a good choice? Since I will not be using ferrules, I would like a type resistant to splitting.
Epoxy/glue - ???? - I plan on using the knife year round. 130 degrees in the summer in my car to -20 degrees in the winter.
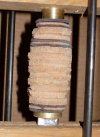
Bolster - stainless steel washers with the end of the tange heated and preened.
I haven't bought anything yet so any advice is welcome.
Thanks,
Bo Thomas
People haven't been knocking each other aside to take a crack at this series of questions so I'll give it a whack.
It's hard to answer the questions with the little bit of information you've given. A drawing or photo's would be helpful to better understand the knife you have in mind.
What is your background in working with metal? Are you 16 or 60 yrs old?
I'm a little confused with some of the terminology being used. You talk about getting a blade with a "full tange". Did you mean a stick tang that goes all the way through the handle? I think I've seen them referred to as "through" tangs (but I might be making this up too).
I think you're planning on using a Scandinavian style blade with a stick/hidden tang that goes all the way through the handle where you will peen the end (mash it down sort of like a rivet). If you heat the end of the tang for this process you'll probably burn your handle. I'm pretty sure it's normally done cold.
I've only made six stick tang knives. To me they are more difficult to make than a full tang style blade requiring more metal and wood working skills.
Bolster and/or guard, mmmm... if I had a picture of what it is supposed to look like I could talk as if I knew what I was talking about, but just because I DON'T know what I'm talking about doesn't mean I won't try to answer the question. You talked about using stainless steel "washers". It's probably just me but I immediately think of washers that you would get from the hardware store. I don't see how this type of stainless steel washer would work with it's great big hole in the center. But the concept of using stainless steel is sound. You want a piece of metal slotted to fit over the tang and slide down snug with the ricasso leaving no gaps showing(ideally). Brass is often used here partly because it is softer and easier to work than stainless steel. Metal as thin as a washer indicates to me a simple type of guard that might stick out a little bit. That should be doable.
Elm is not typically a first choice for handles. Why are you asking about elm? Do you happen to have some on hand? I have no idea if it would serve your purposes or not. Do you have an old hammer handle? If its wood is good enough for a hammer it should hold up to what you'll use your knife for. If you intend to use this knife really hard then perhaps you would consider a stabilized wood, or synthetic handle material such as micarta or G10.
For glue use a slow curing epoxy. There are brands recommended throughout the threads, but slow curing is a common trait. They tend to be stronger and work better.
Answers to most of your questions are buried in the threads of the forum. Have you been nosing around in them, doing searches on the topics you had questions about? If not then this would be a good time to start.
How do you plan to make a hole through your handle material for the tang? I can't help with that as I've never successfully done it.
What tools do you already have? Files, rasps, clamps, and sand paper are pretty useful to have.
Tell us more about your "vision", and about yourself. You will get more feedback when we know you better. We want you to succeed. Good luck.
- LonePine
AKA Paul Meske, Wisconsin