How To How do I fix a lockback that is too tight?

Joined
Jul 27, 2017
Messages
727
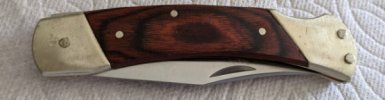
I am trying to make a lockback from a Rough Rider kit. Please forgive the sloppy crafmanship, I'm still learning, and I have not ground down the pins or done the sanding and buffing, yet. I'll get there.

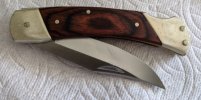
I have a problem, though. I think I made the plates too tight. This makes the lock on the spine stay up (see image) unless I press it down manually, and press it pretty hard.

When the lock is loose the blade will just drop free up to the point in the photo.

If you were to hold it in your hand you would find that the back lever/spring (not sure what to call it) does not want to teeter-totter. There's too much friction. This is an issue from both the front and from the little button at the back.

Does anyone know how I can fix this? And how to prevent causing this problem in the future?

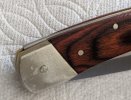
I am considering putting a screwdriver in there and twisting to try to open the space between the two plates to relieve some of that friction but I'd rather get some of all of your advice before I mess this up any further.

Many, many thanks!!!
 

Attachments

  • dea343f7-d975-4743-800e-5c79dc5467dd.jpg
    dea343f7-d975-4743-800e-5c79dc5467dd.jpg
    37.8 KB · Views: 8
  • 69e9bab5-513b-4631-a24b-88fecb638597.jpg
    69e9bab5-513b-4631-a24b-88fecb638597.jpg
    18 KB · Views: 8
  • aaea1f63-e103-4a3c-bf98-10716b11ffd8.jpg
    aaea1f63-e103-4a3c-bf98-10716b11ffd8.jpg
    57.8 KB · Views: 8
chances are you peened the middle pin to much.
 
Tap it lightly once on each side-with the other side unsupported.
Repeat as necessary.
 
The three pins have different functions and are peened differently.
Once all pins are in place and everything seems aligned:
The but pin is peened first. Peen it snug. You can always go back later and snug it more.
The pivot pin is peened next. Peen it only enough to start getting some tension/friction on the blade. Again, you can tighten it much easier than loosening it.
Last, peen the center fulcrum pin. This pin is barely peened. Just enough to hold it in the scale. You aren't trying to hold the scale down, just keeping the pin from moving.

Once all pins are peened, trim most of the excess off with a fine file and then do any final peening only on the pivot pin. Go slow and test the blade. Don't finish them flush yet. Give it many open/close cycles. Oil the places that rotate or rub. Open/close some more. Peen the pivot as needed to get a smooth opening/closing. When you think it is done and perfect, open/close a dozen or so more times and set aside for a day or so. Come back and check again. It may seem looser and need the tiniest of additional tapping. Once satisfied, finish the pins and do any final sanding/buffing.
 
Gosh, fantastic advice, folks! I wish I knew this two days ago!

The knife seems to open and close better, now. I only have sandpaper, a flat desk, a peen hammer, and the vice I borrowed from my neighbor. My wife was not happy with me hammering on the dining room table for some reason. I put down a brown paper bag to keep it clean... should be just fine, right...? ;-)

That advice about tapping the center pin with the other side unsupported seemed to help, as did oiling it and exercising the joint a gazillion times. Thanks, Bill.

I put an edge on the blade, too, but I think I'll take it to a proper sharpener.

Between the sanding and exercising that mechanism I seem to have a nice blister on my thumb.

I started sanding a second Rough Rider kit, a much smaller one that seems to need A LOT more sanding. The bolsters and plates are steel, not brass, and I can really feel a difference (especially my poor thumb).

I'll manage the pins as you described, Stacy.

Once they're both ready, I'll take out my never-been-used Dremmel and try the polishing wheels and that red gunk.
 
Find a better place then the kitchen table to work ... if you want to keep the wife happy.
 
Back
Top