How do you drill scales for a tapered tang? {Pics of finished knife added}

Ok, that make more sense. You lost me for a second. :)
I think this will suit me best, since I am still learning most of this stuff.
It just goes to show you, there is more than one way to taper a cat......... :p
 
I am still a little confused Fred. Do you then taper the scales to match the tang?

+1

If you drill the scales while the tang is full width and then taper the tang, the holes in the scales will be perpendicular to the tang surface, not the center line. Am I missing something here?


-Xander
 
+1

If you drill the scales while the tang is full width and then taper the tang, the holes in the scales will be perpendicular to the tang surface, not the center line. Am I missing something here?


-Xander


I think you are correct. You could taper the scales to match the tang but forget about liners because they'll be half gone.
 
Well not to be ornery here--- but drilling and THEN tapering the tang makes me think of Larry the Cable Guy's famous line--- "That's like wipe'n your butt before you poop."

:eek: :p

Sorry for the bathroom humor, but I liked the analogy, disqusting or not. ;)

Or to think of it from a fabricator's standpoint, that's like fitting up a joint just the way you want it for welding, and then hacking a chunk off with the torch before you weld it.

I can see how this could work with some materials and small pins, but if you did this with Corby bolts, ivory scales, and fitted up to a guard- you're going to have gaps somewhere.

That's just physics guys :p ;)

Ben- I'm impressed!!! Looks great! Stout and nicely executed. :thumbup: :cool: :)
 
I think you are correct. You could taper the scales to match the tang but forget about liners because they'll be half gone.

You are correct; there's nothing like arguing against your own points. Its been a long week.
Sorry for the miss direction Ben.

It should have been drill the tang before the taper, attach the scales to the tapered tang and drill them. When I read back over what I said; I new it was going to be an early night.

Fred
 
No worries Fred, I appreciate the input!
 
I taper the inside of my scales on my disk with the table on. I use a caliper to determine how many thousandths I need to make up. I measure often. When I am done, the scales are parallel to each other on the outsides.
 
I appreciate the desire to make jigs and calculate things......but I think everyone is over thinking this.

If the tang is 4" long, and the blade is .125" thick, and you taper it to .0625" at the butt.....the angle is about 1/2°. Making a jig to compensate for half of 1/2° of angle = 1/4°, is almost fruitless. If the jig is to allow uneven sided handle material, like stag and ivory, to be drilled straight, then it is needed, but for flat and roughly parallel handle scales, it is completely unnecessary.
Most drill press tables are not true to 1/4% anyway, so you may be drilling that much ( or more) off to start with.

Here is the ten steps to a perfect handle that I have done hundreds of handles, flat and tapered :

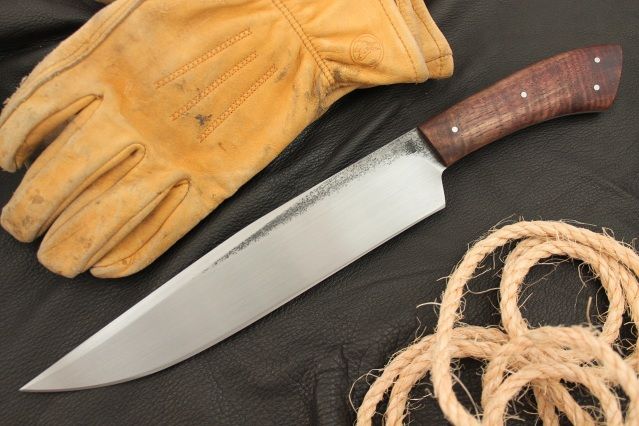
1) Make the blade and finish it. Holes in tang should have been drilled pre-HT. I make tang holes 50% larger than the rivet/bolt size. This allows for some alignment errors, and makes for a cleaner pin/bolt assembly. It sounds like a lot of slop, but it amounts to .03125" space around a 1/8" rivet, and .0625" around a 1/4" mosaic rivet or Corby bolt.
2) Cut the handle block in half to make scales. The block should have fairly parallel sides. I usually cut a rough profile for the handle first, leaving about 1/8" to 1/4" overhang.
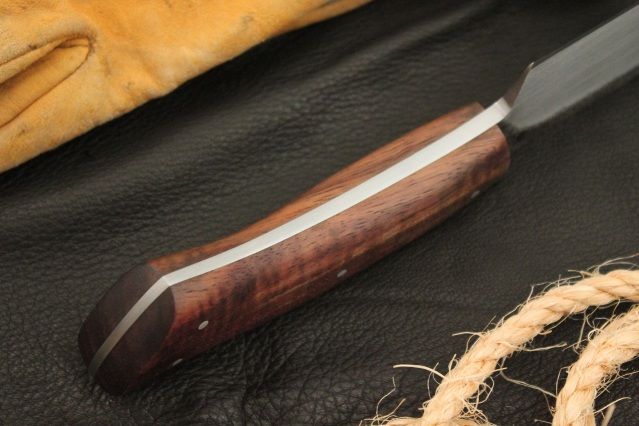
3) Sand the inside of the scales flat, and tape scales together, then shape, sand, and buff front side. This part can't be sanded and shaped after assembly without messing up the blade.
4) Glue on one scale and let dry.
5) Set on drill press table, scale down, and drill from tang side. Use a 1/16" drill bit to make this hole, centering it in the tang holes.
6) Glue on other scale, making sure front ends are aligned evenly - let dry.
7) Place on drill press and drill through existing holes with 1/16" bit. Re-drill for the desired pin/bolt size.
8) Put glue in holes and insert pins or Corby bolts.
9) Tape up blade right to the handle. This protects it from accidental scrapes.
10) Shape handle to desired shape, sand to 400 grit, buff - DONE.

Now, as an engineering person, I realize that if the tang is tapered, the hole is at an angle to the blade centeri\line....but this misalignment is about .010" forward of the other side in a 3/4" thick handle. My eye is good, but I can't see that one side is forward of the other when the difference is .010". What is important (and will matter) is that the hole is true from side to side. The pins/bolts should slide through with ease.....because the through hole was drilled after the handle was glued and dry. This also greatly lessens any gaps showing up as uneven glue lines.
 
I just finished up my first tapered tang, using this jig. I figured a few of you would like to see the results.
And by the way, it worked like a charm! :thumbup:

IMG_1952.jpg


IMG_1955.jpg
 
Very nice Ben!!! I'm glad you took the time to build a fixture; they minimize the headache sometimes.
 
Real, Real...NIIIICE Ben!
Tang taperin takes em to the next level, and congrats on the BDU write up!!
 
Thanks guys! It should make drilling stag and horn a snap too!
 
Back
Top