How would YOU flat grind?

Joined
Sep 5, 2010
Messages
876
I understand the concept, how its done etc.

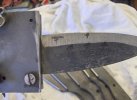
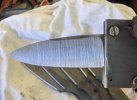
Now imagine, you had an apprentice, or a little sibling and you wanted to explain in the easiest to understand concise way. How would you explain how to flat grind, full flat grind a knife.

I am showing a friend and I can do it, but apparently I cant quite explain it to him, so I am petitioning you fine gentleman!

I appreciate any and all responses on this. Very curious to see the different ways we describe something.
 
have you read the stickies and have you used the search? I believe there could be a lot there for you and your friend. Frank
 
I like to use Fred Rowe's Bubble Jig when I'm flat grinding. I use a table on my home pc (can't link you to it right now because I am at work), the table tells me what degree angle I need per side to obtain the height of flat grind I want depending on the width and thickness of my blade. I then set the bubble jig to that angle and go to town, once I have it established I remove the jig and its easy to maintain that angle. For me, this method pretty much gaurentees I don't mess it up.

Edit: here is a link to the table I use- http://www.bladeforums.com/forums/showthread.php/562593-Chart-of-Blade-Angles-for-Flat-Grinds
 
Frank- I appreciate the response but I'm not looking for stickies I've read a fair amount of them, I'm looking for individual responses and seeing how all of our different mind sets approach a problem :)

Bpiatt- great chart, ill have to experiment with that, thank you!
 
Tin. Man - I use a jig. A few photos will explain a lot more than words so....


Good luck.

-Peter
 
Here is a series of Pictures I put together a while back.


1) make a 45 degree bevel on each side leaving close to the final thickness on your edge
2) set the angel of the blade with the belt such that you grind the high side of the bevel, leaving the edge, there is always a gap between the edge of the blade and the belt
3) keep moving the grind up the blade, always leaving some of the bevel,
4) when you are halfway up the blade (flat grind) there should be half the bevel left, adjust your angel accordingly, this is a very small adjustment
note the lower arrows on pic 4, if you don't have much bevel left move your grind to this point, you should see a good gap between the edge and the belt if you are grinding here

5) take flat almost to the spine of the blade, you should have a tiny bit of bevel left

If you have something that looks like pic 5, you can now go to finer grits and just grind flat, when you reach the spine you should be at the thickness of your final edge.
 

Attachments

  • HPIM3588.jpg
    HPIM3588.jpg
    36.5 KB · Views: 47
  • HPIM3589.jpg
    HPIM3589.jpg
    48.2 KB · Views: 46
  • HPIM3592.jpg
    HPIM3592.jpg
    43.2 KB · Views: 48
  • HPIM3591.jpg
    HPIM3591.jpg
    48.7 KB · Views: 48
  • HPIM3595.jpg
    HPIM3595.jpg
    53 KB · Views: 58
Start by marking your center line (actually, a line on either side of center, leaving about 0.03" as your center width). Next, grind a small bevel 45° bevel that very nearly touches your marked center lines (I grind everything with the edge up, looking straight down towards the edge; arms/elbows tucked to your side, one hand on the tang, the other supporting the spine with a thumb on the flat). I usually not-quite split the difference between that 45° bevel and the flat, and I start to establish my primary bevel, working it until it envelops the entire 45° bevel you started with. Then it's just a matter of working that established bevel up. You do this by increasing the pressure applied to the spine-side of the blade as you grind. It doesn't take much, and if you try to push it up too quickly, you very likely will create another bevel. Rather, keep the blade flat against the belt, and apply a subtle bit more pressure to the spine.

--nathan
 
And...because this forum apparently has too much indigestion to post a long thread at times, here's the rest of my response:

When grinding, pay attention to where your sparks are coming from. At first, it's a good idea to make all the sparks fly from the center of the belt. This will ensure that you are not cutting the edge of the belt into your plunge area which will tend to raise your bevel height at the plunge and make it uneven. I also touch the blade to the belt just forward of the plunge to find my flat, glide the knife over to grind into the plunge area, and then make a full pass all the way to the tip. There is typically a bit of lifting of the tang as you progress towards the tip to account for the taper, but be careful not to burn up or thin our the tip too much.

Those are just some thoughts and things that have helped me. Very few individuals will be anything approaching decent at this when they first start, no matter how gifted the teacher. It takes reps to develop muscle memory and to learn how to control the blade so that you achieve what you are looking for.
 
Thank you for the responses so far! Peter- Your pics arent coming up it looks like, which just increases my curiosity ;)

Patrick, great pics, and very nice grind sir!

Nathan, I agree but nice to have descriptors to help develop the reps. Awesome written description thank you for that.
 
I start by putting a 10 degree bevel on the edge, on both sides of the blade. I don't mark a center line; with the method I use; the height of the bevel will indicate whether the edge is centered. If the bevels are the same height the edge is centered. Once I have the edge at heat treat thickness, I change the angle of approach to 5 degrees relative to the platen. If the blade is a scandi grind I'll start the grind with the finish bevel angle and grind until I reach the desired bevel height; usually 12 degrees.
With blades that will have a secondary bevel at the edge, I like to grind the bevels with progressive angles. The grind takes less time if its done with progressive angles since you are always grinding on the high spot. When you change to a more acute angle you are grinding on the high spot again.

Flat grinding with a Bubble Jig is done in a relaxed posture, no need to lock your body. Grinding with your hands up in front of you instead of down and below you, with your neck bent, will keep you at the grinder longer with a lot less stress.

Fred
 
Back
Top