Inlay Sheath - something new for me

Joined
Sep 21, 2016
Messages
450
Hair-on inlay, with a deer skin lining, using my Singer 15-91 for the inlay stitch and my Cobra 3 for all else. I hand skived the edges for the inlay window as best as I could in order to make the transition a bit nicer, and supported the backside of the inlay with the cut-out from the window so that the front of the sheath remains nice and solid.
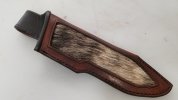
9532.jpg
 
Nice job, Amy..... the first one is the toughest...they all get easier from here on. Hair on inlays are harder for several reasons. It's almost impossible to skive the flesh side to thin the inlay down some and likewise gluing the inlay down to the front panel prior to inserting the filler plug is also next to impossible because the hair is "a moving target". You might consider buying and using 2/3 Oz. leather for your front panel to reduce the thickness of the transition or step of the window. Then back that up with 5/6 or 7/8 for the main body of the sheath . Since I have splitter I just split the block cut 7/8 to about 50%, install the inlay and plug and then cement the the two pieces back together to the original 7/8 and then cut out the actual pattern and stitch the inlay window. Keep at it!

Paul
 
Thanks, Paul !! This one definitely was a challenge. Having some 2/3 oz. to glue to the leather I used for sure would have made things easier for me--that's a great suggestion that I'll look into for the next one that I do.
 
Hey Amy. Great first sheath. Heck, you dove right in there with the hardest inlay material you can use for your first time.
Glad to see you got the 15-91 up and running. It's a trip trying to get your inlay window stitches perfectly straight. Thank God we can turn the wheel by hand, one stich at a time. Waiting for your next one.
 
Thanks, Vinnie. It was only my blissful ignorance that caused me to jump in with the hardest inlay material the first time.....I'm sure to have shied away from it, had I known..... And yes, keeping those stitches straight is a bear, even one stitch at a time. (I still ended up with a wobble rounding that last corner.) Love, love love! that old machine though--it's perfect for my needs. I'll post attempt #2 as soon as I have it completed (Hopefully sooner rather than later).
 
Glad you're enjoying the 15-91.
One thing I found out really quick with my aging eyes. I set up 5 different lights. 3 in the back, and 2 up front. All are at different angles all pointing to the foot area. It helps a lot with eliminating any of the shadows.
I hope your vision is better than mine.
 
Amy,
May i ask what size needle and thread your using, I have a 15-91 as well, just finished rebuilding it and getting ready to start sewing with it. Thank you in advance, Pugs
 
Back
Top