-
The BladeForums.com 2024 Traditional Knife is available! Price is $250 ea (shipped within CONUS).
Order here: https://www.bladeforums.com/help/2024-traditional/
You are using an out of date browser. It may not display this or other websites correctly.
You should upgrade or use an alternative browser.
You should upgrade or use an alternative browser.
Ken Erickson- guess the pattern
- Thread starter ken erickson
- Start date
- Joined
- Aug 27, 2004
- Messages
- 2,701
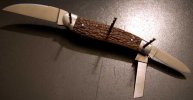
Here is a picture with some of my dyed and picked bone scales on. Starting to look and feel like a knife. Its been a blast making my first whittler. I can read and look but nothing works for me like getting down and doing it.
Next step now will be to cut the nail pulls and then start cleaning things up for the final assembly.
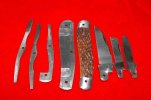
I will hand sand any imperfections out of the springs and give them a high polish and clean up the inside frames to about a 4oo to 600 grit. I will try and take a picture of the two springs, three blades and center spacer before I put it back together for the last time.
PS. sorry for the quality of this picture. I had to take my light box/photo studio down , something about my Wife needing the table for thanksgiving!
Next step now will be to cut the nail pulls and then start cleaning things up for the final assembly.
I will hand sand any imperfections out of the springs and give them a high polish and clean up the inside frames to about a 4oo to 600 grit. I will try and take a picture of the two springs, three blades and center spacer before I put it back together for the last time.
PS. sorry for the quality of this picture. I had to take my light box/photo studio down , something about my Wife needing the table for thanksgiving!
Attachments
- Joined
- Aug 27, 2004
- Messages
- 2,701
Oh Boy! Thats a good question. I now know why everything and everyone says how much extra fitting and time there is in building a three blade whittler like this. I made a hardened jig pattern (for lack of a better term) . I do not think I will be making another for a while as I am busy filling orders. This being the first of this pattern for me , I would make minor changes in a few areas.
Ken
Ken
- Joined
- Aug 27, 2004
- Messages
- 2,701
The way that I do my pivot pins maybe different than many others but here goes. I will make the hole in the blades .001 to .002 larger than the pin dia. I pick a pin that is as close to the bolster hole size as i can find. I do not have a little lathe yet so I purchase my pin stock and it varies quite a bit in size. I like to think as I peen the pin it swells up and grabs ahold of the bolster but does not swell and lets the blade pivot. As far as how much longer the pin is , I guess I am about .030 proud of the bolster when I start to peen. As I peen I look at how I am filling the counter sink and I may take the knife over to the belt sander and reduce the height. I do not want the pin to crack radially. I also have some heat treat foil in between the blade and bolster and as I peen I keep checking the blade tightness . I peen till I feel the blade getting a bit tight then pull the shims out. At this point hopefully I have filled the counter sink and will peen to get any side play out. IF all goes well , when I grind down the proud part of the pin, you can no longer see it.
Ken
Ken
- Joined
- Feb 27, 2001
- Messages
- 26,713
These in progress threads are great and I would like to encourage them, but we need to stop the "exchange" part of them. Please take it to emails or use one of the many forums in the exchange area and reserve this forum for discussion.
Thanks.
Thanks.
- Joined
- Feb 27, 2001
- Messages
- 26,713
Again, I want to encourage these types of threads and Ken has done nothing wrong here. As much as I was tempted, I just don't want me or the rest of us to use these types of threads for anything but enjoying and watching these knives come to life and understanding how much work goes into them. We can always contact the maker off line for orders and I hope that we will. ") .
.
No big deal folks.
.No big deal folks.
- Joined
- Nov 11, 2006
- Messages
- 2,697
I think it is fascinating to see the knife develop.Thanks for sharing it.
- Joined
- Feb 21, 2006
- Messages
- 4,677
I think it is fascinating to see the knife develop.Thanks for sharing it.
X2.The countersink didn't even dawn on me.Great knife in the making
- Joined
- Aug 27, 2004
- Messages
- 2,701
- Joined
- Aug 27, 2004
- Messages
- 2,701
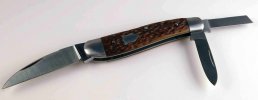
Pretty much finished. I have to do some final rounding and polishing of the bolsters and a final sharpening.
I am pretty happy with this one except for a few changes I would make in the next. I have read some posts were people with whittlers the pen and coping blade do not have much tension? I guess I almost have too much spring on this guy. Its a bit of a fingernail breaker opening the coping and pen blades. From a standpoint of using there is not worry about folding a blade up by mistake. I think I would make the master blade a bit thicker at the tang and increase the pen and coping blade tang thickness. I do have some blade rub when you open the pen and coping but with the 400 grit as ground finish you really do not notice.
Thanks everyone for watching the thread. It was a neat knife to make. I learned a lot .
Here are the specs
D2 blade and springs
410 frame/bolsters
closed length 3 5/16
blade tang thickness master .145 pen and coping .055
standard nail pulls
as ground finish