Knife making

Joined
Mar 10, 2014
Messages
18
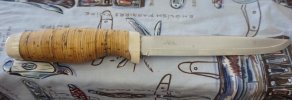
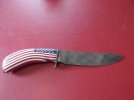
I got this knife blade
70b311ede8ebfa38d153af7a705fd1a7.jpg

Do I need to put a brass bolsters finger guard on it. If show what size would I need.
 
It's your choice. If this is your first knife you may want to go without, a poorly fitted bolster is pretty ugly and you may have a hard time drilling the pins if it is hardened, which is surely is.
 
you don't need to but I'd do it if I was to make a knife out of that blank.
Brass, bronce, stainless, antler, bone hardwood etc.
The blade looks like a puukko (scandinavian knife) Google some images to get an idea and just go for it
 
There are a number of companies that supply fittings for blades. Many of the bolsters/guards are precut. You will need to file for the final fit but if you are careful it should look good.
 
Who made/supplied the blank? There's a chance that they also supply some pre-cut fittings that you can then shape/finish how you see fit. If not, you can probably find a pre cut guard and/or pommel from any of the knife making supply companies. I know Jantz Supply has a small selection of pre-slotted gaurds. You may need some needle files to adjust the final fit up, but it takes some of the guess work out.
 
This is the blade I got
This karesuando knife blank is made out of carbon steel blade measuring 103 x 21 x 2.5mm. It is one of the most popular blades for bushcrafting and other outdoor activities.

What's is the guard of the blade
 
Fill out your profile so we know a bit about you, like age and location. It will help with better answers as well as possibly get an offer of help from a local maker.

Normally, you would take a piece of 1/8" thick brass sheet and cut a slot to fit the tang, then shape it as you wish the guard to be.

Many suppliers sell pre-made guards, but it may be hard to find one that is an exact fit. A quick search shows those type blades are about .100" (2.7mm). A pre-made guard with a slot of .100" by about .650" would be a good candidate. You may still have to do some fitting work.

An alternate and easier method would be a mortise handle:

First thing is to tape up the blade to within 1/2" of the tang with blue painter's tape ( or any paint type masking tape). You don't want it getting scratched or you getting cut!

Cut a block of handle wood in half lengthwise. Lay the tang on the cut side of one piece and draw the outline of the tang. Carefully remove the wood inside that mark deep enough so the tang is no longer proud when set in the recess. It does not need to be an exact fit except at the very front where the blade will enter the hole. That part should be as close a fit as you can do. Once the channel is mortised out deep enough , check the fit by placing the other piece of wood on top and holding/clamping them together. The blade should be able to be inserted with no binding. If all is good, set the blade side and glue up the two pieces of wood with a woodworking glue like Tightbond II. Once glued together and clamped, stick the tang in and out of the channel many times, wiping off any excess glue each time. When the tang comes out clean, set the blade aside and let the glue cure. You can check after an hour to make sure no new squeeze-out has seeped into the channel.

Once the glue is dry, check again that the blade will go in and out OK. You can make a wire scraper if there seems to be something making it not go in good.

Shape the handle and sand/buff as you wish, making the front end where the blade enters a proper fit.

Once the handle is done, put "1 hour epoxy" ( do not use 5 minute epoxy) in the tang hole and then insert the blade tang. Work it in slowly, and wipe off the squeeze out with denatured alcohol. When all the way in place, wipe off any glue and let cure with the blade upright. Once the epoxy is gelled in the work pot, wipe off one more time and set aside to cure overnight.

A little touch up on the sanding/buffing and sharpening the blade is all that is left.
 
OK, then what you will need is a piece of 1/8" brass about 1" square. Saw a slot in it and file the slot until it is a tight fit on the tang at the shoulders of the ricasso. Drill out the antler with a drill bit to make a hole big enough to allow the tang . You will probably need to cut off some of the tang to make it not too long. Leave about 3" of tang.
Use epoxy as described above to glue the brass bolster and antler on. After the resin is cured, file the brass down until it meets the antler. File and shape them together to get the front shape needed, and sand that area to 800 grit.

If you lived near me, I would have you come over and help you do it. Fill out your profile and maybe someone will offer the same.
 
He told you what size should work. Go to one of the knife supply places (usablademaker, jantz, texas knife) and find it.
 
If all is good, set the blade side and glue up the two pieces of wood with a woodworking glue like Tightbond II.

Stacy, would this also apply when gluing up two pieces of wood for a "Bolstered" handle? In other words, if Jarrah burl was your "Bolster" and Curly Anigre was your main handle material, Could I glue the two together with Tightbond ll as long as I have pins in both pieces of wood? Would this be a better bond than G-Flex?

Sorry for hijacking the thread, thought this would be better than starting a new thread :rolleyes:
 
If I was to buy the brass bolster finger guard witch one would I need please can u help me

As has been stated, knowing a few more details about you would greatly help in giving answers. Location is a big one. I'll second Stacy's offer to help if you're anywhere close to Midwest USA.
As for which premade guard to get, it looks like you need one with around a 2.5mm wide slot. Personally, I'd just get a piece of brass and slot my own, as then you know you'll get a proper fit. If you can fit a premade guard to an antler handle, you should certainly be able to make your own guard too.
 
Stacy, would this also apply when gluing up two pieces of wood for a "Bolstered" handle? In other words, if Jarrah burl was your "Bolster" and Curly Anigre was your main handle material, Could I glue the two together with Tightbond ll as long as I have pins in both pieces of wood? Would this be a better bond than G-Flex?

Sorry for hijacking the thread, thought this would be better than starting a new thread :rolleyes:

Yes, the mortise method would work with a wooden bolster. When permanently joining two pieces of wood together, Tightbond II and Tightbond III are superb. It also comes in a dark wood formula that matches many handle woods even better. Properly sanded to 120 grit and mated carefully, the joint literally disappears into the grain lines. I have made tsuka and saya that seem to be one solid piece of wood. Same procedure works great for wa hands and some through tang constructions.

However, when I do a wooden front bolster, as in a wa handle, I usually make the bolster block one piece and slot it. I then drill out the main handle block with a 1/4" drill. I slip the bolster block of wood on first and then put the epoxy filled handle on next. It is a lot easier to pour the epoxy down a 1/4" hole than through a thin slit. By using 24 hour cure epoxy, I am in no rush, so I can mate the alignment pins and get the handle in a clamp/jig quite easily.

The advise to cure the resin with the knife tip up is to keep the run-out from dripping down the blade and making a mess.
At work we get round spray bottles of jewelry cleaner in 48 count boxes with a heavy cardboard grid insert to hold them in shipping. The 1.25" grid block makes a perfect drying rack for working on handles.
 
Andy, There are pictures of some knives we have made right on this page. If you read the stickys, you will find the BF search engine, which will find many more photos. The Gallery is nothing but photos. The Exchange is filled with more.

With no info on you blade, or plans on how you will make the knife, and no profile filled out as a guide - I don't think we can help you any more than we have.

Here are some knives I have made.

The puukko is very similar to the blade you have. I used reindeer antler for the bolster and cap, with birch bark between them. You could use a brass bolster/guard on the front and plain wood just as easily.
 

Attachments

  • DSC00653 (1024x351).jpg
    DSC00653 (1024x351).jpg
    33 KB · Views: 24
  • DSC00651 (1024x682).jpg
    DSC00651 (1024x682).jpg
    53.6 KB · Views: 28
  • DSC00652 (1024x682).jpg
    DSC00652 (1024x682).jpg
    77.7 KB · Views: 26
  • DSC00510 (1024x682).jpg
    DSC00510 (1024x682).jpg
    38 KB · Views: 24
  • DSCF2471.jpg
    DSCF2471.jpg
    42.5 KB · Views: 26
Back
Top