Leading Edge knife sharpening system - 3D printed

I've also checked some printers and came to the same result: you really need a 3d printer yourself.

777edge's post made me check some other things about spyderco sharpmaker addons.
The idea i like most there is the one of small adapters for the sharpmaker, that you actually put in the 30 and 40 degree slots and provide an +-2 and +- 4 offset for the original. So that you can use it to get the angles 44,42,40,38,36,34,32,30 28,26 inclusive, with just a couple of small adapters.

A 'no' is what I have, and a 'yes' is what I can get :) so 777Edge, since you're the only 3d cad person I know that can possibly do spyderco sharpmaker things:
would you be willing to create those? I'd be willing to sponsor/pay a bit.

I'm always keen to do anything knife and sharpening related, no problem.

My only precondition would be that I will open source the design and give it away for free when we are done with it, so its available to anyone who wants one.

I don't own a sharpmaker system, so If I can get the exact dimensions for the sharpmaker rods, and an idea of what you and others might be after maybe with a PM chat then I will work on a design.

When I have the dimensions, then I can also design stone holders for the sharpmaker rods for my LeadingEdge sharpening system.

I will also design a sharpmaker stone holder for Lansky rods, just to make it even more usable for the masses.

Here is what I have already made for the Lansky system to hold Lansky ceramic rods, Venev stones and DMD bonded stones.
https://www.thingiverse.com/thing:4736877

PM me and we can have a chat about it.
 
Last edited:
777Edge, for some reason, I cannot PM you (maybe because of non-paid membership).
Any other way to setup the conversation with you?
 
777Edge, for some reason, I cannot PM you (maybe because of non-paid membership).
Any other way to setup the conversation with you?
No problem, I am already most of the way through designing upgrades for the Sharpmaker, including stone holders for my Leadingedge system, and also adapters that should work with the Sharpmaker slots to allow angles from 20 - 50 degrees (10-25 DPS), with 2 degree increments (1 degree per side).

I am basing the size of the sharpmaker stones on 13mm / 0.511 Inches for each side of the triangle. Hope that is the correct size, it is all I can get online. If you have a caliper, please measure the sharpmaker stones and let me know here asap.

I'll also start a separate thread for it here on bladeforums when I am done.
 
Last edited:
That's great! attached are the pictures I just made. If you need more, let me know.

There is a little play with the diamond rods (which gives a slightly different angle I now see), so I guess the medium rods are a better size to base the width off.

some ideas + thoughts:
  • It would be nice if the adapters can be printed in a single run, making it easier/cheaper to have it printed at a shop.
  • mark/number the inserts with angle and in which receptacle to place (30 or 40, keep in mind that the angle of the inserts is then different for different adapters)
  • a small flat that 'rests' on the original hole for the rods for possible extra stability (taking care not to cover the brass finger protector rod holes)

thanks for all your responses and your willingness to pick this up
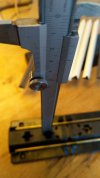
depth of the insert. it's flat at the bottom (not angled)
2021-02-08-sharpmaker-jig-depth.jpg

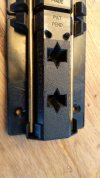
shot of the hole design
2021-02-08-sharpmaker-jig-inside.jpg

width of the insert (holds the flat side of the rod, seems like 14 mm, which gives around 1mm of play, which in case of the medium rod I photographed below is a snug fit.
2021-02-08-sharpmaker-jig-width.jpg

diamond rod side width (60 degrees sides of the rod), this is actually smaller than the medium rod, and this rod has some play, and therefore the angle seems a bit different.
2021-02-08-sharpmaker-rod-diamond-width.jpg

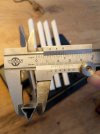
medium rod side width. this is representative of the width of the hole
2021-02-08-sharpmaker-rod-medium-width.jpg.jpg
 
Last edited:
That's great! attached are the pictures I just made. If you need more, let me know.

There is a little play with the diamond rods (which gives a slightly different angle I now see), so I guess the medium rods are a better size to base the width off.

some ideas + thoughts:
  • It would be nice if the adapters can be printed in a single run, making it easier/cheaper to have it printed at a shop.
  • mark/number the inserts with angle and in which receptacle to place (30 or 40, keep in mind that the angle of the inserts is then different for different adapters)
  • a small flat that 'rests' on the original hole for the rods for possible extra stability (taking care not to cover the brass finger protector rod holes)

thanks for all your responses and your willingness to pick this up
depth of the insert. it's flat at the bottom (not angled)
View attachment 1505655

shot of the hole design
View attachment 1505656

width of the insert (holds the flat side of the rod, seems like 14 mm, which gives around 1mm of play, which in case of the medium rod I photographed below is a snug fit.
View attachment 1505657

diamond rod side width (60 degrees sides of the rod), this is actually smaller than the medium rod, and this rod has some play, and therefore the angle seems a bit different.
View attachment 1505658

medium rod side width. this is representative of the width of the hole
View attachment 1505659

My pleasure, and thanks for the good pics and measurements, I think my design ideas should work well based on these.
 
Last edited:
777 Edge,

Congratulation for this sharpening tool - and I like your way off thinking!

You have create a nice sharpening tool my friend!

Thomas

Thank you Thomas, it works very well. Go ahead and make one for yourself if you have access to a printer. I'm sure you'll like using my sharpening system.
 
Thanks, but I still prefer my own sharpening tools :)

But it was nice to se some new ideas, new constructions, and creative thinking!

If/when I by a 3D printer I will probebly print out your tool and test it in the same way I test my own tools.
 
I just recently ran the numbers again accurately and have some updated (more exact) numbers for anyone interested:

Using PrusaSlicer / Slic3r for an estimate, the print time with a Prusa i3 MK3S+ will be a combined total of 28 hours for ALL parts.

This is using between 30-60% infill (More infill and thicker walls for the parts that need to be strong - like the main body and the clamps)

Total plastic filament used will be about 335g.

If anyone is interested in the Gcode files for your own printer, PM me and I'll send them to you.

IMG_20210326_145447.jpg

IMG_20210226_130655.jpg
 
Last edited:
man i wish i had a 3d printer or knew someone i would pay them to print this whole set up for me
 
man i wish i had a 3d printer or knew someone i would pay them to print this whole set up for me

Keep an eye out on Gritomatic, they might start offering this service some time in the near future.
 
Waiting for the 8 mm rods to put my Leading Edge system together :thumbsup: :)

Cant' wait , c'mon Ali Express, hurry up lol

9FanNL2.jpg
 
Cant' wait , c'mon Ali Express, hurry up lol
Dan, just thought i would let you know, just had my first bad experience with Ali Express, and it did not end well. Not going to waffle on, but it is like a huge market place on the net with 100's of vendors some better than others, that is the nature of the commercial world. Any way, i had a parcel go missing, they agreed to refund the money, yeah right, only got back less than one third. So if something goes amiss, be prepared.:mad::mad::mad:
 
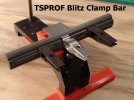
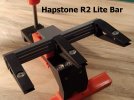
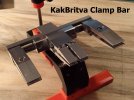
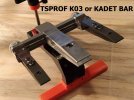
I just added some Bars for TSPROF K03 / KADET clamps; for Hapstone R2 Lite Clamps; for TSPROF Blitz Clamps and for KakBritva Central Wide and side clamps. All of those clamps are available for sale on-line and will work on these clamp bars. They used in the rotatable knife clamp holder. I also posted about this in CelloDan's thread about assembly and use.

Bar - Blitz.jpg

Bar - Hapstone.jpg

Bar - KakBritva.jpg

Bar - TSPROF.jpg
 
Last edited:
I designed a knife, scissors, Chisel, razor and general tool sharpener and made it available for free to help promote our sharpening and knife hobby.

I call it the "LeadingEdge" sharpening system.

It works better than most of the expensive sharpening jigs on the market (Trust me, I have just about all of them). It has many more features than even the most expensive ones. After decades of using just about every system available and being frustrated by the lack of capability and high cost of most systems, I decided to design my own system that can do everything and is very inexpensive to make.

I designed a bunch of accessories to be able to sharpen just about anything with it. (Knives - big and small; scissors; razors; chisels; convex sharpening, whatever you need.) All modules and accessories screw onto either the top or the front of the main unit to enable any type of sharpening. (Only some basic pics here, I haven't posted pics of all of the features)

Go ahead and print & assemble one for yourselves if you have access to a 3D printer.

Here's the info and files :

https://www.thingiverse.com/thing:4135236

It works with everything from KME to Edge Pro to Venev and countless other sharpening stones. Or even just some sandpaper on plastic if you're on a budget.

Enjoy!

View attachment 1537430
This looks incredible! I'm planning to print it out on my (small) 3d printer, which has a 6" x 6" x 6" (~150mm x 150mm x 150mm) capacity. The only part that is a bit too large to print is the main body, which I can rotate 45 degrees to ALMOST fit. I would then have to scale it to 99% for printing. Is that an approach that could work? If so, what other parts would need to be scaled down and which need to be kept at 100% for full functionality? Appreciate any help.
 
This looks incredible! I'm planning to print it out on my (small) 3d printer, which has a 6" x 6" x 6" (~150mm x 150mm x 150mm) capacity. The only part that is a bit too large to print is the main body, which I can rotate 45 degrees to ALMOST fit. I would then have to scale it to 99% for printing. Is that an approach that could work? If so, what other parts would need to be scaled down and which need to be kept at 100% for full functionality? Appreciate any help.
Everything pretty much fits together perfectly and the tolerances are tight so scaling down will cause everything to be just a little off. The magnets might not fit, rods might not fit, all other parts also won't fit properly. I would print everything you can on your printer, and maybe send the main body to get printed somewhere else if need be.

You could try print the main body at 99%, and everything else at 100%, but I can't guarantee how well it will work. Maybe worth a try?

Alternatively, if 99% does not work on the main body, then maybe use your slicer software just to barely "chamfer" the back corners a little bit to make it fit on your print bed?
 
Last edited:
For all of you who have Lansky sharpening stones, I designed and added some Lansky stone holders for my Leading Edge sharpening system. Enjoy!

Lansky Holders.jpg
 
Back
Top