Looking for critique

David W Babcock

Black Metal Forge
Joined
Mar 21, 2018
Messages
80
Good Day,

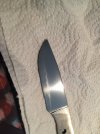
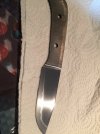
I’m a beginner in a fairly literal sense, I read and take instruction well however. I’m looking to improve and hoping for some genuine feedback - feel free to beat me up so to speak - but please be professional and don’t just hammer me, looking for tips to improve, not looking for a complex lol. This is a smaller (8.25 inch total 3.5 blade 4.75 tang, was 3/16 but less, especially towards the tip, my grinding is getting better but one side as pictured was rough) blade for a female friend that will be fitted with stainless bolsters and Snake wood handle scales. Thoughts?
 

Attachments

  • 3FFEE599-8CFD-4B85-A817-30371A524CC6.jpeg
    3FFEE599-8CFD-4B85-A817-30371A524CC6.jpeg
    222.1 KB · Views: 115
  • 7965AEC8-1FA2-4BF0-A09E-1EC1F5CF95CA.jpeg
    7965AEC8-1FA2-4BF0-A09E-1EC1F5CF95CA.jpeg
    194.7 KB · Views: 113
Overall shape is pretty good. Did you just do an edge quench? Whats the steel? How did you heat treat? Your plunge line appears to break the spine, that's no Bueno. But something youll learn to fix. Also looks like some pretty deep file marks near the plunge. I take it your filing your bevels in? Check out nick wheeler hand sand video.
 
When positioning the pin holes try to center them in tang....looks like the front one is a bit below centerline. Try to stop your plunge line and grind just short of the spine if you are making this a full flat grind.
 
Overall shape is pretty good. Did you just do an edge quench? Whats the steel? How did you heat treat? Your plunge line appears to break the spine, that's no Bueno. But something youll learn to fix. Also looks like some pretty deep file marks near the plunge. I take it your filing your bevels in? Check out nick wheeler hand sand video.
I used my propane forge, watched temps and colours, was approx 1500/1550 def when quenched in high speed oil. Blade is 1075, an yeah I saw Scott’s video just recently he does amazing Hamons, I’d already etched when I came across it, but I’ll be reading more on Nick as I notice he’s shared some valuable tips in the past, thanks
 
When positioning the pin holes try to center them in tang....looks like the front one is a bit below centerline. Try to stop your plunge line and grind just short of the spine if you are making this a full flat grind.
Thanks, actually I did that prior to heat treat and they were even, unfortunately when I went to line up the bolster and scales, I realized I needed to remove more material on the handle. So back to sander, thermos cycled, and re- heat treated. I was thinking of trying to drill some smaller holes around the edge and go with a 6 1/16” pin design instead. Just worried the steel will be too hard now to drill nice, but I didn’t quench the whole tang so maybe it’ll be soft enough. It might look more elegant with small pins three per side versus two large pins in the middle not centred! I’m still learning and new to knives (have some smithing experience although this was a stock removal) this is why I value the feedback. Thanks for your response.
 
If you have a torch you can anneal the tang to soften enough to drill...Keep the heat from traveling up to the ricasso and blade you can do that with a wet towel wrapped around the blade. Shoot for a deep blue color by slowly passing the flame down the tang. Don't over heat all at one time...add a little heat and pull flame back then add a little more as it starts to take on color and stop just as it starts to turn blue and allow to cool while keeping the towel wet.
 
If you have a torch you can anneal the tang to soften enough to drill...Keep the heat from traveling up to the ricasso and blade you can do that with a wet towel wrapped around the blade. Shoot for a deep blue color by slowly passing the flame down the tang. Don't over heat all at one time...add a little heat and pull flame back then add a little more as it starts to take on color and stop just as it starts to turn blue and allow to cool while keeping the towel wet.
I was thinking of that, unfortunately I moved recently and aside from my welder I didn’t set up an account yet for an oxy / acetylene tanks. Gonna have to do that, it’s caused me a bit of a hassle already, but I have a portable plasma cutter so for some things it got me by. Was trying to get this finished soon as I have several people bugging me for a blade all of a sudden, good problems! Have to make some calls on Monday to see if I can get an account set up for tank supplier locally. I have all weekend so I’m gonna grab my cutting oil, carbide bits, see if my drill press can do it....if not I’ll see what I can come up with next week and just start the rough grinding (and one person wants a forged....and I love hitting hot steel....just takes longer) of these other blades. Cheers
 
I think the biggest thing that stands out is your plunge cuts. Thy need to stop befor or right at the spine. Grinding them past the spine which creates a step along the spin is a NO-NO. It happens even to the best of us but me personally toss a knife in the recycle bin if it breaks that no cross zone. You can fix it but surfactibg the flats down so the blade is thinner. I see this a lot with new people. Thy dont have the skill to make nice even edge beavels so thy just blow them right off the top of the spine to hide the unevenly ground surface. So work on that and it will make you knives look tons better. Another thing is focus on removing all the scratches and file marks from the last step. This is especially common around the plunge cut becaus it’s a hard area to clean up. It’s even harder to do it properly. You want the plunge cut nice and crisp where it meets the ricasso flats. Resist the temptations to round that nice crisp edge over.
 
You can bring those plunge lines back in. Try vertical sanding with a magnet or even hand sanding on a granite plate. A carbide file guide makes it some much easier to get those dialed in.
 
You can bring those plunge lines back in. Try vertical sanding with a magnet or even hand sanding on a granite plate. A carbide file guide makes it some much easier to get those dialed in.
I thought about that but a little concerned I’ll eat into the Ricasso as there isn’t much of one to begin with from where I’m placing the bolsters. Or maybe I’m misunderstanding what your saying. I’ve been spending some time watching grinding tips...seems lots of guys have differing ways, I did see a good video from Travis Wuertz yesterday showing how to put on steep bevel, hollow grind to hog off material quicker and then switch to flat - something I think I’ll try next time. This was one of my first attempts at a full flat, Ive pulled off decent Sabre and hollow, but getting the angle just right and lack of “feeling” my grind experience- well hopefully time and practice will pay off. Think I’ll grab some wood and cheap belts to practice with some first. Funny enough I pulled off a very symmetrical grind on a small daggervmy wife wanted but then when I did this, ended up working into the spine trying to keep the blade perfectly centred - much more so on one side than the other, so I definitely did throw the grind off at some point. I’m going to try and maybe file a bit away, get it cleaned up as best I can and get onto the next one. Spent too much time on this one already for something I’m not being paid for lol. Plus I think the person getting it will still enjoy it, was going to use snake wood, but don’t have any wide enough so they get some nice desert iron wood instead. Thanks guys for all the tips, when I get finished with the next one I’ll be bugging you guys for opinion again, thanks again
 
Back
Top