BladeCommander
Basic Member
- Joined
- Nov 13, 2012
- Messages
- 2,637
Background:
I'm not new to knife tinkering. I have been doing knife handles, full tang with scales, for a few years now and I am confident in my abilities to make a decent handle. For the last year or so I have been attempting some regrinds on cheap knives, kitchen knives mostly, and have had varying degrees of success.
8-10 years ago when I was in junior college I attempted to make a file knife with almost no experience with grinding or knife making. I also was wanting to heat treat it myself. The results were disappointing, so I decided to put knife making on the back burner. I started buying low cost but useful full tang kitchen knives re-handling them for practice. A few I took to re-grinding on the 1x30 to see how it went. My most recent attempt as a re-grind went reasonably well so my confidence is up on trying the knife making thing out again.
The Knife(s):
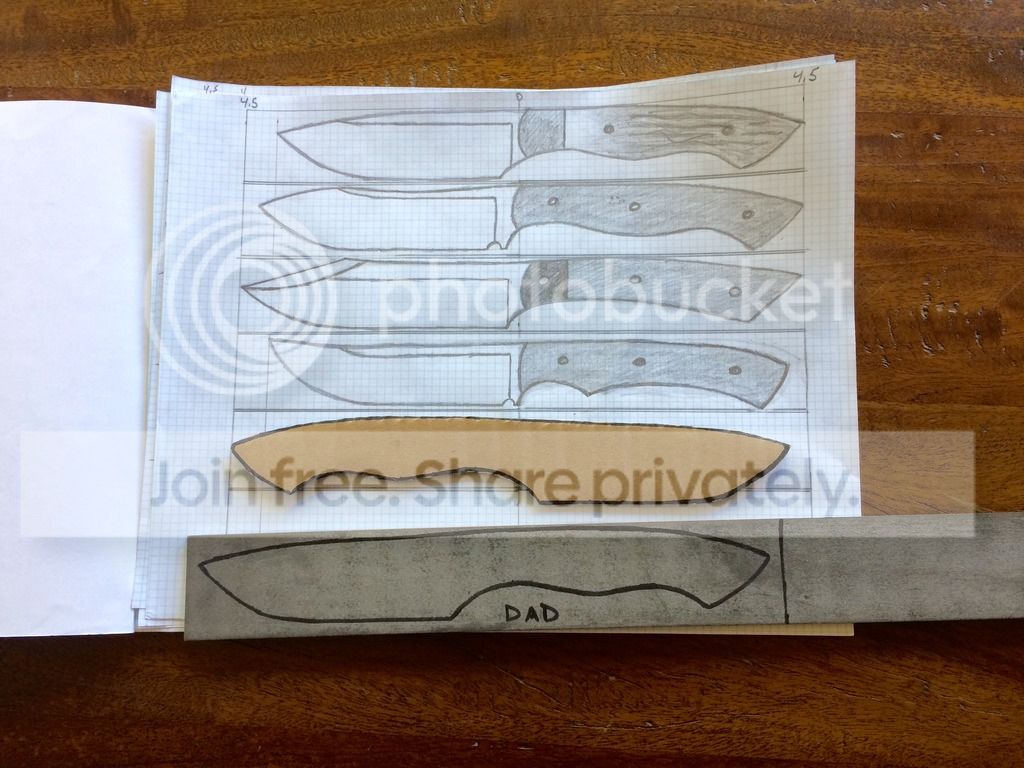
My dad was/is a big hunter, more so a few years back, but he still hunts once or twice a year. For his birthday I want to make him a hunting knife with some Elk stag from an Elk he harvested a few years back. He requires stainless steel, as his knife maintenance is lacking, so I bought an 18" bar of 154cm to kick off the project. I already had the Elk stag material cut into scales so the handle material is in hand as well.
While I had extra material I decided I was going to make myself a knife as well. I really like clip point style with swedge, so that is the design I went with for myself. Dad's is a standard drop point hunter style. I like slightly wider blades which shows in my design drawings. I also feel it gives the knife more blade life as I can always thin the blade if it gets over sharpened. Drawbacks are it makes a bigger knife, and slightly heavier, but the high flat grind takes of a lot of steel and weight. The profiles of both knives came out 100% how I wanted. The grinding was my biggest challenge and despite some slips, I am overall pretty happy with the results. I will review some of the problems I had with the clip point when we get to the photos. I bought the steel as 1/8", but not finish ground so it came out at about 0.15" from the looks of it. I will probably flat sand some of the mill texture off because I made a few mistakes I want to try and erase.
I'm having these heat treated by Texas Knifemaker's Supply, which is where I bought the steel. They are pretty much ready to be sent off at this point.
Drop Point Hunter
4" blade, 3.75" cutting edge
4.5" handle
~1.125" wide
~0.15" at the spine
EDC Bowie
4.5" blade. 4.25" cutting edge
4.75" handle
~1.1" wide
~0.15" at the spine
Photos:
Drawing, Template, and Steel
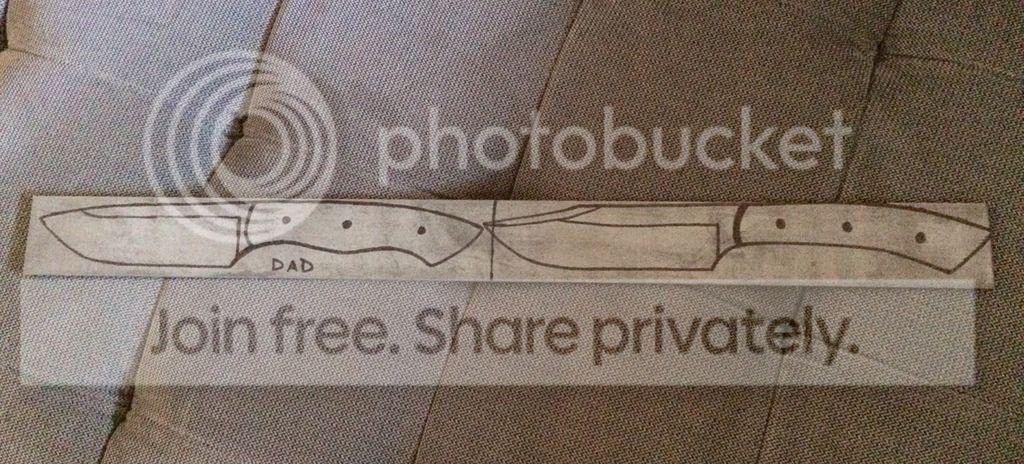
Ready to cut metal
154cm is harder to grind than I expected. This took hours!
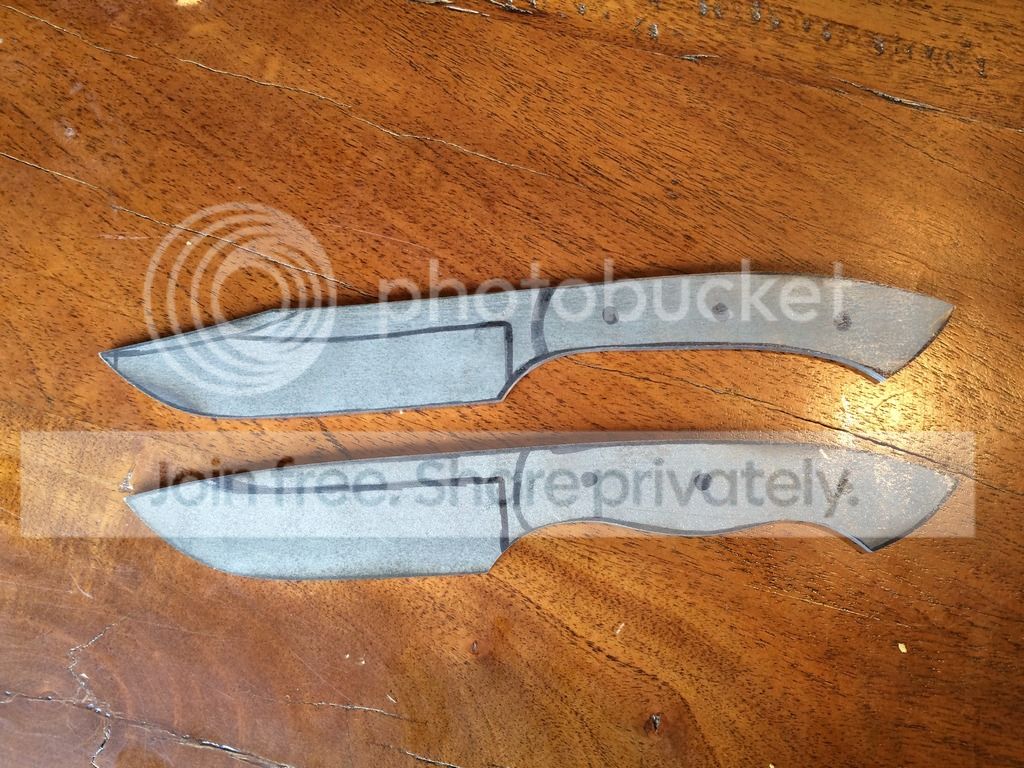
Primary bevels went pretty smooth for my first try. I didn't want the grind so high, but that's how it came out. I wanted about 3/8" of flat for a nice contrast of the bevel, these came out almost full flat ground. Ground on a 1x30 with Norton Blaze 40 and 120 grit. Those belts worked great, will use again. Plunge lines NOT symmetrical, but really not too bad. Will show that after finish grinding before sharpening.
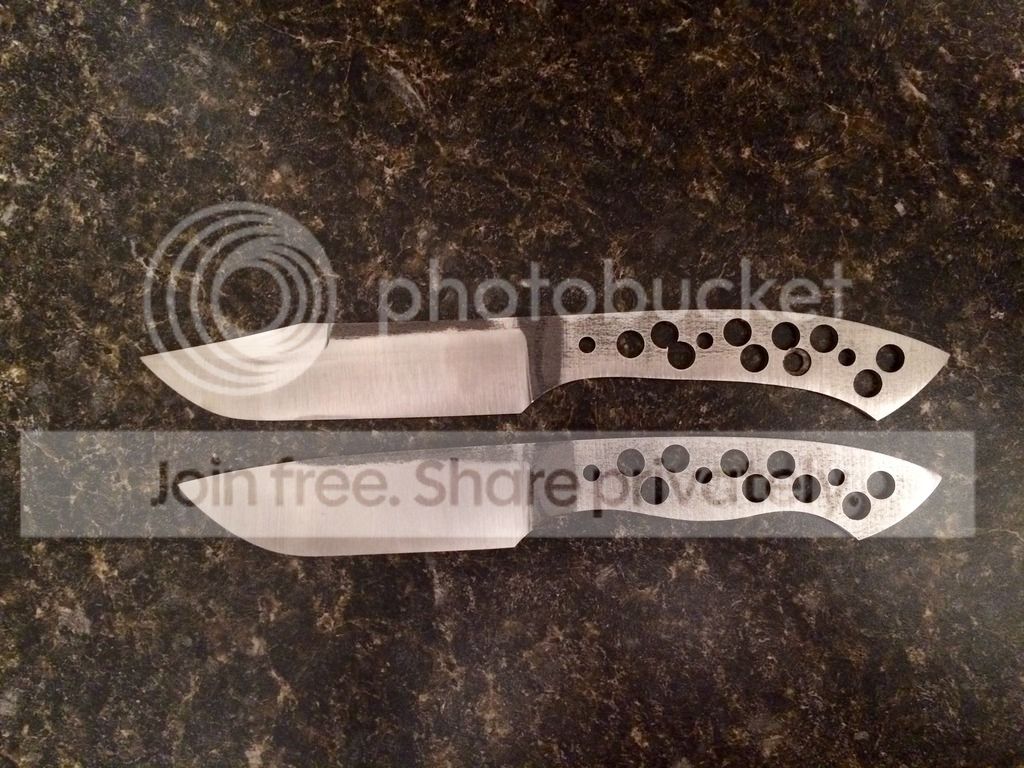
Close up of the swedge coming soon because I want to comment on it and ask for help. I have screwed up a few swedges by trying to cut them with the power sander instead of by hand. AGAIN, I got cocky and went to grinding the swedge with the belt sander. First side looked good, second side was too wide and uneven. Every time I went to fix it, it got wider and wider. What started as a subtle swedge became a super aggressive double edge looking thing. I'm hoping I can do some fixing post heat treat. I'll show the other sides with mistakes as well, these are just the more flattering photos I took.

Thoughts, comments, critiques are welcome. PLEASE give me tips on cutting swedges. No I did not search for threads on this like I should have. I "knew" I could take it slow and make it right... see where that got me.
If you made it through my novel, thanks for reading and thanks in advance for any comments.
I'm not new to knife tinkering. I have been doing knife handles, full tang with scales, for a few years now and I am confident in my abilities to make a decent handle. For the last year or so I have been attempting some regrinds on cheap knives, kitchen knives mostly, and have had varying degrees of success.
8-10 years ago when I was in junior college I attempted to make a file knife with almost no experience with grinding or knife making. I also was wanting to heat treat it myself. The results were disappointing, so I decided to put knife making on the back burner. I started buying low cost but useful full tang kitchen knives re-handling them for practice. A few I took to re-grinding on the 1x30 to see how it went. My most recent attempt as a re-grind went reasonably well so my confidence is up on trying the knife making thing out again.
The Knife(s):
My dad was/is a big hunter, more so a few years back, but he still hunts once or twice a year. For his birthday I want to make him a hunting knife with some Elk stag from an Elk he harvested a few years back. He requires stainless steel, as his knife maintenance is lacking, so I bought an 18" bar of 154cm to kick off the project. I already had the Elk stag material cut into scales so the handle material is in hand as well.
While I had extra material I decided I was going to make myself a knife as well. I really like clip point style with swedge, so that is the design I went with for myself. Dad's is a standard drop point hunter style. I like slightly wider blades which shows in my design drawings. I also feel it gives the knife more blade life as I can always thin the blade if it gets over sharpened. Drawbacks are it makes a bigger knife, and slightly heavier, but the high flat grind takes of a lot of steel and weight. The profiles of both knives came out 100% how I wanted. The grinding was my biggest challenge and despite some slips, I am overall pretty happy with the results. I will review some of the problems I had with the clip point when we get to the photos. I bought the steel as 1/8", but not finish ground so it came out at about 0.15" from the looks of it. I will probably flat sand some of the mill texture off because I made a few mistakes I want to try and erase.
I'm having these heat treated by Texas Knifemaker's Supply, which is where I bought the steel. They are pretty much ready to be sent off at this point.
Drop Point Hunter
4" blade, 3.75" cutting edge
4.5" handle
~1.125" wide
~0.15" at the spine
EDC Bowie
4.5" blade. 4.25" cutting edge
4.75" handle
~1.1" wide
~0.15" at the spine
Photos:
Drawing, Template, and Steel

Ready to cut metal

154cm is harder to grind than I expected. This took hours!

Primary bevels went pretty smooth for my first try. I didn't want the grind so high, but that's how it came out. I wanted about 3/8" of flat for a nice contrast of the bevel, these came out almost full flat ground. Ground on a 1x30 with Norton Blaze 40 and 120 grit. Those belts worked great, will use again. Plunge lines NOT symmetrical, but really not too bad. Will show that after finish grinding before sharpening.

Close up of the swedge coming soon because I want to comment on it and ask for help. I have screwed up a few swedges by trying to cut them with the power sander instead of by hand. AGAIN, I got cocky and went to grinding the swedge with the belt sander. First side looked good, second side was too wide and uneven. Every time I went to fix it, it got wider and wider. What started as a subtle swedge became a super aggressive double edge looking thing. I'm hoping I can do some fixing post heat treat. I'll show the other sides with mistakes as well, these are just the more flattering photos I took.

Thoughts, comments, critiques are welcome. PLEASE give me tips on cutting swedges. No I did not search for threads on this like I should have. I "knew" I could take it slow and make it right... see where that got me.
If you made it through my novel, thanks for reading and thanks in advance for any comments.
Last edited:


 if you find yourself making lots of "whoops" either slow down the machine, or use a higher grit belt. it will take more passes to remove the same amount of metal allowing you to correct the whoops before they go too far. for the swedges, maybe try using a tilting tool rest, and doing them first while the knife is still flat. that way the angle is the same on both sides.
")


 .
.

