Mini Forging Press, Pictures :)

Joined
Jun 11, 2006
Messages
8,651
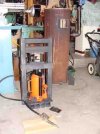
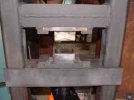
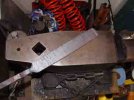
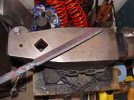
here is the press i made. its small but so far so good. i just need to make some dies for it and I'm set. here is some pictures of my build process. Man a lont of welding welt into this thing. i maxed the press out onto its self and the frame did not even give a hint of having a hard time taking it. but in one of the last pictures you will see a square mark on the bottom anvil. thats from me trying to squish a chunk of brass. well if i had not stoped pressing the brass square stock it could have punched through my anvil there was so much force. so now i have a little dimple in the top and bottom anvils. it should not affect it but if it does then i will weld it full and file it down. let me knw what you think.

P1000895.JPG


P1000898.JPG


P1000901.JPG


P1000905.JPG


P1000906.JPG


P1000907.JPG


P1000908.JPG


P1000909.JPG


P1000910.JPG


P1000913.JPG
 
Last edited:
Nice job JT. I made one of these as well last year. It does a great job for what it was meant to do. I used mild steel for my dies as the heat of whatever you are pressing will ruin the HT of hardened dies. Mild steel works great. Just replace them once they start showing signs of wear. My dies have held up fine so far.

Eric
 
i am going to be making 2 sets of dies to start with. a drawing die and a flatening die. i have a round of M2 that I am going to use for the drawing die and i also have a square block of M4 that i'm going to use for the flatening dies. i will heat treat them as this material is made to handle high tempatures. the dies are going to be able to be swaped fast. i will have a stop welded to the back of the anvils so the dies wont go all the way through. then just a pin in the front to hold them from sliding out
 
With your dies in, are you going to have enough room to put a stacked billet or canister billet in between them?

Great job, JT. I'll have to build one of these someday when I get around to scratching the damascus bug.

--nathan
 
Hello JT,

Here's a few pics of the one I put together. Dies swap out fast so as to change between flattening and drawing. Stop in back with pin or lock in front works great. Look at the picture where the press is sitting on the floor. I mounted the air valve to a piece of wood. This allows me to operate the ram with my foot for squeezing then only have to use my hand for lowering. Makes things a little easier. One other thing I learned. This type of press is very sensitive to placing material dead center when using. If you get a piece off center, it can jam the moving bar between the two uprights. Simple reminder was to draw a vertical line in the center of the die as a reminder to place material on center. BTW, This is great for taking cutoffs like 2" X 1" W2, welded to bar, then squish down to a long, flat billet prior to forging(see pic of outcome). Also good for putting in a hidden tang then finishing up with hammer. Have fun.

Eric
 

Attachments

  • HPress001.jpg
    HPress001.jpg
    15.3 KB · Views: 177
  • HPress002.jpg
    HPress002.jpg
    7.2 KB · Views: 152
  • HPress004.jpg
    HPress004.jpg
    11 KB · Views: 136
  • HPress005.jpg
    HPress005.jpg
    12.5 KB · Views: 117
JT, nice job mate, i'm looking at building one of these things too, is there any reason you welded the top bar to the frame instead of making it adjustable, (i noticed you have the holes drilled for that purpose)?
 
Thanks for the build pics Jarod :thumbup: And thanks for bringing this subject up. I have been slowly building a full sized press,but at the rate I work in my shop a mini press is all I really need.Plus I really need a compressor....(who doesnt)
Whats a good size compressor for this press?
 
Looks like you're going to having lots of fun as soon as you get your dies made. I'd love to come down and see how it works.

Rick
 
I have been thinking about hooking a small air piston to the lowering screw so i can have a 2 way valve for the air. one way lowers the the press and the other raises it. but maybe not, it might be more work then its worth. but i deffentley need a larger handle. i might just make a longer bolt replacement bolt and wild a T on to it.
 
man that thing is sweet, i got a harbor freight gift card for my b-day , and i think that may be how i spend it (the jack).

JT, I have some h-13 rounds...like a 5 gallon bucket full, id give ya a couple, but im sure you have access to anything you need.

there about 6'' long and maybe 1'' dia., i had one that was about 8'' long, and 3'' round, but they went to my own dies for my hammer.
 
I'm good with material, but thinks. I talked to Stacy and it seams like i will need a 1" round. so what i will do is round up all the broken 1" roughers at work that are no longer useful and weld them to a base plate. thy are already hardened hss so as long as I'm careful with welding i should have some nice drawing dies. i will just use the shank of the mill bit as its like 2 or so inches long.
 
well if it dont work out, let me know, that h-13, is supposed to be made for hot work
 
Ok i have 2 cut off shanks from HSS end mills. thy are 2.2" long and 1" in diameter, will that be long enough for what i need for drawing dies. I'm just going to be reducing stock and making Damascus with it
 
Last edited:
Good looking press.
One of the main reasons i weny to the I beam framne is the off center loading. I worked with a 25-40 ton press built the same way as as my mini press. I'm using 1.5 inch t dies and during testing had no problems with off center pressing.
Take Care
TJ
 
Back
Top