-
The BladeForums.com 2024 Traditional Knife is available! Price is $250 ea (shipped within CONUS).
Order here: https://www.bladeforums.com/help/2024-traditional/
You are using an out of date browser. It may not display this or other websites correctly.
You should upgrade or use an alternative browser.
You should upgrade or use an alternative browser.
My First Handmade Slipjoint
- Thread starter wolfeknives
- Start date
- Joined
- Jan 2, 2006
- Messages
- 482
It is gratifying to know that this somewhat unconventional treatment is appreciated by some of the members who are steeped in "traditional" knives. Over the years I have had many discussions with Joel Chamblin regarding decoration and designs which depart from the classic. While I can appreciate that it will not appeal to everyone, maybe not even many, there may be a place for this type of knife. To me it is important that the traditional "bones" shine trough clearly. I am looking forward to my journey with these knives, some completely traditional, some a little out of the box.
Wolfe
Wolfe
- Joined
- Nov 15, 2007
- Messages
- 3,372
Beautiful knife, excellent work.
Mike
Mike
I have always had a soft spot for slipjoints. About the middle of last year I started thinking about finally making some of my own. This brought me to this forum. There is a wealth of information here, all of it freely given. Thank you so much, all who contribute here. I ended up purchasing a considerable number of knives, giving me a feel of what is good and maybe not so good. I am certainly hooked on these things now.
Since the only thing my good wife ever wants for Christmas is one of my knives, I decided to take the plunge and attempt a slipjoint.
The blade and spring are 440C, the liner in 416 stainless. The covers are tortoise shell reclaimed from an old hairbrush that was in rough shape. Pins and escutcheon in 18K gold. I have to thank Gray Tailor for the mentoring in flattening and working the antique tortoise shell.
The entire knife, including blade and nail nick are hand filed and hand finished with sandpaper. A dumb method for making these things, but that is just what I do. It does make it a truly handmade piece.
I realize that the knife is not entirely traditional, but my wife was very happy to receive it, and that makes me happy too.
A second knife of similar but more traditional design for myself is well on the way. It will sport clear mastodon, chequered scales, sans the interframe sides on the handle, just an integral liner.
Then some more user friendly knives, sans major filework.
The photographs are not the greatest for showing the knife. But it has been dark and blowing snow for a few days, I will take better photos when I can shoot outside.
Wolfe
Amazing work, Wolfe, a worthy piece for your wife or anybody to carry!
As far as not being strictly traditional, I think you're in the clear. If push comes to shove, just claim that you were inspired by this variant of the Remington R1592:

(dealer photo)
- Joined
- Jul 12, 2012
- Messages
- 10,260
Exquisite!
- Joined
- Mar 31, 2014
- Messages
- 8,640

What a fantastic work of art ! I had already admired your many beautiful fixed blades.
")
") Looking forward to seeing your future folding knives as well.
Looking forward to seeing your future folding knives as well.Very nice knife Mr. Wolfe!
I'm in the making of my last slipjoint that is coming out nicely, so i'd like to use a reclaimed very old straight razor's handle in turtle - in overall good shape and coluring - as the material for my knife's handle...
The antique turtle exibits some fissures and i would like to ask you how to handle this problem.
I don't know wheter filling them with ca, or trying to "hot iron" the slabs between wet tissue to squeeze welding them closed, did you have similar issues with yours?
Thank you in advance, and i'm sorry i couldn't manage to send you a PM (i couldn't find that forum function)
- Joined
- Jan 2, 2006
- Messages
- 482
Very nice knife Mr. Wolfe!
I'm in the making of my last slipjoint that is coming out nicely, so i'd like to use a reclaimed very old straight razor's handle in turtle - in overall good shape and coluring - as the material for my knife's handle...
The antique turtle exibits some fissures and i would like to ask you how to handle this problem.
I don't know wheter filling them with ca, or trying to "hot iron" the slabs between wet tissue to squeeze welding them closed, did you have similar issues with yours?
Thank you in advance, and i'm sorry i couldn't manage to send you a PM (i couldn't find that forum function)
Though in Japanese language, these videos are very helpful: http://www.thecarvingpath.net/forum/index.php?/topic/2528-tortoise-shell-eye-glasses/ (If it is not ok to post the link, moderator please delete)
I believe much of the material used for knife handles was welded, it would make economic sense.
I pressed the shell between heated steel plates as sown in the videos. Since the shell I used was very old, it was extremely brittle, less so after I had flattened it. After pressing, allow at least two weeks before using, there will be considerable shrinkage as the material stabilizes.
Wolfe
- Joined
- Dec 2, 2005
- Messages
- 72,831
It is gratifying to know that this somewhat unconventional treatment is appreciated by some of the members who are steeped in "traditional" knives. Over the years I have had many discussions with Joel Chamblin regarding decoration and designs which depart from the classic.
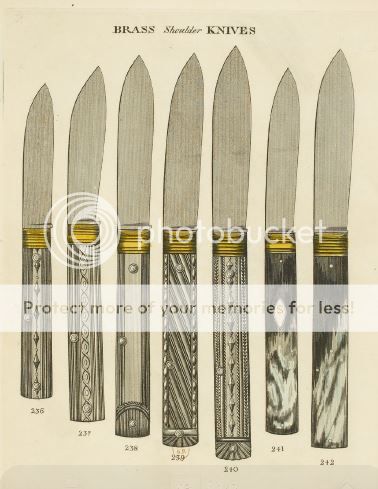
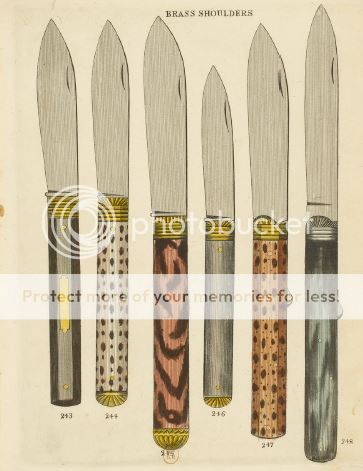
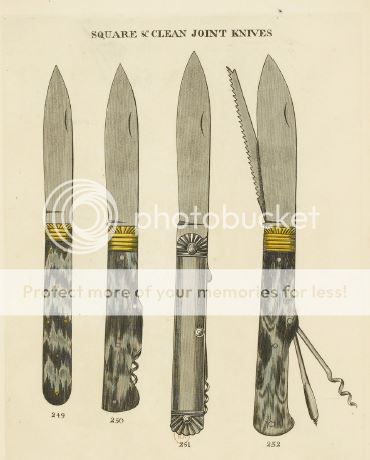
Here are some Sheffield knives from 1816:
:thumbup:
- Joined
- Jan 2, 2006
- Messages
- 482
I received a PM from Ted01 asking how I file the nail nick. Hope it is ok to post the short process here. Sorry about the fuzzy photos.
Step 1:
Lay out the shape and position of the nick. Shown are the die sinkers files I use. They are shovel shaped, with one safe side. They are ground to a knife edge. A triangular or pointed, flat needle will work as well. They too will have to be ground to have one safe side, and a knife edge. This will enable you to get a clean sharp line at both ends of the nick.

Step 2: I then use a small cut-off wheel (Dremel) to rough ot the nick. Leave yourself lots of room for filing.

Step 3: Then carefully file to the outline you have scribed at the start. Use the sharp edge of the file at both ends of the nick to provide clear definition there.

Step 4: I use a sharpened piece of brass and various grits of sandpaper to remove file marks and finally polish the nick.

The entire process likely does not take much longer than setting up a machine, plus you end up with a clean, polished nick.
Wolfe
- Joined
- Jul 23, 2011
- Messages
- 114
Wolfe, thanks for posting the nail nick process. This is a very beautiful knife showing extraordinary hand craftsmanship.I received a PM from Ted01 asking how I file the nail nick. Hope it is ok to post the short process here. Sorry about the fuzzy photos.
Step 1:
Lay out the shape and position of the nick. Shown are the die sinkers files I use. They are shovel shaped, with one safe side. They are ground to a knife edge. A triangular or pointed, flat needle will work as well. They too will have to be ground to have one safe side, and a knife edge. This will enable you to get a clean sharp line at both ends of the nick.
Step 2: I then use a small cut-off wheel (Dremel) to rough ot the nick. Leave yourself lots of room for filing.
Step 3: Then carefully file to the outline you have scribed at the start. Use the sharp edge of the file at both ends of the nick to provide clear definition there.
Step 4: I use a sharpened piece of brass and various grits of sandpaper to remove file marks and finally polish the nick.
The entire process likely does not take much longer than setting up a machine, plus you end up with a clean, polished nick.
Wolfe
- Joined
- Dec 2, 2005
- Messages
- 72,831
The entire process likely does not take much longer than setting up a machine, plus you end up with a clean, polished nick.
Very interesting to see that
When I visited Sheffield cutler Stan Shaw with Campbellclanman the other year, Duncan asked Stan how he put the nail-nicks in his knives without a milling machine. Stan demonstrated for us. After 75 years in the trade, it took only a second or two! 
- Joined
- Jan 2, 2006
- Messages
- 482
Very interesting to see that
I have a couple of Stans knives, both with long pulls. Can I assume that he did those by hand as well?
Wolfe