My Forge Build, Have ?

Joined
Jun 8, 2006
Messages
254
Ok, I am not a certified welder, but I get it done and it works for me. The interior of this is 18" long 6 1/2" wide 4 1/2" tall I think. I have not got the burners yet but figure 3 burners. I am having the rear with 2 sliding interlocked doors to control loss of heat. I have on the front, door in 2 parts so I can change size of opening. IS THERE A NOMINAL FRONT SIZE OPENING ? Also I was going to build an insert with brick to cut down on the interior size if only using 1 or 2 burners. I would leave a 1" gap on top of the insert. Here are some pics. Thanks for input.
 

Attachments

  • My Forge.jpeg
    My Forge.jpeg
    50 KB · Views: 59
  • My Forge 4.jpeg
    My Forge 4.jpeg
    63.3 KB · Views: 59
  • My Forge 2.jpeg
    My Forge 2.jpeg
    50.9 KB · Views: 59
  • My Forge 3.jpeg
    My Forge 3.jpeg
    59.7 KB · Views: 53
  • My Forge 5.jpeg
    My Forge 5.jpeg
    55.8 KB · Views: 55
  • My Forge 6.jpeg
    My Forge 6.jpeg
    51.9 KB · Views: 53
  • My Forge 7.jpeg
    My Forge 7.jpeg
    60 KB · Views: 58
Oh boy... you may have created a monster, Dr Frankenstein!

It pains me to point out some issues...
- The 3/8 plate will hold a lot of heat, for a long time. Lightweight sheet metal is used, mainly
- The stove brick you have in there will overheat and crumble apart after a couple uses. You need the lightweight refractory brick
- You should have a layer of kaowool insulation between the brick and the forge shell. again... that baby is going to get HOT. Hot enough to catch stuff on fire or melt hoses... be careful.
- Three burners in that forge is overkill in my opinion.
- This is an educated guess, but I think the rear sliding doors are going to seize up after they over heat and warp.

That being said, you've already welded it up. I honestly hope you prove me wrong, bud.
 
I found a fellow on net youtube.com that had built one from 1/2" material that looked nice. I always like to over kill projects just in case I advance in it I don't have to rebuild or add. I did use hard brick as that is what he had. I KNOW, I KNOW, I do a lot of reading on here. What if I just change brick ? I hate to scrap the case but I will if it is a bad idea. $100 in hard brick , what use would they be for me if I replace with soft bricks ? Also what is the smallest front opening for a set of tongs and material ? Thanks everybody, this is why I ask to avoid problems.
 
I could always grill me a piece of meat on the top while I work, or keep my coffee hot. OR, set-up my still over the top and even brew me some fuel. :rolleyes:
 
You may have trouble finding soft brick that will fit without a lot of fitting. I know they make a hard fire board that you can cut to size. Perhaps a layer or two of that? Or you could cut the soft bricks down to match the size of your current bricks if you don't want to sacrifice interior space. If your bricks are 9"x4.5"x1.25" you can cut a 2.5" 2300 soft brick in half (split the 2.5" thickness) and you will have 2- 9"x4.5"x1.25" bricks. Keep the hard brick as a sacrificial floor that you can easily replace when the flux eats it.
 
OK, I will try and point out the main problems. How you deal with them is up to you.

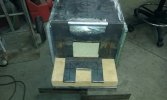
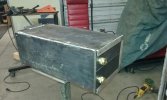
1) The heavy casing will absorb and hold heat . It will get HOT! Sorry to say, but there isn't much to do about this problem.
2) The brick is the wrong type ( if it is hard firebrick as it seems to be). I would get a steel shop cart from HF and place the hard bricks on the top to make a refractory covered table top. Place your forge on this. That way you can roll the forge to where you need it, and the brick tabletop will help with the heat problem of the heavy case. It also gives a good place to set hot blades and tongs.
3) The right bricks are the soft type K23 or type K26 firebricks. You can use them to replace the existing bricks, and it will help a lot. An inner coating of 1/4" of satanite will make them work better. A coat of ITC-100 over the satanite will make it even more efficient. Because of the heavy case, I would recommend this setup. If you are set on keeping the existing bricks, then I highly recommend building up the inside corners and applying satanite and ITC-100 over them.
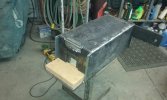
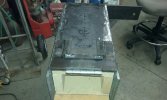
4) The steel sliding doors are the wrong thing. Remove them, fill the back with two firebricks, cut a hole in the bricks to make a rear port, and use some of the hard firebricks you have to stack and block as much of the rear port as desired.
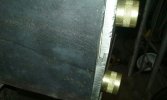
5) The front entry port is usually around 3" wide by 2" high. I would remove that steel port entirely. Then you can be adjust the size opening by positioning some firebricks on each side.

Other concerns:
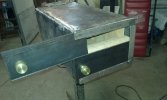
Because the case may get hot, you need to keep propane hoses and electric cords far away. I would pipe the burners in 1/4" pipe from at least 24" away from the forge. Put the gas valves at the end of the pipe, not at the burner end. Hopefully, the shell won't get so hot it causes problems with the burner operation.

That thing is a beast. It will be heavy, so consider stability and such in placing it. This is where the larger shop cart is a good idea.
https://www.harborfreight.com/16-inch-x-30-inch-steel-service-cart-5107.html

Two burners would be more than enough for that forge. One good blown burner would probably run it OK.

A round chamber, or one with curved corners, is far more efficient than a square/rectangular one. Before adding the Satanite coat to the bricks, first build up all four side corners so there is a curved ogee from bottom to sides and sides to top. Mix up some fairly thick satanite for this build-up. Then apply the final 1/4" satanite layer, followed by the ITC-100. Read up on how to apply ands cure these products before doing it.

All the materials you need, as well as lots of FAQ info is on hightemptools.com . If you had spent some time there before your build, you would have seen many forges and ideas, as well as how to properly build a forge. BTW - The stickys in Shop Talk have a whole section on forges and burners.
 
At roughly 535 cubic inches, you only need 210k BTU for forge welding. That's 2 Graham burners.

I understand about over-engineering things, but 3/8" plate is seriously way overboard. I used to use 1/4", now I use 14 gauge. It cools off quicker and is easier to move making it more likely to get used.
 
I have an older Chile forge, which uses quite heavy metal in the body. It holds a lot of heat, and it's probably only an eighth inch or so. I'd hate to stand near a forge made of 3/8" plate for very long...
 
I use to use that hard fire brick as a door on the rear of my forge and it cracked very quickly. That brick is designed to leat heat go through it but not so much that it damages the steel wood stove. With a wood stove you wanna to heat to get to the steel outside but not on a forge.
 
I have a solution to my problem. I am gonna side line this. I am gonna do some reading in the suggested section. I am only out the hard bricks and time. I already had the sheet of 3/8 plate. I don't want to build a just so-so forge. I want one that if I really get into this I will not need to have a do-over. And if I don't or this old age takes me out of the game, well then some youngster might make out. I really, REALLY , appreciate ya'll taking time to share.
 
Look into an vertical forge as well. I'd say that having a 1 burner venturi forge along with a blown vertical would be ideal. what the heck... make a coal forge too!
 
I am close to cutting a propane tank and making something. BUT before I scrap this steel box, without anything inside, it is 9" wide and 7" tall I.D. how efficient would it be if I lined it with 2" soft brick both sides and 1" top and bottom ? That would leave me approx. a 5" tunnel and if I carve the bricks try to round the sides instead of square. Just a thought. You won't hurt my feelins none. I want an efficient propane forge. I don't want to waste it. Thanks
 
I would scrap it. My first forge was square. I'll never have another square one.
 
IMHO, the best forge round shell is a piece of 8" to 10" diameter pipe.
For a round forge, 12" chamber length is great, and a 16" to 18" long chamber is plenty. One good burner will run it, and two is max for the longer forge. Blown is always better. A 4" chamber uses an 8" diameter pipe, and a 5-6" chamber takes a 10" diameter piece of pipe. Cut the pipe 2" longer than the desired chamber length. Line a with 2" of kao-wool, and coat with satanite and ITC-100. Make the ends from 1" thick Ins-board. You can cut the front and rear ports larger if desired and use firebrick to close as needed.

If making a vertical forge, cut a 16" length of 12" diameter pipe in half and weld in 6" sides. This makes a 16X12 oval-ish vertical forge that will be about 18" tall when done. The inner chamber will be about 12X8" and 14" high once lined. Cut the ports as 4" high and 3" wide cutouts from the lip down on opposite sides (longways). Weld 4X3" pieces of 1/4" steel on the bottom of each port as port shelves. Weld them with 2" inside and 2" outside the shell.
Line with 2" of kao-wool ( I like Hi-Z for a welding forge), and satanite/ITC-100.
Don't make a bottom or top on the forge. Make two oval plates in 1/8" steel that are 1" larger than the forge perimeter , weld a 2" lip of 16 gauge metal around each to make an oval pan slightly larger than the forge body. Use one for the bottom. Just set the forge on it and fill the bottom with 2" of kitty litter. Welding legs on this is OK, or just set on a base of hard firebricks.
Put an inch of kaowool in the top piece and cover with an inch of satanite or kast-O-lite 30 ( Cast-O-lite 30 would be best). When dried well for a week, bake in an oven at 500-550F for a couple hours. Coat with ITC-100 an bake again. Place on top of the forge, refractory down.
This 3 piece construction makes taking down the forge for re-lining easy. As always, fire the lining slowly and with progressive heat cycles.
 
Back
Top