My Green Terassaur and its' Homemade Chocolate Dangler.

Joined
Jun 6, 2008
Messages
1,574
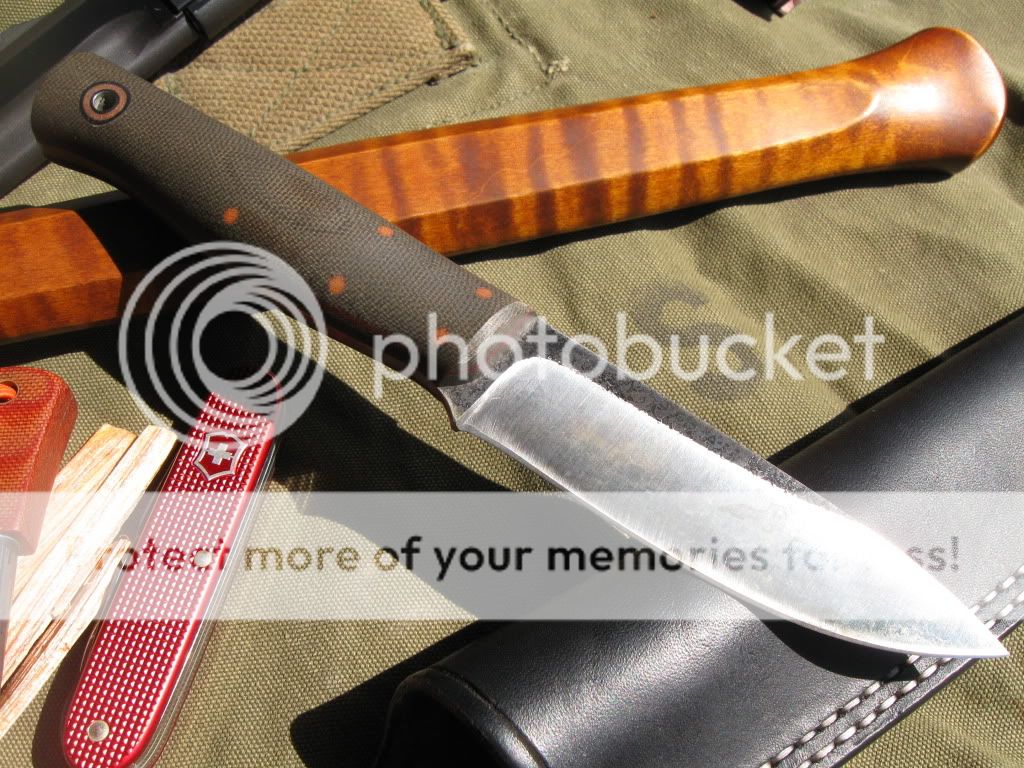
I had wanted one of these for a long time. Being a big fan of the Skookum Bush Tool the Terassaur was a must have when I found out that Andy and Joe had teamed up on a design. Think I waited over a year checking the forum to find one I liked when I had the cash.

I had started making my own sheaths some time ago so I put the extra $30 from the blade only purchase into materials. This is my first dangler with a lot of influence from JRE/BHK and other makers. It has a lot of drop to clear the wide waist belt on my Arc'Teryx backpack. 9oz. tooling leather, Fiebing's Chocolate dye, solid brass hardware, artificial sinew and a Bees' wax coating.

The knife came with a rounded off spine that wouldn't touch a ferro rod. I flattened out the spine to give it a crisp edge but it still doesn't really throw good sparks. Acts like it is differentially heat treated compared to my other full hard blades.

The edge is stout and bites good into wood. Handle is super comfortable with a lot of room for different holds. I beveled the crisp edge on the front of the handle to reduce the wear on the stitching of the sheath.

I think I'll leave the edge somewhat thick on it for durability. With a 5/32" thick spine, low blade height and the edge bevel it isn't the best slicer but that's not how I plan on using it. It carves, notches, pierces and batons great. After saying that I must also say it can hang with most of my other outdoor knives in the kitchen as well.

I like the overall design. Especially the low blade height. Makes for a stout but streamlined tool that doesn't have a lot of rotational torque transferred to the hand during heavy cutting. Only negative to that is there isn't much of an aggressive contour for the sheath to hold the blade tight but a good application of Bees' wax stiffened it up and helps a lot.

Overall I really like it and Andy did a great job on it. It has some stiff competition with some of the other blades that I have but think we'll have many adventures together!

IMG_8616.jpg


IMG_8620.jpg


IMG_8618.jpg


IMG_8614.jpg


IMG_8613.jpg


IMG_8108.jpg


IMG_8548.jpg
 
Brian, Good job on the sheath. :) Also thats a nice looking knife. They look good together.
 
nice knife and knives brian. good review too. thanks for sharing.
 
Nice looking sheath. Really nice work on that!

I really like my convex Terrasaur. Great knife.
 
Nice review and a great knife. I really like the Smith 41 also i wish i still had mine. That's about the best in hand feeling and most accurate 22 i've ever owned.

Doug
 
Brian,

1) Your Nesmuck Trio is first class.
2) You attention to detail and work on your sheath is great - the double welt is NOT easy and you skived it properly and seemlessly. Your dye work is great - NOT easy! I seem to have seen that double stitch on Fiddleback work before though... :D
3) Love the brass fitments.


Can I make four humble suggestions? Turn your Chicago screw over on your dangler - it is backwards. Also - when finishing the BOTTOM of your belt look - round off the edge. It will last longer - and not get caught on any edges. Also - stay away from straight stitches on the belt loop - they can suffer from the 'zipper' effect and rip out. You don't need to melt the stitching - you reversed stitched 4 threads - TRUST me - they don't pull out.

I am picking nits here - because your leather work is awesome - I LOVE the slight angle on your opening - it matches the handle angle on the fiddleback - great work.

Post it in the Sheath section - get feedback from the masters - you will get nothing but better - but you can sell your work as is. Never buy another sheath for a custom knife - you will have a better quality and more satisfaction from your own making. Good job.

TF
 
TF,

Thank you, I appreciate it. You know, I might have seen some of your work with the double stitch. :)

I've always wondered which way the Chicago screws go.

Makes sense about the bottom of the belt loop.

TF said:
Also - stay away from straight stitches on the belt loop - they can suffer from the 'zipper' effect and rip out.

Could you clarify what you mean about straight stitches?

I'll trust you on the ends of the thread and try it.

Leather work is fun but also challenging. It's rewarding learning a new skill. There have been a lot of times that I received a new knife and didn't like the sheath it came with so I always wanted to make my own.

Thanks for the encouragement, I appreciate it very much!

Brian
 
Seriously - your stuff looks great.

Here is what I mean:

HikingBuddySheath-RedStripe002.jpg


See the belt loop stitch at the bottom?

There are no straight lines. This keeps the holes punched in the leather out of a straight and less likely to tear like a zipper would - in a straight line.

Does that make sense?

This is all the words I have gotten from the masters on the Leather forum. Do it your way - I like the shield look and it has become a little bit of my signature - but you will get your own distinct style soon. Some people sew this attachment as a circle.

TF
 
Gotcha TF. I was originally thinking the type of stitch or something.

What you're teaching me makes sense.

I got in a rush on that one and was going for simple. I did spend some time brainstorming a different way to do it but couldn't think of anything original.

I've tried coming up with a way to place that connection on a different spot on the sheath.

One reason to get away from the wear and tear on the stitches and another so that it would be easier to form to the handle.

Seems that the two layers stay flat and don't form as well as a single layer.

Moving it down makes for one long and sloppy loop .. or a super high ride unit.

Thanks for your help and ideas.

BTW, nice job on that sheath.

Brian
 
I hear what you are saying - and why you did what you did. The chances of this ripping out are next to none.

If you want to try a removable dangler - they make them in brass too. (www.hardwareelf.com) - look under D Rings.

Also, on your edges - take a little more time with the sanding. Take it down to about 400 grit - then lightly dampen the edges - sand (always only in one motion) again, then use an antler to rub VIGEROUSLY at the edges until you have a glassy look. You will see where you need to sand some more if you do - simply do those steps over.

Then - dye the edges - let dry - use some Gum Tragacanth, let it dry some, and rub again with the antler. Then use a chunk of canvas to rub the edge one final time.

The edges will look a little more solid - but yours are very nice to begin with.

Also, Use a smaller needle on the last and first hole you punch - it will make that look a little tighter as you only have one loop of thread (at the tip and the opening of the sheath)


With all of this said - Please do not hear me as telling you what to do - or that your sheath is deficient. It was one that I have looked at quite a bit in the last few days.

Your cuts are straight, your stitching is GREAT and even. Your design is well thought out - and executed. Your dangler is VERY functional and I like the little chamfering you did - Although I don't think it is necessary - I see where you were going - and it will help the piece move more freely.

I am really impressed with your work. Keep it up!

You really have a heirloom quality set up with these two - you should be very proud.


By the way - what are you sealing your sheaths with? Montana Pitch Blend?

TF
 
Thanks for the D-ring link!

I've been trying different ways to burnish, I'll give your tips a try.

I had never heard of Gum Tragacanth and just looked it up. I'll give it a try for sure.

One thing that is challenging is trying to make the sheath as small as possible and still have a nice shape that is bigger at the top and doesn't pull in when its' formed to the knife.

I used Bees' wax on this sheath.

Brian
 
Jeez. Love the knife and sheath, but the sidearm and hatchet are epic in their own right. What's the lowdown on that little axe?
 
I had never heard of Gum Tragacanth and just looked it up. I'll give it a try for sure.

One thing that is challenging is trying to make the sheath as small as possible and still have a nice shape that is bigger at the top and doesn't pull in when its' formed to the knife.

Brian

1) Gum Trag - can be found at Tandy - cheap as chips.
2) You and the REST OF THE WORLD have that same problem. Honestly, this is why I went to the double stitch - it allows me to wrap a little more leather around the knife and not have a bend nasty looking opening. It makes for a welt that is, well, a bit too large than necessary - but - for bushcrafters - I think it adds some safety.

Try this - I have - and I like the result. Cut your welt - then - cut two more sections of welt the length of the handle of your knife - skive them into triangles - and glue one wedge in first - then your full welt - then the second wedge. In other words - add a second wedge like you did above. Skive carefully - and finish your edges well - and you can get away with less leather at the edges.

Just a thought.

TF
 
Never thought about a wedge above and below the main welt!

That would add symmetry when forming ... rather than having a flat back side and a big hump on the front.

Also give a bigger opening without a bunch of extra material half way down the handle.

Thanks for the great tips TF.

Brian
 
You have hit it Brian. Give it a try - it really can tighten up your welt (single stitch) and give the symmetry you mentioned.

TF
 
Back
Top