My new forge body. I need help

Joined
Jun 11, 2006
Messages
8,651
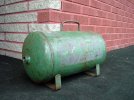
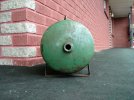
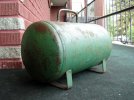
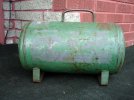
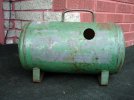
Here is my new tank i got to use for my forge. it is 8" wide and around 14" long it has a handle and legs. i was wanting to do a vertical forge but i came across this tank and for 20 bucks i hade to have it. i was thinking about doing a 2 burner venturie with one layer of fiber with one more layer on the bottom of the forge to create a flore and seal up the layer seam. but my question is this. is one layer of 1" fiber going to be ok for welding temps. also what kind of doors should i put on this. i was thinking about doing a 2" hole out the back and cutting a 6" hole in the fround so that there is a 1" lip around the edge. then i would put a plate over the hole that has a smaller hole in it around 3x3 and bolt the plate onto the frount. so i can take it off to change the lineing. any help with this would be great because i realy dont know what im doing. what size burners should i use, should i make the burners or but them. and what size of burner input hole should i cut into the side. the tank seames to be between 1/8"-3/16"thick. thanks for all the help.
 

Attachments

  • tank 1.jpg
    tank 1.jpg
    56.9 KB · Views: 44
  • tank 2.jpg
    tank 2.jpg
    57.1 KB · Views: 26
  • tank 3.jpg
    tank 3.jpg
    56.3 KB · Views: 20
  • tank 4.jpg
    tank 4.jpg
    52.5 KB · Views: 19
  • tank 5.jpg
    tank 5.jpg
    55.4 KB · Views: 24
Here is a great tutorial to help you out. http://www.indiangeorgesknives.com/building_a_forge.html

I made my forge from a propane tank and didn't make a door for it yet. I'm just using fire bricks for the door. If that tank is aluminum then I'm pretty sure it won't work for a forge body. I'm no expert when it comes to building forges but I prefer a blown burner like the one in the tutorial. Hope this helps you. Good luck and keep us informed with the progress.
 
I think a 3/4" venturi burner would reach welding temps in your forge with the usual satanite/itc 100 over 1" of refractory blanket. I used a 2" pipe for the burner mount. If you really want a door on it, why not cut one end off full diameter and deep enough to hold 1" of wool with the refractory cement. Then put any kind of window in it that you want. I'm not real sure you need to double up on the floor. It may be more helpful to lay in one of the flux resistant liners.
Best of luck, Craig
 
I forgot about another important link. http://refractory.elliscustomknifeworks.com/

On Darrens site he lists the temperatures for the Inswool. He sells everything you need to complete your forge. If you use IG's tutorial you will need to get some clay kitty litter from the dollar store and some satanite to mix with it. Darren carries the satanite. I purchased 5lbs of it and used it all. I coated my forge with satanite and ITC-100 and did a 50/50 mix of satanite and kitty litter for the floor around the fire bricks but my bricks were 2" thick. I haven't tried getting my forge to welding temps because I don't own nor know anyone close who owns a pyrometer so I'm not sure exactly what temps my forge is getting. Easiest solution is to use IG's forge building tutorial and purchase everything you need for it including the gas hookup from Darren. Darren is a great guy with superb customer service. I have never heard anything negative about him or his customer service and I seriously doubt that I or anyone else here ever will. One of these days I'm going to shake his hand and thank him for everything that he has done for me and helped me with. If you have problems with the forge when building it give IG a call. Use his home phone number unless you use Verizon Wireless then you can call his cell. The other members on this site can give you advise about your particular forge body.
 
ya i decided to go with forced air. im doing a dual burner and i have built it allredy. there is one input for the air and one input for the gas then it hits a tea and splits and then theres a 90 with a 10" long burner tube. the tea and burner tubes are 1" and the tea with air and gas inlet is 1 1/4". it works great. but i have a little problem. what does it mean when the flame starts working its way away from the burner tip and ends up going out. not enought gas or to much air. i tested it with my little propane tourch than uses the little bottles so im thinking not enought gass. ill post a picture of it.
 
With that shell and 1" HTZ wool you will have a chamber of about 270 Cubic Inches. ( approx 5.5X11.5",That figure includes the satanite, bubble alumina floor, and ITC-100,too.) It should easily reach welding heat.
You only need (and want) a single burner.
Replace where your tee is now with two 1X2" bell reducers with a 2" pipe nipple between them, then the 1" burner tube. This will make a mixing chamber and make the burner tube work better. Kevin Cashen has a good diagram and explanation on his site.

Once the burner is modified to a single tube, test it with the same bulk tank, regulator, and blower you will use on the finished forge.
Adjust the gas pressure and air until the burner looks like a big torch. It doesn't take more than a couple of pounds of gas pressure.You usually have to choke down the air a lot to keep things balanced right. A needle valve in the gas line makes fine tuning the flame easier. You don't want a ten foot flame, unless you are going to build a ten foot wide forge.

About the end holes, I would cut a two inch circle for the back and a five inch circle for the front. You can get the roll of wool through that and it won't be hard to do the inside work through a hole that size. If, when running the forge, you want a smaller front hole, or to close off the back one, use insuboard, which also makes a great replaceable floor liner.
( BTW, All products I have mentioned can be purchased from Darren Ellis.)
Stacy
 
does a single burner have a hot spot. that was what i was trying to avoid by using 2 burners. here are my pictures of the dual burner. so you think one burner is better then 2. also would a 4" hole in the frount still beable to fit the liner inside. because im going to do the 1" around the inside then 1" more 1" chunk for the floor and a 4" hole would just reach the floor. thanks.
 

Attachments

  • DSC00733n.JPG
    DSC00733n.JPG
    52 KB · Views: 34
  • DSC00735n.JPG
    DSC00735n.JPG
    41.6 KB · Views: 21
O and one more thing, where should i put the burner on the tank. im assuming 1"-1 1/5" down from the top of the tank. and should be centered from lef to right?
 
With a double burner configured like you have, you may have difficulty balancing the burners. It could even create more of a hot spot problem.

With a single burner, place the burner about 1/3 forward from the back. Place it so the flame goes in even with the forge lining top, and angled about 20 degrees forward. This will make the flame swirl around the surface of the chamber. If you are making a built up floor, make the 4" front hole "D" shaped (with the straight part down) and put it a bit above the floor level . That way you have a flat opening aligned with the floor. To figure out how small the hole can be ,try this. Cut the wool to the width that will fit the inside of the forge (It will probably end up being trimmed a bit more, but that does not matter right now). Roll it up tight and see how big the roll is. This is what you need to get it in the forge. To try it out to see if it will go, cut a hole in a piece of stiff cardboard the shape you are thinking of making the front hole. Try to put the roll through it. If it goes through just barely, great. Adjust the hole smaller or larger until you get the smallest hole that will pass the roll of wool. Use this cardboard hole as a template to cut the front opening.

I highly recommend you putting a good 1/4" layer of bubble alumina on the floor and up the sides about an inch. It is very resistant to flux.
Stacy
 
so your saying insted of a circle cutout do a circle with a flat bottom. and the burnertwards the back. i did some pictures to see if i have the right idea. but my question is this. am i going to affect the spiral effect of the flame if i have a flat floor. which one is bettor flat or not. here are the pictures
 

Attachments

  • tank 3 cut out.jpg
    tank 3 cut out.jpg
    54.3 KB · Views: 25
  • tank 5 burner cutout.jpg
    tank 5 burner cutout.jpg
    54.6 KB · Views: 21
do i have to have a back door, i probley will never use it. and with the burner in the back it will force the heat to the frount. is the burner better in the frount or back. IG says the frount but im open to any comments. if i put the same style of opening on each end i could use it eather way, burner in the frount or back just by turning the forge around.
 
Your picture looks right. With a flat floor and a flat bottom door, you will get the easiest insertion and removal of a billet/blade. Make the front and rear doors the same shape (back door can be the same size or smaller) and build up the floor to be an even surface right through the forge. Billets slip in and out easily.
With two doors,I am not sure if it is better to put the burner to the rear or front, but as long as it spirals the flame down the forge it should work. George is probably trying to cut down on the Dragon's Breath. However, if you only have one door, the flame should come from the end opposite the door. As to one door, it is fine to have only one. It might be just as easy to add the back hole and make a plug from a soft fire brick. That way you can have it both ways. (IG, no comments about plugging the back hole and going both ways !!!) You said you are going to make damascus in this forge. You will need the back door unless the longest billet you plan on making will be 5". You will need to draw the bar out to twice the desired length to fold it. A 6" billet will draw to 12" prior to a fold, so your forge wouldn't be big enough without a back door.
The flat floor will not affect the forge operation enough to be a problem. It is just easier to work with. Once the forge is fully heated and running at temperature, it will be fine. In a great big barrel forge it might matter more.

I hope some others will chime in and give their opinions and ideas. I don't want to be the only voice here.

Now, there is one thing you have not mentioned - A pyrometer.
With a pyrometer and a needle valve, you can get the forge running at a nice even temperature. Add a solenoid valve and a PID controller, and it will reach a set temp and hold it there.
Stacy
 
I am hoping this question is relevant in some way to the thread, so here we go. Is it neccessary to have an idle circuit or pilot light w/ solenoid valve, or will it be self igniting? Also, what is the easiest/least expensive way to get ahold of the gas solenoid? Thanks.
 
I have a pyrometer, just a hand held one with a 18" long probe. it will go to2000F and it also has a smaller probe that goes up to 600 the just needs to tuch the steel and it will tell you the temp. for a blower im going to use a vac suction motor in a housing. i have a ac voltage controler that has plugs one one side and a big nob and a needle meter. it is powerfull to run my 2.5 hp disk grinder. so it runs the blower very niceley and has a very nice air volume control from just a very small wisper to a full on gust. no need for a gate valve. do i need to put an jet size on the gas tube input on the burner or just pipe it in through a needle valve. you said 20 degrees angle on the burner twards the frount. man i love this blower set up, it also sounds cool like a jet spooling up. does any one know how much 1" wool will compress down to, if any one has any scraps could you smash it down and messure its thickness. this way i can caluclate if my hole size is big enought to fit the amount of wool i need. thanks for the help
 
Any Cal. - The solenoid valve will turn the gas on and off, so if it directly controls the gas flow the unit will just re-ignite itself (It won't cool down enough to not ignite if the controller is set above 1300F) every time it turns back on. That said there will usually be a WOOF when it re-ignites. I have developed a by-pass system (I'll post the plans later) that lets the solenoid switch the forge from a preset low flame to a preset high flame. The burner never turns off, just cycles from low flame to high flame. The blower has dual settings on it so it is balanced with the gas.

JT - The needle valve is placed in the gas line where it enters the manifold (where the ball valve is ). You can fine tune the gas flow much better than with the ball valve. Keep the ball valve, too. That way when you shut the burner off, and then re-ignite it, the needle valve is still set.

Just roll the wool up tight. You don't really want/need to compress it. I'll cut a 25"piece of HTZ to fit and see how small it rolls up to. The reason I gave you the cardboard template info is so you could figure the hole size out for yourself. Just remember, you don't want it too small. You have to work through it when putting the coats of satanite and such on the wool.
BTW - You can calculate the width of the wool (25") and figure the spiral size from that, but the formula is complicated. Trial and error are the best way to go. I believe this is it: L=piN(D+d)/2 where N=D-D/2*T Since the inside diameter of the spiral is 0,d=0 . D is what you are looking for. T is the thickness of the wool=1". L=the circumference of the cylinder, which is about 25" - Have at it ( or just roll up two feet of wool).
Stacy
 
insted of using propain i was thinking about using natural gas piped out of my water heater line. it this possible, how would i do it.
 
Check with your local gas company. You may have to change your meter and add a 1" gas line. Most home systems run on 1/2 pound pressure. Forges run on 2 to as much as 20 pounds, depending on burner type. Most blown units use 2-5Lbs. You may also have to have annual fire inspections of your equipment by the FD. Propane is much easier, unless you are setting up a professional shop.
Stacy
 
Back
Top