Myakka's Linger sheath.

Ken C.

Jack of all trades, master of none.
Lifetime Platinum Membership
Joined
Jun 14, 2000
Messages
15,403
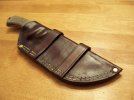
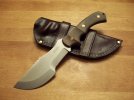
Myakka contasted me regarding a sheath or his Linger. After discussing what he was looking for I set to work on the design. I made a pretty simple scout-stye sheath. The sheath in ambidextrous and the knife locks into place very nicely. There is no way in hell this knife will fall out of the sheath. It "clicks" in like Kydex. 2 rows of stiching and rivets at the throat and tip compliment the color.

This is the very first sheath I have done for a WSK. I am quite proud of it.
 

Attachments

  • 100_2597.JPG
    100_2597.JPG
    45.8 KB · Views: 114
  • 100_2599.JPG
    100_2599.JPG
    45.1 KB · Views: 121
Ken Rocks:thumbup: :thumbup: :D

I cant wait to get my baby back with it's new sheath.

Thanks Ken you were a pleasure to deal with.

Ron
 
I love how high it comes up on the handle. That's is truly a perfect match to the WSK.
 
That's some real nice leather work Ken :thumbup: The WSK style knife looks like it would be tough to sheath because of the shape, but you nailed it.
 
Thanks guys. :)

The whole key to this sheath was the handle that Roger makes on his WSK. It just screamed "WET MOLDING"!!! This worked in my favor because when I build a sheath for a knife of this type (deep handle forming) I make it so the knife locks into place. It's a process that I perfected using OxyClean in the water I soak the leather in. It draws out all the air in the leather making it harder once it dries (at least I think it does). The OxyClean also forms a protective dark film on the leather which makes stray glue spots a breeze to clean up. It doesn't allow the glue to sink into the leather.

Anyway, like I said earlier I'm proud of how it turned out. There are probably a few things that I can do to make my next one better. One such idea is to rivet a thin strip of plastic inside the fold of the sheath. This will prevent the top edge sawteeth from ripping up the leather inside. (Sorry, Ron. It was too late to add it to yours!)

I love how high it comes up on the handle. That's is truly a perfect match to the WSK.

I left enough of the handle exposed to use a 3-finger grip to unsheath it. The thumb and pointer finger will fall right into place on the rest of the handle once it's cleared the throat.
 
Very nice leather work.....I might need one of those?
 
Looks like a real nice sheath. I've never made a scout style but I sure like them and have a knife that would be perfect for one. I need to get off my butt and get to work. While I'm at it, I think I'm gonna try your oxyclean trick since I have some in the laundry room. Care to share more details on the process? :)

My only question is that, judging from the molding, the sheath seems to be oversized. Is there a reason for this? I'll admit that I'm a nut for keeping a sheath as small as possible for ease of carry. As for protection from the saw edge, plastic would work but I hate mixing plastic and leather. How about a small welt piece on the fold or, maybe gluing two thinner flesh sides together to form the sheath from?
 
My only question is that, judging from the molding, the sheath seems to be oversized. Is there a reason for this? I'll admit that I'm a nut for keeping a sheath as small as possible for ease of carry. As for protection from the saw edge, plastic would work but I hate mixing plastic and leather. How about a small welt piece on the fold or, maybe gluing two thinner flesh sides together to form the sheath from?

Repeated removal of the sheath will wear on the welt and by my thinking a single row of stitching would not be adequate. The angle at which Ron will be removing the knife (from behind his back) will force the main edge down into the welt. I made it wide and I double stitched it to prevent the edge from working down into either side of the welt. The knife also needs room to move when removing it. Making it too small and tight would not enable easy removal or insertion. The last thing you want is for your knife to hang up in the sheath.

As far as the sawteeth protection I think I am going to stitch in some thinner leather (6-7oz.) flesh side down to preven the excess wear. You're right when you say that plastic and leather don't mix.
 
SWEET! Loving that design!
 
Repeated removal of the sheath will wear on the welt and by my thinking a single row of stitching would not be adequate. The angle at which Ron will be removing the knife (from behind his back) will force the main edge down into the welt. I made it wide and I double stitched it to prevent the edge from working down into either side of the welt. The knife also needs room to move when removing it. Making it too small and tight would not enable easy removal or insertion. The last thing you want is for your knife to hang up in the sheath.

As far as the sawteeth protection I think I am going to stitch in some thinner leather (6-7oz.) flesh side down to preven the excess wear. You're right when you say that plastic and leather don't mix.

I agree completely with the double stitch on the welt, only way to go on this knife. I guess with the design of the blade, this knife would need more room to move in order to properly seat and remove from the sheath. It just looked a little oversized in the pics. Not beating your work up at all as I really like the sheath and, as I said, need to try my hand at this design. I'm a bit tired of doing inlays and stamping.

I think you're right on using a flesh side piece to protect the sheath from the saw teeth. I wonder if you could use a piece of rawhide? Never tried to work with that stuff and wouldn't know if it was possible but it sure seems like it would be tough. Anyone out there ever tried something like that?
 
Back
Top