Mysterious lines (perpendicular to grind lines) appear on bevels

With stainless steels, the Peters’s guys say to go ahead down to 0.015”
If I remember correctly, 0.018” is the micrometer setting that didn’t bind on this one. I know they do some straightening if necessary, but I’ve never received a crooked edge.
 
Last edited:
Note to folks who may be new to making knives:
The edge thickness required at HT is to prevent/reduce warp and a bacon edge. It has nothing to do with final blade thickness. The surface steel has been changed during HT and needs to be removed.
ALL knives, regardless of how the HT was done, need a couple thousandths (sometimes much more) of surface sanded/ground away after hardening and tempering. What type of heat treatment method was used will determine how much you need to grind off.
 
Okie dokie, I’ve always done red/green/gray scotchbrite cleanup to remove scale and get a satin finish post HT but if more is required I’ll keep grinding. 🙂

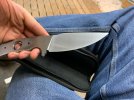
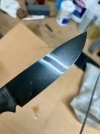
Edit to add: Like this, for example, was a recent one that wasn't etched/stone washed, also AEB-L. I got it to this level, post HT, and my brain said "put scales one it", but does more need to come off? How do you determine how much "bad" material is there? For what it's worth, it's skinned out a few animals already but if I'm putting out substandard product I absolutely want to improve.
 

Attachments

  • IMG_0661.jpeg
    IMG_0661.jpeg
    516.3 KB · Views: 2
Last edited:
Okie dokie, I’ve always done red/green/gray scotchbrite cleanup to remove scale and get a satin finish post HT but if more is required I’ll keep grinding. 🙂

Edit to add: Like this, for example, was a recent one that wasn't etched/stone washed, also AEB-L. I got it to this level, post HT, and my brain said "put scales one it", but does more need to come off? How do you determine how much "bad" material is there? For what it's worth, it's skinned out a few animals already but if I'm putting out substandard product I absolutely want to improve.
You’re asking about “bad material” because you ground and sanded again and it went away?
 
It was in response to Stacy's comment "The surface steel has been changed during HT and needs to be removed." To remove the scale/discoloration post HT (and also to get rid of the tiny scratches they all seem to get being handled in their pre-HT state) I've always done a surface conditioning belt progression (and sometimes hand sanding, if I'm going for high polish) and was asking if this was insufficient. I've never taken AO/silicon/ceramic belts to my knives post heat treatment, except to do 70% of the work of an edge bevel ( very fast passes and dunking in water constantly) and then I always remove the last few thousands with a Wicked Edge system to get it actually sharp.
 
Then at least some of what you are seeing isn’t banding.
Well I will 100% disagree with this statement. MOST of the alloy banding I see indeed follows the curve of the blade, and that makes total sense to me when alloy comes into solution. What else could it possibly be? It certainly isn't grind lines, as they are either vertical (off of the grinder) or horizontal once hand sanding is started. I don't ever really recall seeing banding go from the plunge grind straight out to the front of the blade on a blade with a curve at the edge. Next time I have a low alloy steel I will etch and show. Right now I am using mostly PM steels and don't really pick up much banding at all. Even CPM M4 didn't show much banding on my last knife, but steels like W2, Blue series, A2, anything with tungsten or vanadium, I get banding that 100% follows the curve of a blade.
 
Well I will 100% disagree with this statement. MOST of the alloy banding I see indeed follows the curve of the blade, and that makes total sense to me when alloy comes into solution. What else could it possibly be? It certainly isn't grind lines, as they are either vertical (off of the grinder) or horizontal once hand sanding is started. I don't ever really recall seeing banding go from the plunge grind straight out to the front of the blade on a blade with a curve at the edge. Next time I have a low alloy steel I will etch and show. Right now I am using mostly PM steels and don't really pick up much banding at all. Even CPM M4 didn't show much banding on my last knife, but steels like W2, Blue series, A2, anything with tungsten or vanadium, I get banding that 100% follows the curve of a blade.
You can’t move banding by grinding a curve and heat treating. It doesn’t move that easily. It follows the rolling direction.
 
In response and explanation:
There is no practical way to measure how much to remove. The numbers we give are for reference, not actual measuring. Most folks just grind a few firm passes with a 120 or 220 grit belt and call it done. If the HT was done right, that is sufficient.

I grind post-HT now for most blades, so the issue is moot.
However, if you grind the bevels first and then do HT, you will need to go back one grit and re-sand all the surfaces, then sand up to your desired finish type. That should remove any decarb.
If you ground the blade to as thin as the HT will take, say, .15", and just used the surface belts, it is likely that there will be some decarb missed somewhere. This does not affect the edge or blade quality, but may show now or later as spots of dark and light areas on the blade..

Generally, you go back to a 120 or 220 belt and grind the surfaces to remove all decarb. Then you go up the grits or use surface conditioning belts. Surface conditioning belts are normally done after all machine and hand sanding. As I said earlier, grinding the bevels and other parts post-HT eliminates the early steps that you just have to repeat anyway.

Your blades are likely perfectly fine.
Carbon steel blades are exposed to oxygen during thermal cycling/annealing/normalizing, and HT. Depending on your heat source and length of time, the decarb may be from fairly shallow to pretty deep. Usually, it is .002-.003" deep, but in some cases it can be .005" thick. This is why all carbon blades need to be re-ground post HT. If you don't, blotches may show up on them. It is also part of why you leave a carbon steel blade much thicker before HT.

If you want to be sure that the surface is uniform and all decarb is gone on a carbon steel blade, dip it in FC for a minute or two. Decarb will show as a light color area. If there are light and dark areas, try sanding more and checking again. If it is all evenly dark, you are good.
On stainless steel, it may take 5 minutes or longer to show a difference in color. The issue is much less of a problem with stainless steel because the surface is shielded from most oxygen exposure during HT. There is still a very thin layer of decarb, buy a few passes with a 220 belt should remove it quickly.

Hope this helps - Stacy
 
Last edited:
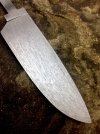
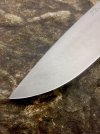
I can't make the banding do what it does, but it clearly follows the curve of the blade. These are three different alloys, and I don't recall which was which. Blue # 2, 1.2442, and A-2 (IIRC).

You can see the carbide banding hug the curve of the edge. I don't know how it does it, but it does, and it makes sense in my head Now I would imagine that if you took a piece of steel in the shape of a rectangle, or square, and you hardened/tempered that piece, then cut a profile out of the hardened steel, then yes.....I can see how carbide banding would just run straight across any curve you might have cut.


IMG_1416.jpg IMG_2070.jpg IMG_0344.jpg
 
If you ground plywood into a curved knife like shape the same effect would appear.
It appears the banding has followed the rolling direction in a laminated manner to me.
 
The curve is a function of the taper ... not the direction of the lines. The lines are straight.
 
Back
Top