need advise on an anvil stand!Sorry (kind long)

Joined
Jan 1, 2006
Messages
55
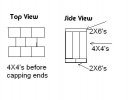
Okay all, I 've done a search but couldn't find exactly what I needed. I have a good 110# anvil that was a gift. Great rebound , but no idea who makes it .My brother-in-law got it for me from hammer source I think. At any rate I am not sure what would be the best, most inexpensive and quasi-portable way to mount it. Any Ideas? I had thought about 11"x5" rectangles of MDF screwed or bolted one to another, and since my anvil doesn't have holes in the feet I was thinking about 1/4' wire cable securing the anvil to the the base.Then I would router an x shaped groove in the base so the cable could go underneath the stand. I thought about cable tensioners to tighten the whole thing down. Does this sound workable? Any other Ideas?
 
Sounds good, but I see most guys with chain instead of the wire rope. I believe it deadens the sound a bit as well as holding the anvil down.
 
I used a stack of 2x4s screwed together w/ decking screws. Do one course one direction and another 90-degrees off from that, etc, etc. To attach mine to the stand I took a couple pieces of angle iron, drilled a hole in the middle and lag bolted them down over the anvil feet and into the stand. It's nice and tight on that stand!

-d
 
I think chain is the best also. Just use lag bolts through one of the links on each side and crank them down until tight. I have tried three different stands for my 150# and the one that is best is a 22" dia douglas fir butt cut. Since being a butt cut it has a natural conical taper to it so the base is a larger diameter then the top. It also weighs as much as the anvil but was much more challenging to get it from the logging site into the shop. Thank god for hand trucks with straps and good neighbors that think forging is cool!
 
My anvil is sitting on a "stump" laminated out of 4X4's. I bought 2- 8 footers and cut them into 8-2ft peices. Screwed them together in a row of 3 then a row of 2 then a row of 3 so they're staggered. Then capped the ends with 2X6's. That got me to the height I wanted, with just a couple bucks worth of lumber in it. You couldn't beat it apart if you tried.
To keep the anvil lined up right I cut out half circles from 2X6 to match the feet of the anvil and screwed them down to the top so that the anvil sits inside them. Its not too terribly heavy to move around either.
 
:confused: :confused: Matt, can you elaborate on the "stump" i guess I'm not firing on all 8 but i'm not tracking when you say staggered. Is there a particular reason for this? Are they going the same way each time? Sorry so dense, I've been in the hot sun all day and around gunfire.:confused:
 
I don't know, i seem to have this innate ability to screw up a rock fight! But once I get started it might be. I'd also heard that it is a good idea to be able to get close to your work if needed
 
Mine is stacked 4X4's, alternating 90 degrees every layer. I planed them down so they're all nice and square. I predrilled holes so that my 3" deck screws would be 50% in each board. I also used carpenters' glue.

They were free dunnage... they came from 24 or 28' pallets that my boat-builder friend gets Aluminum orders on.

It's level, flat, and weighs about 150 lb.

My anvil is glued to the base with silicone glue. I learned this trick from Russell Jaqua, the man that designed and built my anvil.

I recently saw a way to make a plate base, with 3/8" angle iron "ears" and bolts that screw up against the anvil base. It was quite ingenious, yet very simple.

I can almost guarantee you're thinking, "Silicone glue? WTF!?!?!" But it works :D

I also took some canvas belting that I used to be used on machines at my great-grandpas saw mill for my hammer loops.

standard
 
Plumbers pipe hanger strapping is easy to get, easy to bend and fit, and easy to nail down with double head nails (already has holes). Pretty durn cheap to boot. Just wrap it around and down front and back then nail in place.
 
linkshande said:
:confused: :confused: Matt, can you elaborate on the "stump" i guess I'm not firing on all 8 but i'm not tracking when you say staggered. Is there a particular reason for this? Are they going the same way each time? Sorry so dense, I've been in the hot sun all day and around gunfire.:confused:

Maybe this will help:
attachment.php


The top view is without the 2X6 end caps. It shows how I staggered the 4X4'
s. That way they aren't alinged with each other, cuts down on warping or twisting that would make them seperate.
The side view shows how it would sit. The 4X4's run vertically, and the 2x6's cap the ends and help further tie them together. I also rotated the bottom 2-2X6's 90 degrees from the top set so that the seams are perpendicular rather than lined up with each other.
 

Attachments

  • anvil stump.JPG
    anvil stump.JPG
    11.5 KB · Views: 271
Mine is made out of rough cut 2x10s stacked edge wise. The 2xs are bolted together with all rod and nuts in a loose fitting hole. This allows the anvil base to shift and be self leveling. I have half inch mild steel rod driven into holes around the anvil feet to keep it in place. I can move this anvil and base very easily . If I get a chance Ill take a picture tomorrow and post it..
 
linkshande said:
Decker, approx. how many 2x4's did it take? ( keeping in mind height diff.)

Lesse...I used math for this when I did it, let's see if I can resurrect it now :)

My stack is ~18in square (it's a 335lb anvil) and needed to be 20" high for me.
Each "course" was 5 pieces of 2x4 wide. I needed 13 courses to get to 20".

Sooo...

5 pieces x 18in = 90in

So I suppose I used 13 96" 2x4s :D

-d
 
I made mine out of 2x8 scrap pieces. Alternated the layers. Screwed together with 3" deck screws. I made it in two layers, so it can be broken down and put in the trunk for demos. The two layers are held together by verticle pieces of 1/2" plywood screwed to either side. I use the plumbers banding material described above and that works great. I cut a piece for each foot of the anvil, screw down one side hammer it to fit snug around the foot, and screw in the other side. The whole thing breaks down with a cordless drill and is quite sturdy.
Ed
 
Nick Wheeler, the anal retentive bladesmith :p

here's mine:
dicksworkshop2.jpg


just a bunch of scraps screwed together. The anvil is held down by its own weight (300#s - the thing doesn't budge)
 
Hey Nick, I can't believe that paper weight of an anvil you have needed to be glued down. If I end up going north again I'm going to have to come by and see your monster. How far are you from Lonnie Hansen's?
 
Well, with this one, it's not so much that it NEEDS to be glued down to keep it from moving, but it GREATLY reduces the high pitched ring. I had it on this base for several months before I finally jacked it up and put the silicone under it (a full "caulking" tube of it)... and it TOTALLY got rid of those high tones that hurt your ears.

I guess I made it "one with the base" :rolleyes: :p :D

Hey Mr. Wulf... when am I gonna get to see some knives out of that kick-ass shop!?!? :D

Oh, Ray... Um, I'm not sure actually. Doesn't Lonnie live in Spanaway? My only reference for ya is that I'm 3 hours from Eugene right off I-5... My door's always open :D
 
Very nice base Nick -- mine is pretty craptastic.

I know that you're supposed to have the anvil come to your knuckles, but I have mine higher. I always figured that any lower and it would be bad on the back to bend down and hammer. Is that recommended height just a "rule of thumb" or are there other benefits to having it that low? (sorry for the ot)
 
Back
Top