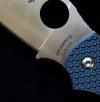
Need help with sharpening on my Hapstone M3 (Sharpening journal)

Joined
Aug 3, 2020
Messages
619
I’m sharpening with a Hapstone M3 and I’ve noticed that my blades are losing the normal curvature after sharpening. There are some problem areas on a blade that doesn’t come to an apex as easy as others and I’m thinking the problems is push pull stroke. Can anyone help me correct this from happening. I practically turned my dragonfly 2 into a wharncliffe and not on purpose.
 
It is typical to have uneven or nonuniform grind on production knives.
I use Edge Pro and often find areas near the tip and the heel need more sharpening to reach the apex, particularly when I reprofile the factory edge.
If I ignore this, which I did as a beginner, I would take off more materials from the edge in the other areas, thereby changing the edge line.

So, what I do is to identify these areas when grit scratches come close to the apex.
These areas can be easily identified as shiny spots or using a loupe.
An area would look like this (This is exaggerated).

Untitled-1.jpg

Then I focus on these areas to remove more metals, sometimes using the edge of a sharpening stone, and have even scratch marks along the entire edge bevel.

Hope this makes sense.
 
Last edited:
Yes that does make sense and thanks for the photo. That is exactly the kind issue I’m having. Won’t focusing in on one area enlarge the secondary bevel or change the edge line? I’m finding it takes quite a bit of work to correct a small area illustrated in your photo.
 
Yes.
Consider the grey area already ground to the apex.
If you continue sharpening the entire edge bevel, the white area would protrude.

And yes, it is difficult to remove metal only from that kind of a small area.
But if you take your time and check the edge bevel often with a loupe, it can be done rather quickly.
Sharpie also helps to some extent.
Grind materials off using the edge of a coarse sharpening stone with slow and short strokes, and light pressure.
 
Okay, I spent 3 hours sharpening one knife tonight and I’m just frustrated. It was a factory edge spyderco. I used sharpie to confirm the angle was at 15 degrees. One side the heel and the tip were way off from the belly of the blade. It took an hour or more maybe to get it to where I thought it was perfect. The tip gave me the hardest time. I was using a CKTG 140 grit diamond plate. I started with a Venev 240, but that would have taken to long. One side ended up with a larger bevel than the other. When progressing up through the grits the tip didn’t get sharp and the heel is hazy compared to the belly. I have the run the length of the edge with every stroke because if i just focus on the heel and tip the blade gets missshapened and not longer looks factory, which happened again. Why can’t I get the heel and tip. I’ve sharpened a knife every night this week. Same problem. I feel like to do it right I would take off WAY to much metal.
 
I think many production knives come with 18~21 DPS edges, including Spyderco.
So if you try to sharpen them at 15 DPS, you are going to remove a lot of metal.
Also, it is typical to have uneven primary bevel and therefore to end up with uneven edge bevel width.


Just a few more tips.

1. You need to make sure that the edge is receipt paper cutting sharp at each stone, even from the coarsest, from the tip to heel after deburring on the stone as much as possible using very very light strokes.

2. Also make sure that your stones hit the blade at the same angle using an angle cube. Some stones may be thinner or thicker than the others. Then, you may not hit the apex at every stone. I can kind of see that finer stones might not have reached the apex on Coldsteel.

3. For the Coldsteel, you hit the ricasso and therefore raise the stone there. This may make the heel area unreachable for some stones. Try adjusting the blade position on the stage to see if it helps.

4. If you rounded the tip, you might have slid the stone too far off from the tip. Stop the stone when the tip reaches the midline of the stone.


Finally, do not sharpen your fav knives until you are sure about the system.
I have ruined good knives at the beginning myself.
Just use cheap knives for practice.


Edit: When you do the Sharpie test, you should use a fine stone like #600. Coarse stone may be able to scratch the Sharpie near the apex even at a shallower angle than the true angle.
 
Last edited:
I think so.

If you make sure of the angle at each stone, the tip should be sharpened, assuming that you form the apex well from the tip to heel at the coarsest stone.
Also, keep the knife position and angle consistent all the time.
It would affect the sharpening angle at the tip in particular.

For the uneven edge bevel, you have two options.
One, you can sharpen the narrower side more than the other intentionally in future sharpening sessions, and the difference is going to be corrected over time.
Two, you can sharpen at different angles to match the bevel width.

The heel might be difficult.
For Coldsteel, you can probably position the blade in such a way that the ricasso parallels the stone. Then, the stone would not hit there.
Since Spyderco knives do not have a sharpening choil, you cannot sharpen the very end toward the heel.
You should either stop the stone before its hitting the ricasso thereby putting the stone on the bump (see the pic), or remove some materials off first from the heel area using a corner of a coarse stone.
It needs some patience, and the result won't look very nice because you may need to remove some materials from ricasso as well.

Before
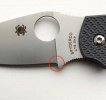
Chap6.jpg

After
Chap_dark.jpg
 
Thank you. So should I go back to the bench and start over in order to get the tip sharp? Should I also even out the bevels by sharpening the narrowest side to match the wider side at same time? So I guess I’d be going back to profile the edge.
How much metal is removed by this sharpening? Am I taking thickening behind the edge in a major way or am I removing small amounts of metal?
 
If you just want to make the tip sharp, you may want to use a fine bench stone to touch up the edge with a slightly higher sharpening angle.
This might be enough.
But I would go back to a coarse stone.

I would not try to adjust the bevel widths in one session but over several of sharpening sessions.

If you want to have the very heel sharpened on Spyderco, you can use your #140 and grind off materials from the bump first.
If you don't care about it, then you can start from Venev #240 and raise a full length burr from the tip to the heel (or before the bump).

Since you have already reprofiled the edge, you won't remove so much materials off.
The tip may need some work, but it shouldn't take longer than 5 min on each side.

Then, you can chase the grit while making sure the consistent sharpening angle on all stones using an angle cube.
Put the stone you start with on the blade, put the angle cube on the stone, and measure the angle.
You then adjust the Hapstone arm angle to have the same number for all stones.

Also, make sure if each stone hits the apex (or if scratches reach the apex) by detecting a burr or using a loupe.
Sometimes a blade has a little bit of covexity, which may result in inconsistent sharpening angles depending on how you hold the knife.

I have ditched polish edges because of these things and just use a single coarse stone to make a toothy edge now.

Hope this helps.
 
I might try and go back on the Manix with a 240 grit Venev and work on the heel and tip. Yeah I notice the higher I go in grit the more problems present themselves. I might try and stop at the 400 Venev stone. Here is the Smock I worked on last night. I think this one should be salvageable. Again the tip was the problem with this one and the heel looked good in the lower grits, but as I went up in grit there is some haze at the heel in the light. With the Smock and the Manix would you go back to a 240 venev and raise a burr heel to tip? And are clamped systems better (easier) than the M3 I have?


How do you move a stone on blade?
Back and forth from heel to tip?
One single edge-leading stroke from heel to tip?
Something else?
 
I’ve been doing sweeping back and forth motions heel to tip. I was doing up and down motion, however, I changed to heel to tip edge leading strokes
 
Last edited:
I initially do the back and forth motion until burr raised from heel to tip.
Then switch to a single edge-leading stroke from heel to tip to have a consistent scratch pattern.
Debuuring is also done with single strokes.

One thing you need to be careful is that the heel area tends to be ground insufficiently because a stone scratches there very transiently, particularly with a lateral motion.
So, when I put a stone at the heel to start motion, I purposely start with more of an upward motion rather than lateral motion to make sure the stone grinds the area enough.

To me, both Spyderco look pretty good.
If they are sharp from heel to tip, I would just use them until they demand resharpening.
 
Thank you Miso. I feel like it’s starting to come together. I sharpened a kershaw leek tonight. raised a burr heel to tip at each grit, deburred before moving up in grit, checked angle with angle cube with each stone change. Stopped at Venev 400 grit. No stropping. It is pretty darn sharp and I’m satisfied with the sharpness. I don’t know if you can see in pics but it lost it’s wharncliff shape a bit towards the tip. How do I go about straightening the bevel line again and establishing the wharncliff shape? Do I remove move metal at the heel? Or remove more metal where the curve is developing?


That would be quite difficult.
I have never done this, but you should probably grind the edge by putting the blade perpendicular to a stone to make the edge line what you like.
Then grind the edge bevel to reform the apex while keeping the edge line, which requires grinding specific spots more than the others.

Or, you can gradually correct it by grinding more from the belly over many sharpening sessions.

I think in the future you should start with the factory angle at 18~21 DPS but not 15 DPS.
A jump from a factory angle to 15 DPS requires a lot of effort, time, and substantial loss of metal.
Coarse diamond stones remove materials fast.
I've made a drop point knife with a fine tip to a recurve knife with a rounded tip once in the past.
That was a $700 knife and a hard lesson.....
 
This one was profiled to 20 DPS. Factory angle was >22 DPS. What grit do you begin with when you dull a factory edge? Should I not drop below 400?
 
I now reprofile an edge to 15 DPS directly from a factory angle using either #150 or #240 diamond.
But I take my time to keep the edge line as intact as possible, by identifying high and low spots early.

I used to reprofile a factory edge at the factory angle with a coarse stone like #150.
Then gradually reduce the angle over several sharpening session to 15 DPS.

My point was that, when you remove a lot of metal at once, you tend to remove them from certain spots nonuniformly rather than from the entire edge uniformly.
This is due to uneven factory bevels.
If you use a fast-cutting stone, when you notice that unevenness, it may be too late, and the edge line is already deformed.
 
^You should summarize your basic Edge Pro sharpening process, along with your collection of misc "lessons learned", in a single post ("What I've learned about sharpening with Edge Pro" or whatever). Haven't seen a collection of comments about EP that seemed more spot-on than your several posts in this thread. Just combine them all into one organized post you have the makings of a great sticky thread there. Some of these things I was sitting here nodding as I read; had to learn the hard way the first few weeks of trying out the EP, and if I had seen posts like this at the time, would have saved a lot of headaches and a couple of cheap knives that I use for practice. But the upside is, we learn through doing--wrecking a couple knives along the way tends to cement the lessons learned into the memory. :)
 
Back
Top