- Joined
- Jan 10, 2005
- Messages
- 105
Well I have been out f the knife making art for awhile and I finally got my new shop together. I built my workbench, bolted my new vise, drill press, and old KMG which has so much rust that I should be shot. But it still works like a champ (one bearing is squealing a bit though :grumpy:
I am making a knife as a military gift soon. I drew out what I want it to look like and order 2 wide 1095, but I am still waiting for it to come in. However, I found an old piece of 1095 lying around (1 ½ wide) and it had a knife silhouette scribed out... must have been over 2 years ago!
Since Ive been out of the game so long, I figured I shouldnt start on the gift knife yet, but experiment with stuff lying around to re-learn the art. So I got the jig saw out and cut the blank out (Jig saw isnt the preferred tool for that, but its all I have at the moment). First blade died on me because I went too fast, but the second jig blade got it down. Then I grinded the rest down on an inexpensive 80 grit belt (Need to buy those hogging belts that I've been hearing about). Once I got a profile out (I say "a" rather than "the" because at the time I didnt care... I really regret that now because its turning out nice).
I then started grinding the bevel and I couldn't believe how straight I was getting it on the first try. I didnt even scribe the center line (Because my scribe is getting shipped tomorrow). I havent made too many knives in the past, but it seems I am picking up right where I left off 2 years ago. I am really happy about that.
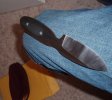
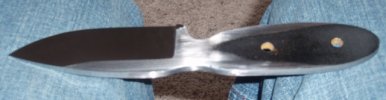
I dont like the profile of this knife, but the bevels are coming out nicely. Its at the 120 grit stage and I think its ready for 220. I'm at 1 mm thick at the edge, so I expect to have to bring the width down as I grind more with the 220 and 400 grit. Thats not bad though since it is a very large width knife.
One question though, the steel seems to rust quickly. As I grind and dry it off, I see rust spots within 5 minutes. Is this because I am still using low grit and water is getting between scratches? Or am I using inferior steel?
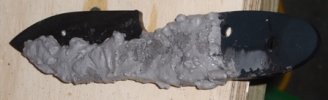
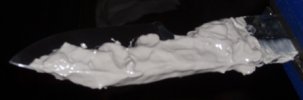
Hope you like, any suggestions would be greatly appreciated since I am re-learning everything and trying to get the basics down so that my next knife will be great looking. Also, from now on, all my knives will have differential heat treating. I picked up some imperial's brick and fireplace mortar cement at Lowes that I am looking forward to try out with this blade. I will update my progress here.
Thanks for looking.
I am making a knife as a military gift soon. I drew out what I want it to look like and order 2 wide 1095, but I am still waiting for it to come in. However, I found an old piece of 1095 lying around (1 ½ wide) and it had a knife silhouette scribed out... must have been over 2 years ago!
Since Ive been out of the game so long, I figured I shouldnt start on the gift knife yet, but experiment with stuff lying around to re-learn the art. So I got the jig saw out and cut the blank out (Jig saw isnt the preferred tool for that, but its all I have at the moment). First blade died on me because I went too fast, but the second jig blade got it down. Then I grinded the rest down on an inexpensive 80 grit belt (Need to buy those hogging belts that I've been hearing about). Once I got a profile out (I say "a" rather than "the" because at the time I didnt care... I really regret that now because its turning out nice).
I then started grinding the bevel and I couldn't believe how straight I was getting it on the first try. I didnt even scribe the center line (Because my scribe is getting shipped tomorrow). I havent made too many knives in the past, but it seems I am picking up right where I left off 2 years ago. I am really happy about that.
I dont like the profile of this knife, but the bevels are coming out nicely. Its at the 120 grit stage and I think its ready for 220. I'm at 1 mm thick at the edge, so I expect to have to bring the width down as I grind more with the 220 and 400 grit. Thats not bad though since it is a very large width knife.
One question though, the steel seems to rust quickly. As I grind and dry it off, I see rust spots within 5 minutes. Is this because I am still using low grit and water is getting between scratches? Or am I using inferior steel?
Hope you like, any suggestions would be greatly appreciated since I am re-learning everything and trying to get the basics down so that my next knife will be great looking. Also, from now on, all my knives will have differential heat treating. I picked up some imperial's brick and fireplace mortar cement at Lowes that I am looking forward to try out with this blade. I will update my progress here.
Thanks for looking.

")


")
